Jump to content


Photo
- - - - -

1984 Mayfair rebuild


  • Please log in to reply
135 replies to this topic

#1 gavfoz

gavfoz

    Speeding Along Now

  • Members
  • PipPipPipPipPip
  • 362 posts

Posted 29 December 2006 - 04:53 PM

Hi

Welcome to my project page!

At the start of July I towed home this 1984 Mayfair thinking it would be a stop gap project whilst I found a nice old Land Rover to restore. How wrong was I! 5 months later it still ain't on the road! Still its been fun I guess.

July 2006
Posted Image
Posted Image
Doesn't look too bad really from here!
Posted Image

The Mini had been badly sprayed up at somepoint. Sadly a light sanding tended to reveal filler rather than metal. A-panels, front drivers wing, front panel, rear wheel arches, door steps and the passenger floor would all reveal some degree of rust eventually.
Posted Image
oh, and the rear subframe was rotten. It had even rusted through where it had been previously patched!

Aug 2006
Spent most of the time trying to get quotes for the work.
Stripped the interior out completely leaving just the steering wheel and clocks
Spent many weekends sanding down the whole bodywork to find trace of more rust
Posted Image
The drivers floor had been previously replaced but never rust-proofed or finished properly.

Sept 2006
By september all I had was a bare shell full of rust
Posted Image
More sanding and parts sourcing. Declared the doors as scrap but just kept my head down and tried to sus-out what to do.

At the end of September I had a week booked off work to work on the Mini but my old Land Rover engine decided to eat its exhaust valves on the way to Wales. Sadly the week was then spend stripping and rebuilding the broken engine.

Oct 2006
Fed up with high qoutes for the welding required I bought a SIP Mig welder and taught myself using a book and a bit of spare sheet I had. Its been a good skill to gain and has made my money go much further than expected.
Posted Image
Just look at all those repair panels!

Nov 2006
November was a bad month Mini wise. I am a building site engineer in Coventry and we spent three weeks resurfacing a cross-roads in the Ball hill area of the city. I did get a bit more sanding done though in the evenings. . . and then a new mountain bike destracted me briefly

Dec 2006
Plans changed a fair bit. I cut the passenger a-panel of to reveal the flitch panel was just rust and I had nowhere to attach a new panel. I then cut the wing off to find the front panel was shot. To solve this I calmly pushed the Mayfair back into the garage and had some retail therapy. I ordered a fibreglass flip front, brace bars, solid front subframe mount kit and everything else I needed. Then I went to pick it up in my Fiesta and the damn thing would not fit in the back! The Mini has been testing at times!
Posted Image
Posted Image

Currently most of the welding is finished up the front. new door steps, new flitches, a-panels, footwells etc are 90% done. Would of finished today had it not been raining :) The bootlid has had all the holes filled except for where the handle goes. Basically its now just a case of plodding along until the damn thing is finished!

I am going to spray it Primula yellow eventually, have got a Mk1 grille to fit, pair of bucket seats for the front, full negaitve camber kit and some hi-los sat in a box somewhere, group 2 arches, motorbike wing mirrors and tons of other stuff I have gained over the months. Considering wether to cage it as I intend to enter some point-to-point and 10-car rallies in it. I have promised the wheels to a local gent thats restoring a Mini Special, i just got to decide on the wheels I want. Got to be 10s though. Thinking maybe powder coated starmags. . .Oh, and the front drums are to be replace by 7.5discs eventually. . .

The true bargain of the build so far is a passenger door that had been restored and then dry stored for 22years. Its absolutly perfect and mine for all of £9.99! Awesome.

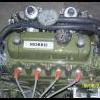
Engine is a standard 998. Not sure what to do with that yet. Either big time tweak it (Stage 3 head, Hiff 44, Kent cam etc) or swap it out and tweek a MG Metro lump.

Thats about it for now
Cheers
Gav

#2 Bungle

Bungle

    Original Spamster

  • Members
  • PipPipPipPipPipPipPipPipPipPipPip
  • 28,971 posts
  • Location: Cornwall
  • Local Club: cornish mini club

Posted 29 December 2006 - 07:08 PM

:) keep up the good work

#3 Legend

Legend

    Stage One Kit Fitted

  • Noobies
  • PipPipPip
  • 80 posts

Posted 30 December 2006 - 06:05 PM

lookin good, id defo leave it on tens, what sort of overall look u goin for? i.e. race, classic etc??

#4 rsroadkilla

rsroadkilla

    Speeding Along Now

  • Members
  • PipPipPipPipPip
  • 365 posts
  • Local Club: Japshowcarz

Posted 01 January 2007 - 07:59 PM

dude. Sounds like a bumpy ride!!!!

Glad to see you havent given up though :gimme:

Keep going mate! It'l be worth it when its finsihed!!!

#5 gavfoz

gavfoz

    Speeding Along Now

  • Members
  • PipPipPipPipPip
  • 362 posts

Posted 02 January 2007 - 04:55 PM

Cheers folks.

This set off as a do-up-and-flog exercise but I got bitten by the bug and the plans changed when all the rust showed its face! Going for a stripped out racer look with two tone paint, removable front end, retro-10s and a bit of the Mk1 front end treatment. Oh, and its got a sunroof and opening rear windows for now! Still, until its got an MOT thats the way its got to stay!

Gav

#6 Retro_10s

Retro_10s

    Moderator

  • Members
  • PipPipPipPipPipPipPipPipPipPipPip
  • 10,139 posts
  • Location: Bromsgrove

Posted 02 January 2007 - 05:13 PM

Going for a stripped out racer look with two tone paint, removable front end, retro-10s and a bit of the Mk1 front end treatment.


Some one mention my name? :gimme:

If you're after 10's on disk brakes and can't afford the cooper setup may I recommend the fiesta caliper conversion, it allows you to run 7.9 disk using mk1-2 fiesta calipers that fit under most 10 inch wheels.

cost can be kept down to under £100 for the whole conversion if you're savvy for a bargain....... try the search function.

I would wager the fiesta conversion offers better braking than the cooepr S setup, bigger discs and also the fiesta pads are much larger than mini ones........

Edited by Retro_10s, 02 January 2007 - 05:13 PM.


#7 gavfoz

gavfoz

    Speeding Along Now

  • Members
  • PipPipPipPipPip
  • 362 posts

Posted 07 January 2007 - 09:12 PM

using mk1-2 fiesta calipers that fit under most 10 inch wheels.


Are they not getting like rocking horse poo these days? I ain't seen an early Fiesta for ages. . .

Since last update I have sourced a drivers door and continued to weld when the weather allows. I have finished my "smoother" style bootlid . . .
Posted Image
. . . but ran out of high build primer!

I blagged Mic's free front subframe as mine has a bent front crossbeam. Just need to go pick it up.

I am on the look out for some Dunlop alloys but plenty keep cropping up, its just waiting to find a set quite near work or home.

Bought some plates to convert from Mk3 rear lights to Mk1. Not sure if I will use them yet as it may be a step too far. Also bought some plastic headlight bowls so I have a completely unrustable front end!

Been playing with possible paint schemes and the one in my avtar is my favourite so far. Twin tone is the future of retro :(

Chow
Gav

#8 steveobennet

steveobennet

    One Carb Or Two?

  • Members
  • PipPipPipPipPipPipPip
  • 944 posts
  • Local Club: stu's turbo club

Posted 08 January 2007 - 12:04 AM

stripped out retro racer, like it! i reckon a mk1 rear light conversion would suit it, go on you know you want too! it great have a rust free front end isn't it! keep up the good work!

#9 gavfoz

gavfoz

    Speeding Along Now

  • Members
  • PipPipPipPipPip
  • 362 posts

Posted 13 January 2007 - 03:03 PM

Still unsure on the Mk1 lights. Offered up the plates and I think it will look quite cute. Have you seen the prices the Mk1 light clusters go for! Ouch. . .

This morning trial fitted my bargain find of a passenger door. Looks like I will need to get some different shims looking at the panel gap. The passengerside is now finished after I have sorted the rear wheel arch/bootfloor join. Might do that tomorrow if it don't rain.

Posted Image

Just to make a few people jealous:
Posted Image
Having looked at that I have noticed I have put the fixing pins at the bottom in the wrong holes.

Posted Image
And finally the old girl lost a bit of weight. I have removed all the tar backed insulation/sound deadening from the floor to check for rust. Just a few small patches of surface rust found which will be easy enough to tackle.

Plans are to sort all the bodywork issues out, primer the lot and refit everything. Get it MOT'd. Drive it for a bit to check it all out. Gonna leave the standard skinny drums all round for now. I may get away without arches with my 5x10s and negaitve camber setup. I will do the fiesta calliper discs in the summer but at the moment I really need to get the thing on the road and out of the garage.Then when the weather is better respray it like so:
Posted Image (the top half is Primula Yellow, not sure on the bottom yet)
considering getting the sills cut off and replaced. When I replaced the door steps I found the origonal rusty sill was sat behind the half decent oversill. The inner sills have also been patched in the past so before the respray it would be wise to cut the lot off and replace. One less job for the future perhaps!

Now its about to rain so stuck inside like a caged animal!
Gav

#10 mad4mins

mad4mins

    One Carb Or Two?

  • Members
  • PipPipPipPipPipPipPip
  • 1,396 posts
  • Location: Andover
  • Local Club: WAMO!

Posted 13 January 2007 - 04:32 PM

that looks ace.. im loving the strawberries and cream.. colour scheme :D ;)

#11 Bungle

Bungle

    Original Spamster

  • Members
  • PipPipPipPipPipPipPipPipPipPipPip
  • 28,971 posts
  • Location: Cornwall
  • Local Club: cornish mini club

Posted 13 January 2007 - 05:04 PM

i like where the colour split is ;)

#12 miniallsort

miniallsort

    Up Into Fourth

  • Members
  • PipPipPipPipPipPipPipPipPip
  • 4,723 posts

Posted 14 January 2007 - 12:13 AM

very nice man keep us updated

#13 gavfoz

gavfoz

    Speeding Along Now

  • Members
  • PipPipPipPipPip
  • 362 posts

Posted 14 January 2007 - 03:01 PM

Had a change of plan this morning. As it was not so windy and looking like a nice dry day I thought I would continue welding.

I took the door off again and I reinforced the passenger A-panel with a bit of small diameter bar.
Posted Image
I started to seem weld the drivers flitch panel but after about 100mm I ran out of welding wire. BUMMER!

So I finally got my front subframe solid mounted. What a begger of a job. Getting the solid mounts in under the firewall box section is not easy. But hey, its done now. One more job off the list!
Posted Image

As its a bit cold to paint I think this afternoon will be mostly spent studying wiring diagrams to see how many wires actually go to the flip front. I have got an alloy caravan hook-up ready to fit in a box somewhere. Could get on with that.

I think a week off work is brewing. . .

Gav

#14 gavfoz

gavfoz

    Speeding Along Now

  • Members
  • PipPipPipPipPip
  • 362 posts

Posted 14 January 2007 - 05:23 PM

Wiring done ;D . Just hope all the leads are long enough still! Just need to insulation tape the remaining wires and zip tie them somewhere neatly.
Posted Image

Just realised I need somewhere to mount the washer bottle. Passenger side on the inner wing behind the A-panel looks favourite.

Gav

#15 CanadianMiniFan

CanadianMiniFan

    Camshaft & Stage Two Head

  • Members
  • PipPipPipPipPipPipPipPip
  • 1,591 posts

Posted 14 January 2007 - 08:06 PM

Looks awesome, i like the two tone split like that too, i'm either doing that but black with a white top or white with just a black roof....its different so i'll probably do that. Keep us updated.


1 user(s) are reading this topic

0 members, 1 guests, 0 anonymous users