Hi All
Very new to the mini scene but have been in the car scene for a long time, Bought a 1998 mini cooper sport pack a few moths ago and been hooked since..
Yesterday i bought a clubman estate as a project and i am thinking of turning it into a pick-up, the conversion will be very easy, but i am not sure if it would be a good one..!!
Having had a look around the car it is really solid, has been in an old lady's garage for years and years and only has 24k on it..
Bits of rust in the boot floor in the corner by the rear doors, some round the rear wheel arches
(can someone tell me where to get the repair panel for this please)
Also thinking of changing the front of the car from clubman to a round front.
any opinions/views/thought welcome..
will post pics soon
meanwhile here is one i did a quick 2 min doctor of in paint shop

Mini Clubman estate 2 pick up conversion
Started by
cooper_shaz
, Sep 23 2005 02:41 PM
27 replies to this topic
#2

cooper_shaz
-
- Members
-

- 1,000 posts
One Carb Or Two?

#3
Purple Tom
-
- TMF+ Member
-
- 4,921 posts
Up Into Fourth
- Location: Derbyshire
- Local Club: TMF
Posted 23 September 2005 - 02:45 PM
please leave it as a Clubby estate!
They're getting rarer now, and I think only the genuine Pick-Up looks good, because of the vertical rear section. The Clubby Estate and Van back slopes forwards at about 10degrees, and they just look wrong as a Pick-Up - in my opinion anyway!
It looks good too, I like the wheels.... :grin:
They're getting rarer now, and I think only the genuine Pick-Up looks good, because of the vertical rear section. The Clubby Estate and Van back slopes forwards at about 10degrees, and they just look wrong as a Pick-Up - in my opinion anyway!
It looks good too, I like the wheels.... :grin:
#4
Guess-Works.com
-

- Traders
-
- 19,840 posts
Gearbox Guru
- Local Club: Rugby Classic Mini Owners Club
Posted 23 September 2005 - 03:02 PM
Noooooooooooooooooooooooooo !
But on the subject of changing from clubman to roundnose, the quickest way is to chop the whole of the front of and put a fiberglass roundnose flipfront.. otherwise youre changing all the front panels including inner wings.
But on the subject of changing from clubman to roundnose, the quickest way is to chop the whole of the front of and put a fiberglass roundnose flipfront.. otherwise youre changing all the front panels including inner wings.
Edited by GuessWorks, 23 September 2005 - 03:04 PM.
#5
Jammy
-

- Members
-
- 25,397 posts
Moved Into The Garage
Posted 23 September 2005 - 03:34 PM
I share the same opinion, if you want a Pickup there have never been so many on Ebay at the mo! And I question the rigidty of the conversion. Also, some of the pickups on Ebay at the mo require quite a bit of restoration, which would allow you to fit a Clubb front if you wanted.
#6
Teapot
-

- Members
-
- 5,010 posts
TMF Legend
- Location: Seaton, East Devon
Posted 23 September 2005 - 04:16 PM
I think you're entitled to do what you want with your own car. IMHO this one look very tidy but rather sad,
as if it can't make up its mind what it wants to be

as if it can't make up its mind what it wants to be
#7
Pickup76
-
- Traders
-
- 1,191 posts
Ring Runner 2005
- Location: Peterborough
Posted 23 September 2005 - 05:05 PM
Urm well its not gonna look anything like a mini pickup but you could make it look that sort of style i suppose. Clubby estates have the wrong heal boards and the wrong rear corners as minis 84 said so you'd need to sort those and i dont think you can get the rear window panel so you'd need to fabricate something there but making it a pickup minis possiable. There was one at mini 45 that acctually looked pretty good, alot of time had been put into making a correct looking rear window and making the bed right but it still had the sloping corners. IMO keep the estate and get a pickup but its doable
#8
cooper_shaz
-
- Members
-
- 1,000 posts
One Carb Or Two?
Posted 26 September 2005 - 08:30 AM
Thanks for the opinons guys..
I have listened to the cries of horror and i am going to leave it as an estate, thanks for the pics of the clubman pick up... I will restore the estate back to its former glory !!.
Will post pics this week!!
cheers!!
:worship:
I have listened to the cries of horror
and i am going to leave it as an estate, thanks for the pics of the clubman pick up... I will restore the estate back to its former glory !!.Will post pics this week!!
cheers!!
:worship:
#9
Jake Blues
-

- Members
-
- 2,955 posts
TMF Moderator
- Location: Coventry
- Local Club: Central Minis
Posted 26 September 2005 - 08:47 AM
Good news!! (check out www.clubmanestates.co.uk as well)
#10
cooper_shaz
-
- Members
-
- 1,000 posts
One Carb Or Two?
Posted 21 February 2006 - 12:02 PM
Well it is like an addiction, just dug out this post from all those months ago and the Clubby had been getting pushed to the back of the queue for too long, so over the last few weeks this is what has happened
After months of getting put to the back finaly made a start on the CE

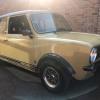
This is the car as i found it. Was parked in the garage i bought so did a deal and bought the car too.
Stood still for about 10 years, Garage was very well ventilated, clean and dry so car is in good shape, bar rear valance which was removed and the rear doors, but spares new ones came with the car

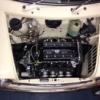
There are laods of invoices for service work and bonus is it had a new goldseal engine fitted

Odd bit of surface rust in the boot but nothing to worry about.
parts had been stripped but every nut and bolt was present

Body panels were really straight and after striping out the interior all that was needed was one door step and the rest of the interior was solid

So the work began Jan 28 - 2006
Cleaned flanges up and welded in new valance panels and fitted new fuel tank and sender

Jan 28/29 cleaned down floors and re-sealed with stone gaurd


after cleaning down the roof it was in great shape, so was the rest of the car, nice straight panels

But it is getting a full re-spray anyway
cleaned up and painted the boot area and re-fitted everything

Prepped the new doors


Fitted everything up to make sure all was well, and it was Phew..!!
4th Feb 06
Sanded down the car, surface rust round where the plastic wheel arches were, nothing drastic anywhere


8th Feb 5pm, off to the paint shop (Let me borrow his booth)


Poor car, looking a bit angry at being photographed nekid

Strip of the final bits and key down the whole car.
7pm little dings filled and car cleaned down
8pm masked up and suited up ready to clean car down in the booth and on with the barcoat (stops any reactions with the old paint)
8:30pm - quick scotchbrite and tac rag and on with a coat of primer
9:15pm out the booth, flat down the car - re-mask the car once it is cleaned and back into the booth
9:30 on with the first coat
9:45 on with the second
10:00pm on with the third
2 pac paint, so let it sit in the booth over night
Thursday morning -


Looking nice and clean and happy.

close up

I have decided to let the car sit for a week and a bit, let the solvent fully evapourate and paint cure before flatting and polishing

not polished yet but you can see the potential
11th feb
All the hinges and small parts are cleaned and painted

and re-assembly begins


12th Feb
Now to tackle the interior
Bought underlay/soundproofing and carpet on a roll
time to get out scissors, knife, spray glue and lets trim

Underlay going down


started to cut the bits of carpet to shape and fit them

Feb 15th of for an MOT :driver
Oh no it failed... :eek
Washer jets missing ... oops forgot to put them back on
handbrake needs tightening .. ok
cv boot split .....
Seat belts insecure ... doh... loosened when fitting the underlay
headlight aim incorrect (fitted new headlamp bowls)
wipers and sticky, probably need a strip down and grease...
and....... thats it...
so not too bad at all, happy with that
This weekend coming 18th feb, will sort bits for mot
and finish carpets and interior off and flat and polish the car..
The reason this was such a quick project was that the car was in good shape to begin with...
anyway, hope your still awake... cheers for reading if you are..
IF YOU WANT TO SEE BIGGER PICS [link=www.pedalcar.co.uk/mini newwindow]click here or go to www.pedalcar.co.uk/mini[/link]
After months of getting put to the back finaly made a start on the CE
This is the car as i found it. Was parked in the garage i bought so did a deal and bought the car too.
Stood still for about 10 years, Garage was very well ventilated, clean and dry so car is in good shape, bar rear valance which was removed and the rear doors, but spares new ones came with the car
There are laods of invoices for service work and bonus is it had a new goldseal engine fitted
Odd bit of surface rust in the boot but nothing to worry about.
parts had been stripped but every nut and bolt was present
Body panels were really straight and after striping out the interior all that was needed was one door step and the rest of the interior was solid
So the work began Jan 28 - 2006
Cleaned flanges up and welded in new valance panels and fitted new fuel tank and sender
Jan 28/29 cleaned down floors and re-sealed with stone gaurd
after cleaning down the roof it was in great shape, so was the rest of the car, nice straight panels
But it is getting a full re-spray anyway
cleaned up and painted the boot area and re-fitted everything
Prepped the new doors
Fitted everything up to make sure all was well, and it was Phew..!!
4th Feb 06
Sanded down the car, surface rust round where the plastic wheel arches were, nothing drastic anywhere
8th Feb 5pm, off to the paint shop (Let me borrow his booth)
Poor car, looking a bit angry at being photographed nekid
Strip of the final bits and key down the whole car.
7pm little dings filled and car cleaned down
8pm masked up and suited up ready to clean car down in the booth and on with the barcoat (stops any reactions with the old paint)
8:30pm - quick scotchbrite and tac rag and on with a coat of primer
9:15pm out the booth, flat down the car - re-mask the car once it is cleaned and back into the booth
9:30 on with the first coat
9:45 on with the second
10:00pm on with the third
2 pac paint, so let it sit in the booth over night
Thursday morning -
Looking nice and clean and happy.
close up
I have decided to let the car sit for a week and a bit, let the solvent fully evapourate and paint cure before flatting and polishing
not polished yet but you can see the potential
11th feb
All the hinges and small parts are cleaned and painted
and re-assembly begins
12th Feb
Now to tackle the interior
Bought underlay/soundproofing and carpet on a roll
time to get out scissors, knife, spray glue and lets trim
Underlay going down
started to cut the bits of carpet to shape and fit them
Feb 15th of for an MOT :driver
Oh no it failed... :eek
Washer jets missing ... oops forgot to put them back on
handbrake needs tightening .. ok
cv boot split .....
Seat belts insecure ... doh... loosened when fitting the underlay
headlight aim incorrect (fitted new headlamp bowls)
wipers and sticky, probably need a strip down and grease...
and....... thats it...
so not too bad at all, happy with that
This weekend coming 18th feb, will sort bits for mot
and finish carpets and interior off and flat and polish the car..
The reason this was such a quick project was that the car was in good shape to begin with...
anyway, hope your still awake... cheers for reading if you are..
IF YOU WANT TO SEE BIGGER PICS [link=www.pedalcar.co.uk/mini newwindow]click here or go to www.pedalcar.co.uk/mini[/link]

#12
cooper_shaz
-
- Members
-
- 1,000 posts
One Carb Or Two?
Posted 21 February 2006 - 12:03 PM
Feb 18th 2006
Well not a productive weekend as such.
Bogged down with the flu bug that was going around, but Friday night managed to all the things that needed done for the MOT
and cracked on with the carpets..
After the sides were fitted it was time for another trial fit of the rest of the carpets taking note which bits would require trimming.

Looked at the cross member, I decided to do this in 3 sections, I for each edge and one for the middle.
With the pieces in place it was simple a case of marking the edges to cut with a soft pencil and then cutting to shape

This was not fixed at this time, just trimmed.
Next piece to get to shape was the bulkhead carpet.
I pushed the carpet right into the corners with a scraper and again marked the edge to cut with a pencil.
Carpet was pulled out then re fitted to make sure the lenes were correct.
After i was happy with that it was trimmed and fitted

Then on to the pieces for the inner wheel arch, agian trimmed to size, spray glued and fitted

Same for the other side

Looking in from the back of the car with the edges of the cross member piece fitted

Cross member piece now in place, also decided to remove the rear ashtray for a cleaner look

Front carpet simply laid in place without glue, and trimmed round the gear lever

Back section laid into place and slits cut to fix seat belt anchors

and another

Then it was onto the boot carpet

This was fixed to the back of the seat and left loose on the boot floor to give easy access to spare wheel etc

And there we have it, job done

Before

After

Before

After

Well not a productive weekend as such.
Bogged down with the flu bug that was going around, but Friday night managed to all the things that needed done for the MOT
and cracked on with the carpets..
After the sides were fitted it was time for another trial fit of the rest of the carpets taking note which bits would require trimming.
Looked at the cross member, I decided to do this in 3 sections, I for each edge and one for the middle.
With the pieces in place it was simple a case of marking the edges to cut with a soft pencil and then cutting to shape
This was not fixed at this time, just trimmed.
Next piece to get to shape was the bulkhead carpet.
I pushed the carpet right into the corners with a scraper and again marked the edge to cut with a pencil.
Carpet was pulled out then re fitted to make sure the lenes were correct.
After i was happy with that it was trimmed and fitted
Then on to the pieces for the inner wheel arch, agian trimmed to size, spray glued and fitted
Same for the other side
Looking in from the back of the car with the edges of the cross member piece fitted
Cross member piece now in place, also decided to remove the rear ashtray for a cleaner look
Front carpet simply laid in place without glue, and trimmed round the gear lever
Back section laid into place and slits cut to fix seat belt anchors
and another
Then it was onto the boot carpet
This was fixed to the back of the seat and left loose on the boot floor to give easy access to spare wheel etc
And there we have it, job done
Before
After
Before
After
#13
minimadjonesy
-

- Members
-
- 6,417 posts
Crazy About Mini's
- Local Club: SMAC
Posted 21 February 2006 - 12:13 PM
now that's what I like to see! another clubby saved! nice work, beautiful car! 
#14
Lt-SilverDragon
-

- Members
-
- 724 posts
One Carb Or Two?
Posted 21 February 2006 - 01:00 PM
Ooo I like the carpet nice contrast to the outside colour.
#15
wobbit
-

- Members
-
- 1,579 posts
Camshaft & Stage Two Head
- Local Club: basingstoke mini club
Posted 21 February 2006 - 01:07 PM
looks great!


0 user(s) are reading this topic
0 members, 0 guests, 0 anonymous users


