I am teaching myself to weld so thought the perfect start would be to seam weld my rear subframe for the new trailer project.
Can anyone tell me the best places to weld it to give it more strength or seal it up or should I just weld up all the seams I can reach? Also what is the best way to protect the inside the of the subframe where I cant get a spray can or brush to? Can i somehow inject waxoyl or some other product in there?
Any advice would be really appreciated. Cheers.

Subframe Welding
Started by
Brams96
, Jul 29 2010 08:18 PM
21 replies to this topic
#1

Brams96
-
- TMF+ Member
-

- 2,308 posts
Up Into Fourth
- Local Club: Kentish Mini Club
Posted 29 July 2010 - 08:18 PM
#2
sonikk4
-

- Admin
-
- 15,885 posts
Twisted Paint Polisher!!!
- Name: Neil
- Location: Oxfordshire
Posted 29 July 2010 - 08:58 PM
There are quite a few flat areas on the subframe that you could seam weld easily. Try the top and bottom sides.
I would suggest getting the subbie either chemically stripped or media blasted after you have welded it up. Once its cleaned/blasted some serious priming and painting then you can use waxoyl in all the nooks and crannies.
Seeing as its going to be used on a trailer then maybe consider getting it powder coated. You have plenty of options.
#3
Brams96
-
- TMF+ Member
-
- 2,308 posts
Up Into Fourth
- Local Club: Kentish Mini Club
Posted 30 July 2010 - 07:30 AM
I had the subframe sandblasted already. I have also gone over it with Heavy Duty Marine rust killer and Rustolyum Zinc primer. After all the welding, grinding & priming is done I will be giving it 2-3 coats of Smoothe Black hammerite and either waxoyling or something else in all the nooks and crannies.
Is there any reason I can't weld up all the holes to seal up the front end (the box section part) of the frame then slosh some type of sealer around inside it? Also if parts of the inside have been sandblasted can I apply waxoyl directly to it as I cant get a brush or spray can to it.
Is there any reason I can't weld up all the holes to seal up the front end (the box section part) of the frame then slosh some type of sealer around inside it? Also if parts of the inside have been sandblasted can I apply waxoyl directly to it as I cant get a brush or spray can to it.
Edited by Brams96, 30 July 2010 - 07:32 AM.
#4
mk3cortina
-

- Members
-
- 677 posts
Super Mini Mad
Posted 30 July 2010 - 09:47 AM
to get inside those little areas in box sections that usually only have a little hole in just big enough to fit your finger into, you need a compressor with a waxoyl gun, the gun has a flexible tube coming off the handle/waxoyl pot part and ont he end of the tube is basically a metal straw bent to 90 degrees at the end, this is what you use to put into those little holes and blast the waxoyl around inside box sections. its a must really for anyone who owns classic rotten cars.
#5
mk3cortina
-
- Members
-
- 677 posts
Super Mini Mad
Posted 30 July 2010 - 09:50 AM
oh, and one more thing regarding your seam welded subframe. ive just done one for a rally mini, basically where two parts of the subframe meet, just weld along the seam, also if your going all out on it, then add some strengthening triangles to the inner corners of the subframe. good job you got it blasted first and then strated welding, nothing like finding a load of paint/grime in the seams your welding up.
#6
Brams96
-
- TMF+ Member
-
- 2,308 posts
Up Into Fourth
- Local Club: Kentish Mini Club
Posted 30 July 2010 - 10:44 AM
In the pic below should I weld the seams and areas circled in red on all sides.
The blue circles - Do I really need holes there?
The purple circles - Add strengthening triangles here top and bottom?
Also along the green circles (& a couple of other seams) the two bits of metal have started to seperate a bit (2-3mm) from rust I think. Should I chop these back and weld fresh metal in there? Are there any legal implications about cutting metal out of a subframe and replacing it?
Attached Files
-
 Rear_subframe.jpg 57.04K
30 downloads
Rear_subframe.jpg 57.04K
30 downloads
Edited by Brams96, 30 July 2010 - 10:44 AM.
#7
sonikk4
-
- Admin
-
- 15,885 posts
Twisted Paint Polisher!!!
- Name: Neil
- Location: Oxfordshire
Posted 30 July 2010 - 11:05 AM
Chopping metal out and replacing it is not a problem as long as its the same thickness (red area), as its for a trailer the implications are not the same as for a subbie that is fitted to a car. You can fill the holes if you want but they are there for draining (blue area).
You can buy aerosol cans of waxoyl that will be fine for the subframe, if you have more to do then as mk3cortina said then buy the bigger compressed air system.
Again as its only for a trailer you dont need to add the triangular gussets but if you want to practise then give it a go. The areas that are boxed wont be fully blasted so pump with waxoyl then turn it upside down and apply again to ensure full coverage.
Any welding that is done to a subframe that is fitted to a car must be of a good/high standard due to MOT regulations, as a trailer is not mot'd then it can be more relaxed but bear in mind that it will be carrying a load so it still needs to be good.
If you do weld up all the holes and there is rust already forming inside then waxoyl will limit it but it will eventually come through.
Edited by sonikk4, 30 July 2010 - 11:06 AM.
#8
Brams96
-
- TMF+ Member
-
- 2,308 posts
Up Into Fourth
- Local Club: Kentish Mini Club
Posted 30 July 2010 - 11:55 AM
Cheers for the replies.
What if I seal the box section all bar 1 hole with, lets say blue-tak, then put loads of rust killer/converter and flipped it around to cover everywhere. Then I could remove the blue-tak let it dry and then do the Waxoyl sealing?
Or I could cut back one side of the seam that is splitting, deal with any rust inside and then seal the whole thing before welding a new section in to replace the chopped out bit. I could then seal inside the final section with waxoyl and fit a rubber bung to stop water ingress?
Sound like a fesable plan??
#9
mk3cortina
-
- Members
-
- 677 posts
Super Mini Mad
Posted 30 July 2010 - 12:16 PM
if the seam is just seperating a little and the edge of it ir a bit flaky, then id just attack it with a wire wheel on a grinder and see how bad it is, then just neaten the edge up with a grinding disk and then seam weld it, i dont see the point in trying to add a sliver of sheet steel that will be less than 1cm in width if you know what i mean. also when i was referring to the strengthening triangles its just what ive done to a subframe, wont hurt to add them but its not needed for a trailer.
#10
Brams96
-
- TMF+ Member
-
- 2,308 posts
Up Into Fourth
- Local Club: Kentish Mini Club
Posted 30 July 2010 - 02:04 PM
I'll try and get some pics of the seperating seams tonight and post them tomorrow for a better idea of what I mean. Cheers for all the very helpful info though
#11
bunch1980
-

- Members
-
- 1,192 posts
One Carb Or Two?
- Local Club: nein
Posted 30 July 2010 - 04:00 PM
Interesting thread is that sub frame up correct way? as the blue circles are on top so how can they be drain holes?
I need to look my rear subframe more closely. With it fitted to car is it possible to fill with waxoyl still?
I need to look my rear subframe more closely. With it fitted to car is it possible to fill with waxoyl still?
#12
panelbeaterpeter
-

- Members
-
- 5,606 posts
Crazy About Mini's
- Location: Scotland
- Local Club: n/a
Posted 30 July 2010 - 08:35 PM
Yes it's the right way up. I usually spray the heel board and parts of the subframe that won't be accessible when fitted with waxoyl, fit the subframe, then inject it with waxoyl. So yeah you can do it when it's on.
#13
Brams96
-
- TMF+ Member
-
- 2,308 posts
Up Into Fourth
- Local Club: Kentish Mini Club
Posted 31 July 2010 - 05:46 AM
Right here are some of the seams that appear to be splitting apart. Someone has drilled extra holes in it too I think.


And finally a seam I have welded up and sprayed, it still needs tidying up a bit though I just ran out of time that day:

(In Pic 2) Should I use a 1mm disc to cut along the seam open it up a bit, clean it all up then seam weld it all back together? Or should I just cut the top section out, clean and reweld new metal in?
And finally a seam I have welded up and sprayed, it still needs tidying up a bit though I just ran out of time that day:
(In Pic 2) Should I use a 1mm disc to cut along the seam open it up a bit, clean it all up then seam weld it all back together? Or should I just cut the top section out, clean and reweld new metal in?
#14
Brams96
-
- TMF+ Member
-
- 2,308 posts
Up Into Fourth
- Local Club: Kentish Mini Club
Posted 01 August 2010 - 07:59 AM
I bit the bullet and decided to start chopping and look what I found:
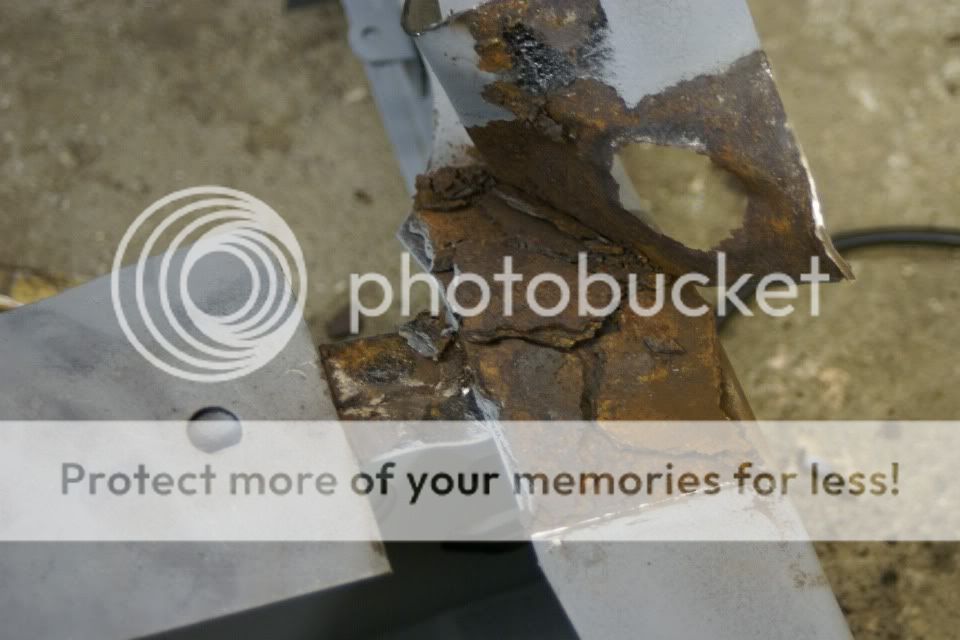
I ground it back and rust killed it before applying some zinc primer and have almost finished welding on the repair patch. It is galvanised so should be better in the future.

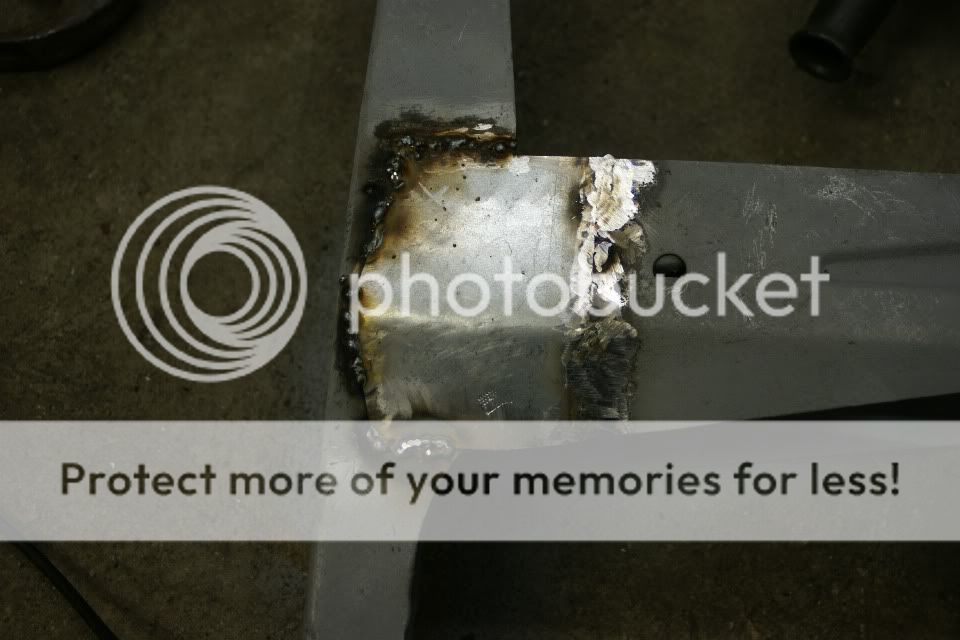
I did get the 'extra' holes filled in and finished though:
I ground it back and rust killed it before applying some zinc primer and have almost finished welding on the repair patch. It is galvanised so should be better in the future.
I did get the 'extra' holes filled in and finished though:
#15
nordicmini
-

- Members
-
- 293 posts
Mini Mad
- Local Club: none
Posted 01 August 2010 - 08:47 AM
Hi Scott not bad but it looks like you left the galvanise on the metal where you welded you need to grind it of where your going to weld and it gives off a poison gas not good .From the picture i would say that you need to turn it up, the weld looks like blobs sitting on top of the metal .Try doing it on a scrap thick bits first then try thinner as you get the hang of it .


0 user(s) are reading this topic
0 members, 0 guests, 0 anonymous users


