Jump to content


Photo

Stages Of Tune For A Mini Engine - Moved To Front Site


  • Please log in to reply
3 replies to this topic

#1 Jammy

Jammy

    Moved Into The Garage

  • Members
  • PipPipPipPipPipPipPipPipPipPipPip
  • 25,397 posts

Posted 09 January 2006 - 12:20 AM

This article has been moved to the front site: Link


This FAQ has been created to explain what the stages of tuning a mini engine are, giving you expected power increases, how they achieve these increase, and any other advantages (or disadvantages) and implications of them.

NB. Where ever possible I have tried to use the same names as used in a Haynes manual, so if you are unsure as to what or where anything is, it should be simple to find it in a Haynes manual.

Standard Parts
Before you do any sort of modifications to your engine you want to make sure the standard components are tip top. Theres no point fitting that brand spanking new Stage 3 cylinder head if your ignition system is old and providing a weak spark. Standard service parts are:

Oil filler cap
Radiator pressure cap
Air Filter
Fan belt
HT leads
Distributor cap
Spark Plugs
Oil and Oil Filter
Rotor arm
Points

If any of these parts are worn they can impair the performance and efficiency of your engine. In addition, a session on a mini friendly rolling road can do wonders, and advisable with a change of air filter. Also, with all of these parts it is perfectly acceptable to replace them with completely standard components, there is usually little or no benefit to be had with so called 'performance' versions, especially when buying spark plugs!

Stage 1 kits
Stage 1 kits have now been on the market almost as long as minis have been on the road. Due to this timespan certain companies have been able to develop kits so that they are now very efficient and are able provide a good 'bang for your buck' value.

A stage 1 kit can differ from company to company, but generally they consist of inlet manifold, exhaust manifold, exhaust system, air filter, carburettor needle (where applicable), gaskets and clamps.

Posted Image
Minispares Stage 1 kit with large bore side exhaust


Most companies boast a 15-20% increase on your engines power output. The way they achieve this through better gas flow into, and out of, the engine. The more air and fuel mixture you can get into the engine, the bigger the explosion will be that ultimately drives the wheels. With this however more exhaust fumes are created and therefore the need for an exhaust system that is capable of removing these fumes.

One thing you must budget for when buying a stage 1 kit is the cost of a rolling road session. This is an absolute must if you wish to get your mini running at its best. Otherwise the £150+ you've just spent on performance parts has gone down the drain.

Apart from increasing the power output of your engine, there has been reports of increased economy. This could be purely because the car is now set up to run at its most efficient and so is no longer feeding excess fuel through the engine.

One disadvantage of fitting a stage 1 kit can be insurance issues. It seems it depends very much on which company you are with and can even be down to your age. Some companies won't increase your premium one bit, others won't allow any modification of your engine at all. With all cases its best to talk to your insurance company BEFORE fitting a stage 1 kit to find out how it will affect your policy. Another disadvantage is that because the car is now more 'livelier' and quicker, your tempted to put your foot down more than you did, therefore actually decreasing fuel economy.

Extra reading: Insurance implications, places to buy.

Places to buy: MiniSpares - Small bore cylinder heads, large bore cylinder heads, large bore (with HIF carb), SPi/MPi.

~~~~Tomorrow night children, we learn about rockers and camshafts!~~~~~

#2 Jammy

Jammy

    Moved Into The Garage

  • Members
  • PipPipPipPipPipPipPipPipPipPipPip
  • 25,397 posts

Posted 10 January 2006 - 10:29 PM

The Next step - Rockers and Camshafts

Rockers
Once you've fitted a Stage 1 kit and felt the hunger for more power, the logical next step is to to upgrade the standard rocker assembley. There are several improvements and deviations from standard rockers. Different ratios, different materials, different designs, I will try and quickly explain the main qualities and characteristics of each attribute.

The ratio of the rocker plays a major part in determining how much each valve opens (valve lift). The greater the ratio the more the valve will open. The more the valve opens the more fuel and air mixture can be sucked into the engine, and the more the exhaust gases can escape, and with less restriction. However, don't always think more and bigger is better. To much valve lift can result in either the valve springs crushing, or worse, valves hitting pistons.

Posted Image
MiniSpeed's 1.5 Roller tip rockers


Roller tips and full roller rockers improve engine performance by lessening friction and loading on parts. They have a rolling surface that roatates over the tip of the valve, instead of the flat surface of standard rockers that drags across the valve tip, therefore decreasing friction across that surface, and pushing the valve backwards and forwards against the valve guides less.

Roller rockers are also usually made of very lightweight, but strong, materials. This means the engine is moving less mass around and allows the engine to acclerate quicker, however to notice any real benifit from this, it must be paired with other weight saving modifications around the engine.

Extra reading: Excellent topic on roller rockers and ratios, Another thread on ratios and rollers. Ratio of various 'standard' rockers

Camshafts
The camshaft is the component that sits inside the engine and pushes rods at the back of the engine, that in turn lever the rockers up and down, which then open and close the valves allowing fuel in, and exhaust fumes out. So you can see, it plays a pretty vital part in the engine! The camshaft is driven by a gear situated on the end of it, which is essentially driven by the crank. Along the camshaft there are flat egg shaped 'lobes' which the rods (pushrods) sit on. Also, the other end of camshaft drives the pump which moves the oil throughout your engine.

Posted Image


The main difference between all the camshafts on the market are the shape of these lobes. Having a more curved lobe will mean the valve will open for longer (duration), whereas have a taller lobe will open the valve more (valve lift). The top engine builders can make a lobe profile on a camshaft specifically for a certain engine spec to ensure it performs to its best, and for the purpose for which it was built (economy, quick accleration, etc).

You'll often hear people describe camshafts as being hot. This means that camshaft opens the valves more and for a longer duration than a standard cam, and the longer and more it opens the valves, the hotter it is! As with the rockers, longer and more is not always best. The duration of the cam, and the amount the cam opens the valve determine the the power band of the cam, that is the range of rpm when the engine is performing at its best.

I've already explained what happens when valves open too much, and if they stay open for too long then a situation called 'overlap' occurs. Overlap is the time in which both the inlet and exhaust valves are open. Now most camshafts have overlap, but in minimal amounts. If you have too much then the fuel mixture will be going straight out the exhaust without being used in the combustion process, which is not good! With race cams, fuel economy is not a worry to a certain extend so there is always a trade off!

#3 Jammy

Jammy

    Moved Into The Garage

  • Members
  • PipPipPipPipPipPipPipPipPipPipPip
  • 25,397 posts

Posted 07 October 2006 - 09:48 PM

Cylinder Heads - Breath madam! Breath!!!

Modifying the cylinder head is all about getting it to breath better. Getting as much air/fuel mixture into the chamber and then letting the cruddy stuff out. The shape of the chamber can also play an important part in making the burn more efficient to get every last hp from the air/fuel you provide it with.

Posted Image

'Stock' heads
If you just have one of the 'vanilla' models of mini (ie. not Cooper, Cooper S, Innocenti, ERA turbo) there are a number of heads you can 'borrow' from other models, practically bolt on to your engine, rolling road and start driving. This can often be the cheapest way of getting more from the cylinder head part of your engine.

With small bore engines you can fit the 12G206 or the (more common but still rare) 12G295 cylinder heads. Before you bolt it down you'll need to check the chamber size, since the head will probably need to be skimmed to achieve a suitable compression ratio. These two cylinder heads also came with double valve springs as standard to stop valve bounce at high rpm. Neither would be unleaded as standard. Another option for the small bore engine would be to fit a cylinder head from a large bore A series engine. Due to the large ports and valves these have a comparatively large flow rate and can add a fair whack of power to the small bore engine, however, in most circumstances it will require that the block is pocketed to stop the valves hitting the block.

For large bore engines, pretty much the only 'stock' head replacement that would be an improvement over the vanilla head would be to fit a head from a Cooper S, 1300 GT, MG 1300 or Metro turbo (12G940, 12A185 AFG163 (warning - 12G940 heads were used on other models as well and do not have the following improvements). Aside from the Turbo head, the others have a slightly larger inlet valve, with the turbo head having the same, smaller valve size as the vanilla heads but boasting improved cooling and sodium cooled exhaust valves.

'Stage' Heads
Alot of the more professional/race orientated engine builders (rather than supplies companies) do not adhere to the 'stages' of tune of cylinder heads. They will usually create a head suited for the specific need of the engine, and therefore it could not be classified under the commonly used stages. However, there are still a lot of companies that advertise a 'Stage 3' head, etc so here are the stages explained.

Stage 1 - Simple gas flowing, ports, skimmed
Stage 2 - Chamber modifications, serious porting
Stage 3 - Big inlet OR big exhuast valves
Stage 4 - Big inlet AND big exhaust valves
Stage 5 - All the above plus special things like angled guides, etc.


The general idea behind modifying a cylinder head is to get as much air/fuel mix into the engine as possible. This begins with making sure the inlet ports are big enough to not restrict the airflow, but no so big that they slow down the airflow. Efforts are made so that there is a smooth, straight as possible path from the inlet manifold to valve opening, with no sharp corners or passages for the airflow to navigate round. It is also thought that getting the ports as smooth as possible is best, however it has been suggested that rough sides to the ports help create 'swirls' in the airflow which cause the air and fuel to mix together more and so burn more efficiently.

The next restriction for airflow is in the valves. Special valves such as Rimflow have a smooth curve from the stem to the base which guides the air/fuel mix around the valve and into the engine, where as standard valves do not have this smooth curve, so when the air/fuel mix comes to the valve it has the same affect as it hitting a brick wall, not great for airflow! The valves also need to be large enough to allow the most possible air/fuel mix into the engine, and also to allow the exhaust fumes out again. Around this the chamber can be shaped to such an extent that it does not hamper the airflow from around the side of the valves in anyway. The chamber around the spark plug will also usually be modified to encourage the spark further into the chamber, to promote better ignition of the air/fuel mix.

Posted Image
Chamber work by M.E.D Engineering


#4 Jammy

Jammy

    Moved Into The Garage

  • Members
  • PipPipPipPipPipPipPipPipPipPipPip
  • 25,397 posts

Posted 20 September 2007 - 11:20 AM

Extra modifications to think about

Gearbox
The gearbox on the A series engine is often thought of as the weak cog. Its fine in standard trim sat under a standard (or near standard) engine, but once you starting pumping more power and (more importantly) more torque through those gears it all starts to become a little shakey!

The first thing you want to look at is making sure your standard gearbox is in good working order. That means that the gearbox doesn't crunch as you try to change gear (a sign the synchromeshes could be on there way out) and that there isn't too much 'slop' in the gear changes, or when the gear lever is sat in a gear. Start putting more torque through an old, tired gearbox and you'll rapidly wear it to a early death!

Once you know your gearbox is in good order you can start to think of modifications, which generally start with a competition Molybdenum differential pin. This is a harder wearing differential pin, for putting that power to the ground around those corners. To fit one though it does entail having the gearbox off the engine (however so do any gearbox mods!). It's a cheap modification too, at ~£25 for the pin, and then cost of labour for fitting if you don't wish to fit it yourself.

The next step up for the differential is to fit a cross pin differential, which adds two more planet gears, helping to transfer the power to the wheels, and reduce wear due to having doubled the number of gears and pins that are taking the power/torque. At between £150-£180 a X-pin diff is much more expensive than the competition diff pin, but they are generally considered almost bomb proof.

Posted Image
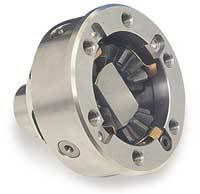
Minispares Molybdenum Cross pin diff


The ultimate for differentials is to fit an LSD (Limite Slip Differential), but be careful, there are several different types designed for different situations, with certain types that you really don't want to use on the road! A couple of examples that you could use on the road are the 'Evolution' LSD available from Minispares, and the Quaife ATB available from Quaife. Whilst they do give very good handling in most situations, costing £470 and £500 respectively, means that most people do not deem it necessary to fit an LSD. Also be aware that fitting an LSD means that you will probably have to either modify your crownwheel, or buy a new crownwheel, adding yet more to the cost.

One upgrade that is often asked about on TMF is straight cut gears, both gearsets and drop gears. Rather than having the teeth cut at an angle (something that reduces the noise from the gears) the teeth are cut perpendicular to the rotation of the gear. This reduces the 'side loadings' on the gear and thus the friction, meaning you can reduce the loses you get through the transmission by 2-5bhp typically. Straight cut drops do nothing more than give you more noise and reduce the side loadings, and expect to pay between £150 and £200 for a set. Straight cut gearsets can often be bought as 'close ratio' sets, meaning for 1st, 2nd and to an extent 3rd you get more mph per rpm. Note that 4th gear stays the same (1:1), meaning that your top speed will not change. Striaght cut gearsets are usually priced at between £350 to £600 depending on who you buy a set from. If you wish to find out what straight cut gears will sound like in your car, find a big open space and drive about with the car in reverse. All reverse gears are straight cut, therefore the noise you get from your reverse gear will be the same as all the gears on a straight cut gearset/straight cut drops.

There is also the option for 'dog' gearboxes and there is even a sequential gearbox on the market, but I believe they are out of the relms of this FAQ.

Extra Reading: Minispares Article: Up-Rating Drop gears, Minispares article: Synchro vs Dog engagement.

Places to buy: Guessworks.com - for all your gearbox needs

Clutch and flywheel
Whilst neither the clutch or flywheel will help to release power, they can certainly help with the performance of the engine, and the clutch (pre-Verto especially) is designed to take specific power/torque outputs. First off you need to work out which clutch you have pre-Verto or Verto (FAQ here). Most people, if they have a Verto clutch, decide to change it to pre-Verto if they plan to modify their engine a lot, largely due to the number of choices that are available for the pre-Verto set up/aren't available for the Verto set up.

I believe for the Verto set up you are limited to an uprated flywheel (lighter, therefore quicker acceleration), a turbo clutch plate, and a turbo cover (which provides more clamping pressure to handle high power outputs - but for non-injection engines only). Compare that to the choices for the pre-Verto set up; you can have a modified standard flywheel, or very lightweight Steel flywheels, four (technically six) different diaphragms, lightened backplates and the option to use a paddle clutch plate. With the pre-Verto diaphragms; standard (blue), Orange, Grey and Double Grey, are made to cope with different power outputs before they start to slip. Blue is standard, and could be used on an engine producing upto about 60 Lbft of torque, Orange goes up to 74 Lbft, Grey I have yet to confirm, and Double Grey is a massive 1250 Lbft!

The idea behind getting the clutch and flywheel assembly as light as possible is to reduce the rotating mass, which means the engine has to put in less effort to rotate, and can 'spin up' quicker, leading to quicker acceleration. However, this can have a downside in that it can sometimes cause quite a lumpy idle (ie. the engine doesn't want to sit at a certain rpm, but jumps up and down). However this doesn't just depend on the flywheel/clutch assy, but also on the engine size, camshaft, rocker ratio, so its best to check with an expert who can advise you on whether a lightweight assembly would be suitable for your engine, and your needs.

Posted Image
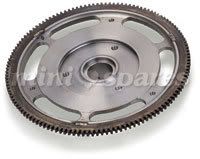
Steel Utralite flywheel available from Minispares


Cooling
To be honest the standard cooling system, when in good condition, can handle a lot of modifications and extra heat chucked out from the engine. Make sure you use distilled water (to stop parts within the cooling system rusting), and the proper quantity of antifreeze. Upgrades can include 2 or 4 core radiators, 'Water Wetter' (an additive that can be used to make the water absorb more heat), and Silicon hoses. With regards to the radiator, the 2 core 'Super' radiator Minispares produce is regarded as one of the best for cooling. Not only is it one of the lightest, but it also performs just as well as the larger 4 core radiator. However, the fins can be prone to damage, so for harsh environments, like grasstracking, its better to go with the 4 core. The standard fan is also up to the job of cooling almost any A-series engine. Not only is it quite light, and quiet, its also has aerofoil blades which make a very good job of directing the airflow through the radiator. Bare in mind that above 30-35 mph the fan is redundant. Silicon hoses look pretty! Not only that but they are also able to withstand higher temperatures and greater pressure than there standard rubber counterparts, and another advantage is that they won't perish like rubber hoses. Making them a great upgrade if you like pretty things that also have a worthwhile purpose!

Posted Image
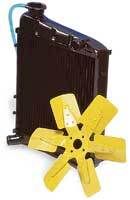
MiniSpares 2 core 'Super' radiator


With regards to how much this will all cost, well expect the 2 or 4 core 'Super' radiators to set you back between £65 and £80 depending on the model of car/engine you have. A silicon hose set will set you back a further ~£70.


0 user(s) are reading this topic

0 members, 0 guests, 0 anonymous users