

We get quite a few topics about tidying up engine bays and painting and cleaning the engine and I had 2 or 3 people asking me about my engine bay at the Malvern show and people have said they’d be interested in a detailed guide on how to do it. So heres my detailed guide of the full process of cleaning up the engine bay from scratch – without removing the engine or any major parts. It’s turned out longer than I planned but at least it covers everything you need. All you need is some patience and about £20 of materials – excluding any new shiny bits you might be buying in the process.
I was considering having my engine out of my car to give it abit of a rebuild and a proper clean, eventually though I decided to have a go at in while it was in place – and it’s come out really well. The only reason you’d ever want to remove the engine for this job is if you wanted to paint round the back of the block and the exhaust manifold - jobs that I thought weren’t worth the effort.
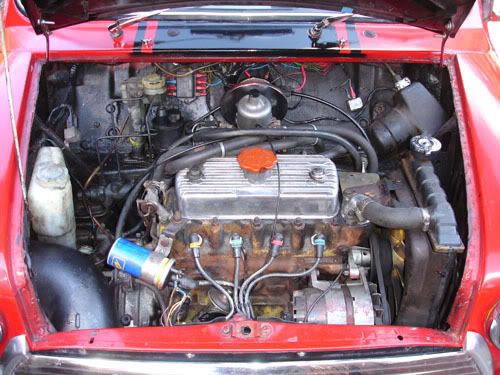
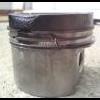
Anyway heres what I started with; your average tatty, neglected A series engine bay:
What you will need:
Cleaning wise:
A tin of Gunk Engine degreasant - I used it in aerosol form
A bottle of white spirits
A bottle of powerful cleaner - I used muc-off, available from any good mountain bike shop
One spark plug brush
A couple of rags
A tin of thinners - for cleaning brushes
Paint wise:
Tins of high temp paint - I used Halfords own brand paint in 250ml tins
One tin of red - or other colour of your choice
One tin of gloss black
One tin of silver - Halfords didn't have any silver high temp paint so I used hammerite
Brush wise:
1 normal paint brush - a 1" wide brush is what I used
1 long handled stiff bristled small detail brush - about 5mm wide - I used an art type brush from a DIY shop
Ideally you want one between these 2 as well - a 1/2" or 1/4" brush would make it easier but I did it without one
Other bits:
To get my engine bay looking really nice and new I needed a few other new bits. You may need things like:
A Lucas sports coil
Blue HT leads
Chrome radiator cap
Chrome dip stick
Chrome dashpot cover
Chrome rocker cover
Chrome fuse box cover
New washer tubing
Lots of cable ties
Some silicon hosing
Right so now the process.
Step 1 - Cleaning
Ok so get the bonnet open and remove the grill - If you intend to re-use your current HT leads, you need to begin by marking the HT leads with coloured elastic bands before you remove them - So you know which order they go back on in.
Once you've removed those and moved/removed anything else that may be in your way such as the ignition coil, you need to get out your gunk cleaner. Start by getting the engine up to running temp and spraying plenty of gunk all over the block.
You want the block to look wet all over. Now it says on the tin do this and then leave for 5 minutes - But I continued spraying the block in gunk, making sure I got it everywhere; you need to get it right up under the alternator and around the side of the block as much as you can - Don't just do the areas you can see. So you just keep spraying layer upon layer of gunk all over the block until you reckon you've covered everywhere completely and so you can begin to see the results. Then you get your spark plug brush - It’s the only wire brush small and short enough to be able to get in the engine bay. You use this and more gunk on the more stubborn areas of grime and oil build up with more gunk to make sure it’s completely clean. So now you've done that and you've used basically the entire can of gunk you need to hose it off. Get a black bin bag, tear it in half and use this to cover the electrics. Just lay it over the distributor, coil, leads and alternator and tuck it down and around the alternator. Then use a hose without the attachments on it so it’s not such a strong jet of water to rinse off the block. Then take the bin back off, re-attach the leads and just rest the coil in place on the head stud so its not dangling down - Start the engine and get it up to running temp again to evaporate all the water. Once you've done this you should be left with a nice clean surface ready for paint, albeit a little rusty and tatty

Then some white spirit and a rag and wipe down anything that you’re going to paint. So the alternator, clutch housing, radiator, radiator bracket, the brake and clutch pipes and master cylinders and the inlet manifold. This is just to make sure there’s no muck left on these that would prevent the paint from sticking. Then get your muc-off or other suitable heavy duty cleaner and spray the fan blades with it. My fan was basically grey/black with years of tough grime which is why I opted for muc-off.
Spray the fan blades with this, rotating the fan by hand and spraying the front and back of the blades as well as the middle of the fan. I had to turn the fan about 3 full revolutions before I started to see the grime start to lift. Then get a rag again and use it to wipe the grime off the fan. You may need to use more cleaner if there really tough bits of grime. You should be left with a nice new looking bright yellow fan!
Step 2 - The first lick of paint
Ok now you can get on with the paint. I started with the big brush and my red high temp paint and used quite a lot of paint on the brush to get good coverage on the base layer. You’re best spending time on this first coat using all you brushes so you don't end up having to go over loads of bits and find you've got a nice smooth finish with good colour on some parts but other parts are dull and rough looking. Then while this is drying you can remove you washer bottle and clean that up. If yours is anything like mine it'll be all black and grimy I just used a pan scrubber and hot soapy water to get the outside clean - but there was grime inside mine too so I had to leave it overnight to soak in some diluted bleach. Anyway After that your first coat of paint on the block should be touch dry.
Step 3 - Painting other parts black
So then get out your black paint and begin painting the radiator bracket, radiator housing and radiator. I found the high temp paint covered really well on this and it only needed one coat and made such a difference! Like the cleaning of the fan, I turned the alternator fan thing by hand and used my smallest brush to get paint onto all surfaces. Then use you bigger brush to paint the inlet manifold. It would have been easier with rocker cover off but at this point I hadn't taken my old one off yet! Its ok though you can do it with it on - I found the inlet needed a couple of coats of black. I also took the wiper motor cover off and gave that a thin coat of black to freshen it up. Once you've done this the block should be ready for another coat. Again get plenty of paint on your brush and aim to get good even coverage.
Step 4 - Painting other parts silver
Now you can get your silver paint out, like I said earlier I could only find hammerite so it was a bit thicker than the engine paint. I started by painting the brakes and clutch lines and the master cylinders. Use your medium and small sized brushes to cover everywhere on these. Once there sorted you can get onto the alternator and clutch casing; You can do most of this from above but you'll need to do it from the grill hole to do the front of it, while your down there you can paint the starter motor too. Then back up top you need to also paint the engine steady. Use your small brush for this and try to not get paint on the bushes and don't paint the earth strap either - It looks a lot neater that way. After this your block will be ready for its third layer of paint. You should notice you’re getting a much deeper colour now and that it’s starting to give a nice and smooth finish. The block should only need one more coat after this.
Step 5 - Detail
Once your blocks had its fourth and final coat of paint - and you’re happy with the finish; this is where you'll want a steady hand, your small brush and some patience. You need to paint all the nuts silver including the head studs (make your life easier by removing the rocker cover), radiator housing bolts and radiator bracket bolts.
This takes time but it really needs to be done. Don't worry too much if you mess little bits up like get a bit of silver on the cylinder head etc you can touch these bits up later. The problem now is that once the block and clutch casings all looking lovely and new it makes everything else look old and grotty. So you'll find even bits you didn't think needed painting will now need it! I ended up painting everything in sight! So now is the time to paint other little bits you've not done yet; like all the little bits connecting to the block. I painted the oil filter mount black, the water temp and oil pressure senders silver and the main parts of the distributor you could see black and silver. I also painted the radiator bracket silver and my ultimate engine steady black in contrast. Once you've done this all the nuts you painted will be dry. So now you can do the threads. All the visible threads you can see needs to be painted black. So the head studs, alternator mounting bolts etc all need to be done black, in contrast to the silver nuts.
Step 6 - Touching up
Once you've painting everything you'll probably need to spend some time touching bits up. Because everything’s so close and connected it’s near impossible to do it all right first time. It’s easy to get some silver on the block when doing the clutch or some red on the alternator bracket whilst painting the block. So now’s the time to finish everything off, touch up all the minor mistakes or imperfections you can see, especially on the head studs which I guarantee you won't have got perfect first time! Then when you think your done have one last double check everywhere that you've
done everything and got a nice finish everywhere - after all this painting the last thing you'll want to do is pick up a paint brush again to touch bits up so do them while you can still be bothered.
Step 7 - Tidying
Now is the time to tidy up anything that lets the engine bay down now. Get out your cable ties and tidy up any loose and messy wiring. My bulkhead was a mess because of the wires and relays all dangling down. So I must have used about 15 cable ties to tie all the wiring together before using a few more to pull it all up under the scuttle by tying it up to the wiper motor pipes. You might also want to tidy up the wiring to the fuse box and in other areas such as the wires going to the coil and to the horn or washer pump. You can also get some back to black/plastic cleaner or similar and a rag and wipe down all the hoses in the engine and get them looking nice and new. After all this you can then fit any new parts you have bought - new rocker cover, leads, coil and other shiny bits. Then fill up your washer bottle with fresh screen wash, re-attach it and reconnect any wires you may have moved such as the temperature sender wires and things. Finally tidy up any last bits and bobs until you’re happy...
Now just stand back and admire your shiny new engine bay! Now you can proudly display your engine bay at shows!
Other issues
If you do have a really standard engine bay you’ll probably have the foam lining along the bulkhead. That’s just there as soundproofing but I’ve heard it’s just a big water trap. I was lucky and this had already been moved and my bulkhead was in good condition – however if you still have this foam lining I’d suggest removing it – It doesn’t look pretty.
If it were me I’d take that off and see what’s underneath. If the bulkhead was generally ok – I’d give it a quick going over with some coarse wet & dry, treat any rust I found with hammerite kurust, before adding a layer of red oxide followed by a layer of smooth black hammerite. That should get your bulkhead looking new and I’d suggest this as one of your first jobs first jobs.
Cleaning
I’ve been asked to add a section about keeping it clean. I’ll presume that if you’re going for a really nice and clean engine bay then you’d of fixed any major oil leaks prior to painting. Little oil leaks here and there aren’t too much of a problem and can easily be cleaned up using more gunk – a quick word of warning though I have not tried using gunk on Halfords engine paint before, so don’t know how well it’d react with the paint. I can’t see it causing any problems once the paint has set (16 hours) but as a precaution I’d test a bit of the block lower down near the gearbox where it’s not as noticeable. Using back to black or tyre shine on the hoses every now and again won’t hurt either and will help you spot any problems with them before they get too bad.
Since fans seem to get so grimy you’ll want to give that a quick squirt of muc-off every now and again to take off any crud and prevent it building up. If you do long distance driving or use your mini as a daily driver chances are your engine bay won’t stay perfect. But like I said any oil and crud can be removed easily with some more gunk. Another thing you’ll want to keep and eye on are the more in your face parts of the engine bay. A bit of interior shine will keep your leads looking new and a clean soft cloth will bring up any chrome goodies you’ve added nice and shiny! Apart from that I think just keeping all the bits like the washer bottle, wiper motor cover, fresh air intake and any other plastic bits clean is about all you need to do.
You shouldn’t have to clean your engine bay so often – I’ll only be doing mine before shows or after long drives
A quick tip taken from gottadesigner from the forum is that she uses cillit bang on here engine bay. She says she Sprays it directly on the worst areas, leaves for a few minutes and removes it with clean water and repeats as necessary. If it needs a little more attitude she ‘persuades it’ with a dish-scrubbing brush then wipes down with a *clean* rag then run the engine for a few moments to dry it off fully. Other than that, she says she just give the block a rub over with a Cillit-dampened cloth in the offending areas and removes with a cloth dampened with good old H2O!
Another tip from here is this: ‘Hoses and plastic bits I use Autoglym Vinyl Cleaner on a cloth followed by a *very* light coat of WD40 to keep them from perishing. Vinyl cleaner also works wonders on tyres if you don't want a 'dayglow' shine on them.’
So there’s some good cleaning tips and I can tell you – her engine bay is immaculate!
If you have any questions about this feel free to ask them and I’ll try and help out

Now credit where it’s due. Some of the tips and techniques I used were taken from a guide written by Neil from MLNI engine; I just used some of them and thought I could write a more comprehensive guide on it. His guide can be found here: http://www.theminifo...x...ic=35869
Heres a photo of my engine after this treatment – What an improvement:
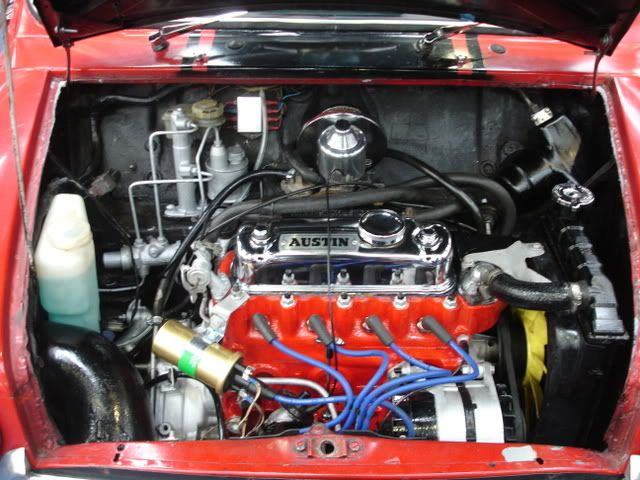
That’s still not finished yet though. I’m yet to add the chrome breathers I’ve bought and fit the blue silicon vacuum tubing which I’m planning on using around the heater and throttle cables and any wires that remain tatty – The coil wires for example.
I’ll probably post some more detailed Pics once I’ve done the last few bits on it.


