Jump to content


Photo
- - - - -

The Rise And Fall Of Sir Reginald!


  • Please log in to reply
343 replies to this topic

#31 Retro_10s

Retro_10s

    Moderator

  • Members
  • PipPipPipPipPipPipPipPipPipPipPip
  • 10,129 posts
  • Location: Bromsgrove

Posted 08 June 2009 - 08:31 PM

Small update - but still progress nevertheless.

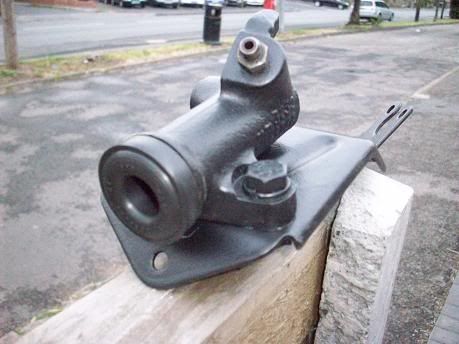
New seal fitted to the clutch slave from Minits, found some thinners today so i took the oppurtunity to degrease it and paint it too. looks much smarter now ans the new seal is great :smiley:
Posted Image

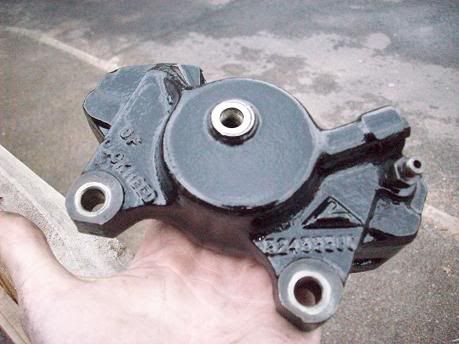
Also wire brushed and de-greased one of my calipers, then painted it up with some spray hammerite i had lying about:
Posted Image

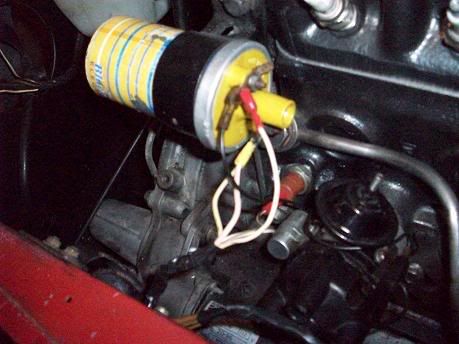
Started tidying the engine bay wires and re-crimping every connection - i hate wires everywhere and so I've been hiding them all and replacing the insulation wrap too. Removed the small black/w wire that goes into the loom for about 5" from the coil to the dizzy , there's no need for it when you can just plug the dizzy straight to the coil anyway, so that's one less wire trailing from the slam panel to the engine. Coil wiring done:
Posted Image

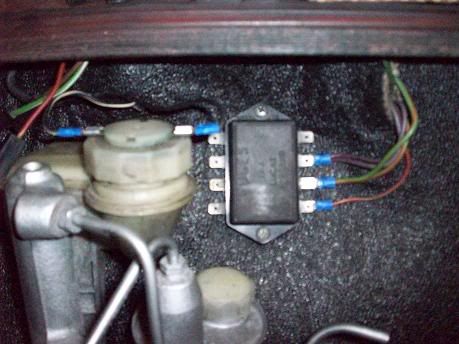
Same for the fusebox etc - nice new crimps and any excess wire removed.
Posted Image

Picked up a battery today to see if everything works once i've finished wiring - haven't powered the car up since i've had it!

#32 Down&Out

Down&Out

    The King Of Retro Cool

  • Traders
  • PipPipPipPipPipPipPipPipPip
  • 4,833 posts
  • Location: -

Posted 09 June 2009 - 09:15 PM

Glad to see the rewire went well :shifty:

#33 Retro_10s

Retro_10s

    Moderator

  • Members
  • PipPipPipPipPipPipPipPipPipPipPip
  • 10,129 posts
  • Location: Bromsgrove

Posted 09 June 2009 - 09:27 PM

nearly done with the wiring - just need to heatshrink all the connections up now and i'll be happy with it. And i need some Blue crimps to finished the fusebox off.

#34 Saxo-Fiesta-Mini

Saxo-Fiesta-Mini

    Up Into Fourth

  • Members
  • PipPipPipPipPipPipPipPipPip
  • 2,889 posts
  • Local Club: LCMOC

Posted 09 June 2009 - 10:36 PM

lookin good lol like the graphite grey did the same treat to my dash board your one of the few people who post on my thread so returning the favour

im still undecided with whether to sell mine but if someone offers what i want then ill have a conflict of emotions

#35 Retro_10s

Retro_10s

    Moderator

  • Members
  • PipPipPipPipPipPipPipPipPipPipPip
  • 10,129 posts
  • Location: Bromsgrove

Posted 10 June 2009 - 04:31 PM

Yes i like the graphite grey too - It's metallic but not that noticeable really - and i prefer it to plain black.

Going to finish the crimping on the engine bay tonight and heat shrink all the connections up too for extra peace of mind. Should have some nice HT leads with the old stlye caps on by the end of the week hopefully.

#36 Retro_10s

Retro_10s

    Moderator

  • Members
  • PipPipPipPipPipPipPipPipPipPipPip
  • 10,129 posts
  • Location: Bromsgrove

Posted 10 June 2009 - 06:27 PM

Righty- just been outside - Finished crimping all the engine bay up - just gotta heatshrink now (do that tomorrow)

Whilst i was out there i decided to take the front bumper off and re-do the black paint that had been brushed on by one of the previous owners, - all went fine and didn't find any rust hiding behind it :D

I also finally got round to re-attaching the clutch slave to the flywheel housing, put some new copper washers on the banjo bolt and plumbed it in, all seems fine with no leaks but i guess the real test is to see what happens when it's been bled through etc.

#37 Down&Out

Down&Out

    The King Of Retro Cool

  • Traders
  • PipPipPipPipPipPipPipPipPip
  • 4,833 posts
  • Location: -

Posted 10 June 2009 - 07:42 PM

may i ask, are you at beaulieu this year? or is it miles from you... :D

#38 Retro_10s

Retro_10s

    Moderator

  • Members
  • PipPipPipPipPipPipPipPipPipPipPip
  • 10,129 posts
  • Location: Bromsgrove

Posted 13 June 2009 - 01:26 PM

Dearest little elves - today we have been 'fixing' an inlet manifold.

I have an alloy Inlet from 'Minits' in Hockely heath. (when i told the guy at Minits what i had he said "blimey that's old!) and to be short - The casting is really really bad - not smooth at all, as you can see:

all round the entrance is lumpy, porous and badly cast.
Posted Image

These lumps will definatley be Detrimental to flow.
Posted Image

The worst offender is hidden deep inside one of the halves - really bad:
Posted Image

Other halve by comparison is not too bad at all - but i still felt it needed work:
Posted Image

So i got busy with a whopping great drill with a grinding bit on, lots of heavy iron oxide paper, and some carb cleaner (for blasting away swarf)

and the end results:
Posted Image

Posted Image

Posted Image

Very pleased with the results - the inside is smooth but textured (It is not considered a good thing to have a supersmooth 'glass like' finish on the inside of inlets as it decreases the fuel/air mix speed through the inlet)

I also found a good working alternator that was absolutley filthy:
Posted Image

Ripped it apart - cleaned all the terminals and re-assembled it:
Posted Image

So - i know have a good Inlet that's been smoothed out and i'm ready to fit the alternator up. All the heatshrink has been finished today on the engine bay wires and it looks fantastic.
Good day so far!

#39 Retro_10s

Retro_10s

    Moderator

  • Members
  • PipPipPipPipPipPipPipPipPipPipPip
  • 10,129 posts
  • Location: Bromsgrove

Posted 13 June 2009 - 04:34 PM

Two updates in one day, who'd have thought!

I have just been out and extended the light switch wiring so that it can be moved to the fog lamp switch housing. I now have room for a spare switch on the lower dash rail >_< :lol:

#40 Down&Out

Down&Out

    The King Of Retro Cool

  • Traders
  • PipPipPipPipPipPipPipPipPip
  • 4,833 posts
  • Location: -

Posted 13 June 2009 - 10:08 PM

Ooh :cry: care to share? Or are you being your usual devious shelf. :cry:

#41 Retro_10s

Retro_10s

    Moderator

  • Members
  • PipPipPipPipPipPipPipPipPipPipPip
  • 10,129 posts
  • Location: Bromsgrove

Posted 14 June 2009 - 08:34 AM

Well I've always wanted a starter button but i've never liked the way people go about fitting them up with aftermarket switches and race style units etc -

Essentially my starter switch will look totally standard as it will be a standard mini rocker switch housed in the spare space i've created on the centre switch panel. So i get the best of both worlds - a push button starter and an interior that isn't ruined.

There'll be some ingenious little security devices wired into the circuit so that someone can't just get into my car and push the button to drive away. Once again - all hidden away so that it doesn't infringe on my dash area.

#42 Retro_10s

Retro_10s

    Moderator

  • Members
  • PipPipPipPipPipPipPipPipPipPipPip
  • 10,129 posts
  • Location: Bromsgrove

Posted 15 June 2009 - 07:54 PM

Update time!

Today i went to Motorfactors and bought another engine steady bush kit after losing one half of the other - It finally went on after boring out the nylon inserts - pain in the *bottom* they were, anyway it's on now and the engine is very steady indeed! Also took the Opportunity to fit the engine earth strap back up.

But today's main success story is that i started to build up my push button starter switch circuit. Bought 1 rocker switch with a green LED in it and two seperate warning lamps, green and red. The rocker switch has been Put into the spare slot on the cluster that bolts to the underside of the bottom dash rail that the fog lamp switch is in.
Posted Image

The green light will come on when the starter switch is armed and the red light will come on when the starter turns over. My mini doesn't have a padded top dash rail or anything, so I after about 30mins of headscratching i decided i was going to have to build a pod for them. So i made a facia out of ply:
Posted Image

Checked to make sure the lights would fit:
Posted Image

then i added a top (which it will be attached to the lower dash rail by) and sides:
Posted Image

Just need to sand it once the glue is dry and then paint it black. I've mocked it up in the mini where i think it'll look good and it's nice a discreet, which is exactly what i want.

#43 RetroRay

RetroRay

    One Carb Or Two?

  • Members
  • PipPipPipPipPipPipPip
  • 834 posts
  • Location: London

Posted 15 June 2009 - 07:59 PM

Thats old skool !!! looks good so far though keep it up >_<

#44 Retro_10s

Retro_10s

    Moderator

  • Members
  • PipPipPipPipPipPipPipPipPipPipPip
  • 10,129 posts
  • Location: Bromsgrove

Posted 16 June 2009 - 09:59 PM

Pics to come tomorrow, but basically the finished light pod is now in, painted etc... and I picked up my HT leads today - they're a nice subtle purple colour and have flexible capped ends.

They look really nice and will be nice colour highlight in the engine bay against the gunmetal grey block etc.. >_<

Cooper Freeflow manifold arriving soon :lol: :dontgetit:

#45 Dog

Dog

    Deathwish Fairy

  • Banned from Buying/Selling
  • PipPipPipPipPipPipPipPipPipPip
  • 9,550 posts
  • Local Club: Shatrats.com

Posted 16 June 2009 - 10:03 PM

Hey Mike, how is the old moose?
and the mini?

Still calling it Reggie?


0 user(s) are reading this topic

0 members, 0 guests, 0 anonymous users