Jump to content


Photo
- - - - -

First Car- A Blue Project Mini!


  • Please log in to reply
118 replies to this topic

#1 tomgale

tomgale

    Super Mini Mad

  • Members
  • PipPipPipPipPipPip
  • 558 posts

Posted 18 June 2009 - 10:10 PM

bought from fleabay the other day and arrived on a trailler from doncaster at 10:15 my dad and grandad had been driving since 3 to fetch it. the camera battery was flat so only got rubbishy phone camera pics


on the trailler

Posted Image


this afternoon i got it out and emptied all of the parts out of it- it was filled to the roof with things, the boot was overflowing too.

before i cleared it

Posted Image

Posted Image

Posted Image


and after:


Posted Image

Posted Image

Posted Image

Posted Image


i made a little mess......
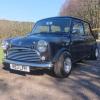
oh well the mini's empty at least. was able to see what condition the body work was in: not that bad considering i only paid £255 for it. Needs: new wings and front panel but these came with the car, sills are a tad rusty nothing catastropic (famous last words), few small holes in the floor pan and drivers side doorstep has a big hole in the middle.

getting everything out of the back meant that i could see what i have and the list is:

1x 998 engine
1x back bench
3x front seats (1 recliner 2 normal)
4x front lights
4x rear lights
2x bootlids (one with tastefull brush painted hammerite red stripe down the middle!)
1x set of door cards
3x rear screen
2x front screen
4x rear side windows
2x heater matrix
2x interior trim (handles etc)
2x steering column
2x steering wheel (not sure which i prefer yet)
2x front subframe
2x rear subframe
8x wheels (6 10 inch 2 12 inch)
1x replacement front panel
2x replacement wings
1x replacment grill
and assorted other bits and bobs (some of which are shiney :thumbsup: )

then i tucked it away back in its garage, its very small only half length so the mini just fits inside.

Posted Image

Posted Image

if i get coursework finished early the mini will get some more attention over the weekend.

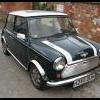
finally added an essential component:

Posted Image
fluffy dice!!!

#2 cookie4343

cookie4343

    **Caution: Do Not Feed Alcohol**

  • Traders
  • PipPipPipPipPipPipPipPipPip
  • 2,257 posts
  • Local Club: CV1 Mini's

Posted 19 June 2009 - 12:12 AM

Looks ace mate, whats your plans for it.
I think 10 inch wheels low as can go and retro would look sweet, best of luck with it. :thumbsup:

#3 deemo

deemo

    Mini Mad

  • Members
  • PipPipPipPip
  • 185 posts
  • Local Club: LCMOC

Posted 19 June 2009 - 12:18 AM

Whey, first reply :thumbsup:
Looks like a great base for a project. sweet buy for £255
What are the plans for her? and which bit's are you doing yourself?
Have fun

*edit* dam you cookie

Edited by deemo, 19 June 2009 - 12:35 AM.


#4 tomgale

tomgale

    Super Mini Mad

  • Members
  • PipPipPipPipPipPip
  • 558 posts

Posted 19 June 2009 - 06:18 AM

thanks for the intrest!

hey cookie- i want to paint it red with black roof and arches the current paint isn't great will try tto find a mk 1 grill -wide 10 inch wheels but il have to sort the brakes, got metro disks at the minuite

hi deemo was going to do most of it myself but never done anything like this before, so it could be a slow process :thumbsup:

#5 tomgale

tomgale

    Super Mini Mad

  • Members
  • PipPipPipPipPipPip
  • 558 posts

Posted 19 June 2009 - 10:05 PM

small update

thought i'd share with you this afternoons mini based activities.. stripping the spare rear subframe! it needed doing as i couldnt fit it in the garage in one peice.

so.. before:
Posted Image

Posted Image

Posted Image

one radius arm off

Posted Image

i sheared my first bolt!!

Posted Image

and fully stripped at the end:

Posted Image

i know its not the biggest achivment in the world, but its the first real 'dirty' job ive done, loved it!
it dosent look that different but ive got a bowl of nuts and several bags of mounts stored away for further use now.
removed all the spiders living in the brake hoses and the strange larvea thing which was hidden in the muck which has accumulated over time.

by the way i saw an orange mini drive past me as i was doing the subframe, any one on here?

#6 mk1leg

mk1leg

    Crazy About Mini's

  • Members
  • PipPipPipPipPipPipPipPipPipPip
  • 9,341 posts
  • Location: Jersey
  • Local Club: Mini Club Jersey, MCR

Posted 19 June 2009 - 10:07 PM

Looks like a good project keep pics comming............... :thumbsup:

#7 tomgale

tomgale

    Super Mini Mad

  • Members
  • PipPipPipPipPipPip
  • 558 posts

Posted 19 June 2009 - 10:13 PM

thanks! will do :thumbsup:

#8 tomgale

tomgale

    Super Mini Mad

  • Members
  • PipPipPipPipPipPip
  • 558 posts

Posted 20 June 2009 - 11:06 PM

today's update:

removed front and rear subbys and placed shell on to a wooden frame with castors in the corner :dontgetit: .

so from this:
Posted Image

to this:
Posted Image

sorry i forgot to take pictures as we were doing it, but heres one of the stuff we removed:

Posted Image

im quite pleased came off with a little bit of persuasion (grinder) but the subframes are intact, the rear looks a bit flaky though :(

#9 cookie4343

cookie4343

    **Caution: Do Not Feed Alcohol**

  • Traders
  • PipPipPipPipPipPipPipPipPip
  • 2,257 posts
  • Local Club: CV1 Mini's

Posted 21 June 2009 - 12:13 AM

Good work mate, did you shear any more bolts when removeing the subframes. :dontgetit:

#10 tomgale

tomgale

    Super Mini Mad

  • Members
  • PipPipPipPipPipPip
  • 558 posts

Posted 21 June 2009 - 07:53 AM

just one! :dontgetit: , had to grind the the top of of one we rounded off though :(


also, does anyone know which paint is best to repaint the subframes? thanks!

Edited by tomgale, 21 June 2009 - 08:06 AM.


#11 minisam1275

minisam1275

    Stage One Kit Fitted

  • Noobies
  • PipPipPip
  • 74 posts

Posted 21 June 2009 - 08:40 AM

good bit of hammerite i put on mine but make sure that you prepare it first get rid of any rust and flaky paint and but a few coats on so it dosnt chip off.

#12 tomgale

tomgale

    Super Mini Mad

  • Members
  • PipPipPipPipPipPip
  • 558 posts

Posted 21 June 2009 - 09:34 AM

hammerite you say? will strip the subframes soon and remove any rust and give em' a few coats. :dontgetit:

#13 miller 666

miller 666

    One Carb Or Two?

  • Members
  • PipPipPipPipPipPipPip
  • 710 posts

Posted 21 June 2009 - 09:43 AM

mini is looking sweeeet! :dontgetit:

sorry to hijack abit, about to paint my subby's with hammerite but wasnt sure if i needed to use a primer on them? or can i just paint it on? also do i need smooth hammerite or the other stuff?

Thanks!

#14 rick.spi

rick.spi

    Camshaft & Stage Two Head

  • Members
  • PipPipPipPipPipPipPipPip
  • 1,686 posts
  • Local Club: "WOT NO BRAKES"

Posted 21 June 2009 - 09:47 AM

i think you can use hammerite without primer (i have) but im not 100% :S lol

#15 tomgale

tomgale

    Super Mini Mad

  • Members
  • PipPipPipPipPipPip
  • 558 posts

Posted 21 June 2009 - 10:29 AM

i was wondering the same, thanks rick! :D


0 user(s) are reading this topic

0 members, 0 guests, 0 anonymous users