Have sorted out some 2H Yokohama A539s for Sunday's Classic run. Bit more legal than my half bald ex-Woodbridge Gymkhana tyres...


Mini Rally Car Blog
Started by
John Clayton
, Jul 12 2009 07:53 PM
45 replies to this topic
#16

John Clayton
-
- Noobies
-

- 110 posts
Mini Mad
- Local Club: Colchester Mini Club
Posted 01 May 2011 - 12:39 PM
#17
John Clayton
-
- Noobies
-
- 110 posts
Mini Mad
- Local Club: Colchester Mini Club
Posted 02 May 2011 - 09:47 PM
Am considering making the Mini eligible for circuit racing...
Scrutineering requirements for a saloon
http://www.pistonhea...ts for a saloon
Scrutineering requirements for a saloon
http://www.pistonhea...ts for a saloon
#18
John Clayton
-
- Noobies
-
- 110 posts
Mini Mad
- Local Club: Colchester Mini Club
Posted 05 June 2011 - 09:07 AM
Had a great time on a Trackday and also the RAFMSA Festival of Speed recently. However, it wasn't without its challenges...
Rally Mini: Head Gasket Repeatedly Blowing/overheating Problem
http://www.theminifo...howtopic=192069
Rally Mini: Head Gasket Repeatedly Blowing/overheating Problem
http://www.theminifo...howtopic=192069
#19
stretters
-
- Noobies
-
- 71 posts
Stage One Kit Fitted
- Location: Sunny Suffolk
- Local Club: Ipswich MOC, AMC, CMC, MCR.
Posted 06 June 2011 - 08:25 AM
Hi John,
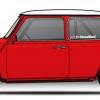
The car looks fairly well sorted, seems that my choice of red with a white roof was the correct option.
Sounds like mine will be of a similar spec, but may have to stick with the trusty 998cc lump until funds allow for an upgrade.
Defo want to come out for a play sometime, maybe double drive a gymkhana with you!
All the best,
Darryl.
Attached Files
-
 mini001.jpg 10.22K
7 downloads
mini001.jpg 10.22K
7 downloads
-
my_int.jpg 9.78K
11 downloads
#20
John Clayton
-
- Noobies
-
- 110 posts
Mini Mad
- Local Club: Colchester Mini Club
Posted 12 June 2011 - 04:10 PM
Mini's on axle stands outside the house at the mo. Took the fan out to clean up the grille in the wing (getting rusty). Also removed the shocks, Nitro Morsd & angle-grinded 2 of the 4 arches. Removed the Alu false floor in the boot and found loads of rust in the steel floor so got to cut that out and weld in a plate now. The passengers sill is v rotten so have cut the top off along the whole length of the passengers door -got to weld it up. Put an Endoscope camera down the sill where it goes aft behind the passenger's door sill and it looked OK so will spray it with Rust Treatment then Waxoyl.
How can you mount harnesses solidly in a Mini? Is a bar across the roll cage in the rear seats area the only solid mounting point?
Evidence of yellow expanding builders foam used to bodge-fill gaps between the boot and the cabin. Not sure if this stuff is fire proof or not?
How can you mount harnesses solidly in a Mini? Is a bar across the roll cage in the rear seats area the only solid mounting point?
Evidence of yellow expanding builders foam used to bodge-fill gaps between the boot and the cabin. Not sure if this stuff is fire proof or not?
#21
John Clayton
-
- Noobies
-
- 110 posts
Mini Mad
- Local Club: Colchester Mini Club
Posted 12 June 2011 - 04:24 PM
I've also ordered loads of parts including:
A Dowty Autofan
Fans For Motorsport Use: Electric, Plastic, Dowty Aerofan (variable Pitch)
http://www.theminifo...x...=193218&hl=
HOSE SILICONE KIT
OIL FILLER CAP GENUINE VENTED
MILLERS CTV 20/50 SEMI SYNTHETIC OIL
AVO competition coilovers for the rear
http://www.dcperform...ocks/pa239.html
I considered SPAX (which the car currently has) but they are not rebuildable so will be far more expensive in the long run.
#22
stretters
-
- Noobies
-
- 71 posts
Stage One Kit Fitted
- Location: Sunny Suffolk
- Local Club: Ipswich MOC, AMC, CMC, MCR.
Posted 03 July 2011 - 07:13 AM
How can you mount harnesses solidly in a Mini? Is a bar across the roll cage in the rear seats area the only solid mounting point?
Evidence of yellow expanding builders foam used to bodge-fill gaps between the boot and the cabin. Not sure if this stuff is fire proof or not?
Hi John, if your shell has the the belt mounts in the rear bulkhead use those.
As for the rear bulkhead you have 2 options, both involve scraping off the old foam!
1) Re foam the rear bulkhead using a fire retardant version, that way you can be sure it really is the proper stuff
2) Cut out a pair of fillet strips in 18 guge steel and weld these over the gaps, if you dont wish to weld to the outer 1/4 panel just joint it with fire proof mastic.
I've seen both ways used in the past, but option 2 seems to be the most effective.
All the best,
Darryl.
#23
John Clayton
-
- Noobies
-
- 110 posts
Mini Mad
- Local Club: Colchester Mini Club
Posted 02 October 2011 - 09:27 PM
Lots and lots has been done on this car in recent weeks since my last post...
Latest update (23 Sep 11) from Class Racing is:
The Mini is now at Lorne Road we got it back on 4 wheels but my colleagues at lorne road are adding so new parts to the rear end which should be much stronger. They are also working all the electrics and the ignition "on" problem. It will be ready to use next week assuming that we do not encounter any problems bleeding the brakes. We have a number of different systems for bleeding v=brakes so I'm sure it will not present too many problems. The new parts at the rear are inner brackets that are made from box tube with a radius and we are adding gussetts to make them stronger. We will make some spares too.
Edited by John Clayton, 01 March 2013 - 07:22 PM.
#24
John Clayton
-
- Noobies
-
- 110 posts
Mini Mad
- Local Club: Colchester Mini Club
Posted 04 January 2012 - 05:49 PM
Over last summer we did the following on it:
-Removed the head after the hd gasked failed due to following the instructions on Holts Radflush (it states to flush the engine when it's hot; guess what happens when you put cold water through a hot engine -I now know!)
-I stripped the paint on the head and rocker cover, rust treated them and then painted them with Tetrosyl Blue Engine lacquer (looks fantastic)
-Removed the front calipers (they were pulling to one side on the track). One was seized due to corrosion. I got them shot blasted, but I coudn't believe how quickly they began to rust again (within hours!). I had to put 'rust converter' on them. Tom battled away to change the seals and install new Stainless pistons. It was a pig of a job and took ages -never again -I'll buy recon calipers next time! We reassembled the brakes with decent race pads, but failed to bleed them up properly (despite trying every trick in the book including clamping off the other wheels' hoses in every conceivable combo (e.g. front to back split system or diagonally split) for every age of Mini. Nothing worked. We missed 2 Rally Sprints due to the brakes not being fixed in time; most depressed and frustrated. In desperation I took the Mini up to this place http://www.eastangli...nicentre.co.uk/ and Ted Sparrow took one look at it and told me 'your calipers are on upside down'! I was gutted. In 2 mins he had solved a problem that had thwarted us for many, many hours of pointless work. Ted also fixed a dodgy lead on the electric fuel pump, changed the oil to competition stuff and I'm really grateful to him for staying late on a Saturday afternoon to get us back on track for the following day's event -top bloke.
-We reinstalled the head after we (and also Andy Bridewell of Merlin Engine Services) checked that the head wasn't warped with an 'Engineer's straight edge' -it was absolutely fine. The engine was remarkably clean and sootless inside -only the most minor clean with emery paper was necessary. There was slight damage to the edge of one of the pistons -it looked like some tiny foreign object had come down the inlet manifold at some point on (IIRC) the cylinder on the extreme right (from the driver's perspective), and this debris had been melted/ground up into a silver burr standing proud of the piston top. It was easily sanded off and the bore was undamaged, thankfully.
-Proper brass manifold nuts were fitted to the inlet/exhaust manifold.
-The Engine steady bars (ESB) had their bushes changed where necessary (perished rubber for decent poly bushes). The ESB at the clutch end had its bracket bent to make it align properly.
-We removed the radiator and I got it 'flow tested' by the local Rad Rebuild firm. It was deemed to flow less well than a new rad, but it's a 4core (rather than a normal Mini rad which is 2) so it was deemed by the guy to still be plenty (even for a rally car) as the rad is 'a monster'!
-While the radiator was out I paint-stripped, applied rust converter then 2-pack primer and then Black stone chip to the vented wing (where the fan blows through. I also did the same (after angle-grinding the rust off as much as poss) to all 4 arches on the car.
-We removed the alloy plate false floor in the boot (that made it a nightmare to mount exhaust brackets under the car, bolt the tank down etc. Tom then did a great job cutting out the rusty spare wheel well and expertly welding in a new panel.
-I paint stripped, rust-convertered, seam sealed, then grey 'high build primered' the whole boot. I was going to leave it 'as is' but after phoning the manufacturer I learned that the paint is porous (due to all the talc it contains to make it 'high build') so it will absorb moisture. As a result, I sprayed several coats of Hammerite black stonechip paint over the whole boot. It took ages. I primered and seam sealed the underside of the boot (but it still needs a top coat and waxoyl when I do the whole underbody.
#25
John Clayton
-
- Noobies
-
- 110 posts
Mini Mad
- Local Club: Colchester Mini Club
Posted 04 January 2012 - 06:14 PM
Over last summer we did the following on it:
-Removed the exhaust manifold, rusttreated it and then painted it with several coats of aersol SPEREX red exhaust (gives a powdery matt finish). It looked great, but I've been a bit disappointed by how quickly the paint finish degraded
-Tom made a better bracket for the bottom of the manifold, welded up the crack in it and then we fibre-glass lagged the whole manifold (to reduce underbonnet temperatures).
-Removed the head after the hd gasked failed due to just following the instructions on Holts Radflush (it states to flush the engine when it's hot; guess what happens when you put cold water through a hot engine -I now know!)
-Sorted a problem in the gear lever ball swivel mech (and also a loose bracket for the gear selector rod).
-I stripped the paint on the head and rocker cover, rust treated them and then painted them with Tetrosyl Blue Engine lacquer (looks fantastic)
-Removed the front calipers (they were pulling to one side on the track). One was seized due to corrosion. I got them shot blasted, but I couldn't believe how quickly they began to rust again (within hours!). I had to put 'rust converter' on them. Tom battled away to change the seals and install new Stainless pistons. It was a pig of a job and took ages -never again -I'll buy recon calipers next time! We reassembled the brakes with decent race pads, but failed to bleed them up properly (despite trying every trick in the book including clamping off the other wheels' hoses in every conceivable combo (e.g. front to back split system or diagonally split) for every age of Mini. Nothing worked. We missed 2 Rally Sprints due to the brakes not being fixed in time; most depressed and frustrated. In desperation I took the Mini up to this place http://www.eastangli...nicentre.co.uk/ and Ted Sparrow took one look at it and told me 'your calipers are on upside down'! I was gutted. In 2 mins he had solved a problem that had thwarted us for many, many hours of pointless work. Ted also fixed a dodgy lead on the electric fuel pump, changed the oil to competition stuff and I'm really grateful to him for staying late on a Saturday afternoon to get us back on track for the following day's event -top bloke.
-We reinstalled the head (with competition head studs and one of the best gaskets for motorsport -the BK450 from the MG Metro Turbo) after we (and also Andy Bridewell of Merlin Engine Services) checked that the head wasn't warped with an 'Engineer's straight edge' -it was absolutely fine. The engine was remarkably clean and sootless inside -only the most minor clean with emery paper was necessary. There was slight damage to the edge of one of the pistons -it looked like some tiny foreign object had come down the inlet manifold at some point on (IIRC) the cylinder on the extreme right (from the driver's perspective), and this debris had been melted/ground up into a silver burr standing proud of the piston top. It was easily sanded off and the bore was undamaged, thankfully.
-Proper brass manifold nuts were fitted to the inlet/exhaust manifold.
-The Engine steady bars (ESB) had their bushes changed where necessary (perished rubber for decent poly bushes). The ESB at the clutch end had its bracket bent to make it align properly. The ESB at the thermostat end had a slot cut in it to make it simpler to remove.
-I confirmed that a thermostat blanking plate was fitted.
-We removed the radiator and I got it 'flow tested' by the local Rad Rebuild firm. It was deemed to flow less well than a new rad, but it's a 4core (rather than a normal Mini rad which is 2) so it was deemed by the guy to still be plenty (even for a rally car) as the rad is 'a monster'!
-FAN: a rally car will always be revving hard (normally 3500 to 6000rpm) so a normal fan is probably blowing too hard much of the time (and therefore sapping engine power). I did consider an electric fan but I consulted the following and heard:
http://www.billrichardsracing.com/ "This was tried on Paddy Hopkirk's works Monte Carlo rally mini in in the 90s and it overheated in traffic"
Pitstop Racing of Brize Norton (Ralph Saunders): "the engine power saved will barely show up on a dyno"
Therefore, I abandoned the elec fan idea and fitted a DOWTY AUTOFAN (the blades automatically feather a bit when the engine is at higher rpm -they are spring loaded and the air pressure twists the blade a few degrees to reduce the fans output). Does it work? If you get the light on it at the right angle you can see as you blip the revs that the 'shimmer' moves so it does appear to work. However, the car was getting VERY hot (even just doing short 4 min 2nd gear stages every 25mins) when competing on a hot summer's day. I ran it with the bonnet off, although it didn't actually boil, so maybe it was just 'nicely hot (3/4 up the temp gauge) rather than (too hot).
-I want to fit an oil cooler but somewhere along the line the pipes were lost for the first one (at Skidz Banbury), and the 2nd oil cooler is also now lost (possibly in my garage or possibly at CEME).
-While the radiator was out I paint-stripped, applied rust converter then 2-pack primer and then Black stone chip to the vented wing (where the fan blows through. I also did the same (after angle-grinding the rust off as much as poss) to all 4 arches on the car (and also put 2 layers of black Waxoyl Underbody seal all over them. Tom welded up inside the front N/S arch where possible, but it was a pain to get to (even after Daz had removed the rollcage) so I had to fill the holes with ISOPON body filler. I don't think the arches will EVER rust again after this complete overkill. I'm working on the basis of 'doing it right once', because the preparation takes SUCH a long time that you don't want to be doing it all again in 5 years time if the rust is creeping back. Lying on your back staring up at the bright sky, it was very difficult to see inside the dark front wheel arches. If I did it again I would put a blanket over the front of the car and down the side of the wheel arch, and then use a head torch. I got Nitro Mors dripping on my face at times which is not good -it stings like mad. I got paint dripping in my hair repeatedly (wear an old hat or -as I found -you will end up having to cut chunks out of your hair before you are presentable to go back to work the next day!). It was a punishing job that I would not be too keen to do again in a hurry!
-Tom replaced the gaiter on the front N/S driveshaft.
-We removed the alloy plate false floor in the boot (that made it a nightmare to mount exhaust brackets under the car, bolt the tank down etc. Tom then did a great job cutting out the rusty spare wheel well and expertly welding in a new panel.
-I paint stripped, rust-convertered, seam sealed, then grey 'high build primered' the whole boot. I was going to leave it 'as is' but after phoning the manufacturer I learned that the paint is porous (due to all the talc it contains to make it 'high build') so it will absorb moisture. As a result, I sprayed several coats of Hammerite black stonechip paint over the whole boot. It took ages. I primered and seam sealed the underside of the boot (but it still needs a top coat and waxoyl when I do the whole underbody.
-Tom made a bracket to refit the battery, and did a makeshift routing of the wires and pipes for the fuel pump/tank.
#26
Tahiti Joe
-
- Members
-
- 663 posts
Super Mini Mad
- Location: Pickering, North Yorkshire!
Posted 05 January 2012 - 01:22 AM
Hi John, have just spent over an hour reading through your 'project' thread and the linked pages! Found it all very interesting! 
For a fair while now I have been wanting too prepare a Mini of my own for use in stage rallying. I have many plans in my head and even have a few noted down! Am currently in the process of searching for an unwanted/abandoned project type rolling shell on which I can be let loose!  Was wondering just how often you compete and what events you have planned for this year? Also how do you often place on a competitive level against the other cars in your class? I regularly travel around the country too different events as I pit for a small Rally Team running a MK2 Escort that competes in mainly forest/gravel events.
Thanks and I'll keep reading the updates!
Joe
For a fair while now I have been wanting too prepare a Mini of my own for use in stage rallying. I have many plans in my head and even have a few noted down!
Am currently in the process of searching for an unwanted/abandoned project type rolling shell on which I can be let loose! Was wondering just how often you compete and what events you have planned for this year? Also how do you often place on a competitive level against the other cars in your class? I regularly travel around the country too different events as I pit for a small Rally Team running a MK2 Escort that competes in mainly forest/gravel events.Thanks and I'll keep reading the updates!
Joe
#27
John Clayton
-
- Noobies
-
- 110 posts
Mini Mad
- Local Club: Colchester Mini Club
Posted 12 January 2012 - 06:27 PM
Glad it's of interest!
So far, I've found that the Mini compares to other cars as follows:
-Airfield track day (wide + long straights) - well down on straight line speed but can brake much later and can corner faster (but still a lot slower lap time in total)
-Autocross + Grass Rally Sprints: Suspension has much less travel and is harder. Gives a harsher ride than a car with coil springs. More agile and chuckable on slow/twisty courses. Nice loose back end (especially on bald road tyres)
Generally: even with 100Bhp it lacks enough grunt to compete with a lot of modern 16v engines which produce so much power nowadays. However, you always FEEL the speed so much more in a Mini that people (including me) enjoy the ride more!
#28
John Clayton
-
- Noobies
-
- 110 posts
Mini Mad
- Local Club: Colchester Mini Club
Posted 12 January 2012 - 06:31 PM
I've got no dates in the diary for Mini outings/events this year as yet, but I will update this blog in due course.
The latest update from CLASS RACING is that they have sorted the rear trailing arm brackets alignment issue (washers on the brackets allowed them to be re-aligned as required), and they are now cutting out some rusty floor in the front footwells. It also needs some Waxoyling underneath, and they are planning to hang the carbon fibre doors on it soon, and hopefully do a partial respray in due course (all as practice for their pupils).
The latest update from CLASS RACING is that they have sorted the rear trailing arm brackets alignment issue (washers on the brackets allowed them to be re-aligned as required), and they are now cutting out some rusty floor in the front footwells. It also needs some Waxoyling underneath, and they are planning to hang the carbon fibre doors on it soon, and hopefully do a partial respray in due course (all as practice for their pupils).
#29
smudger068
-

- Members
-
- 344 posts
Speeding Along Now
- Location: Ipswich
Posted 27 January 2012 - 09:19 AM
Hello John,
My name is Lee Smith, i see you say about the oil cooler being at CEME, is that the college in London, as im at Havering College doing foundation Degree Motorpsort.
But i also know Ted and Nick Sparrow at the mini Centre (as i live in Ipswich)
Who do you run the car with?
thanks
My name is Lee Smith, i see you say about the oil cooler being at CEME, is that the college in London, as im at Havering College doing foundation Degree Motorpsort.
But i also know Ted and Nick Sparrow at the mini Centre (as i live in Ipswich)
Who do you run the car with?
thanks
#30
John Clayton
-
- Noobies
-
- 110 posts
Mini Mad
- Local Club: Colchester Mini Club
Posted 19 March 2012 - 09:25 PM
Hi Lee,
Yes, I know Ted and highly recommend his firm The East Anglian Mini Centre; they have got me out of a fix on several occasions!
I used to have a Sierra at Havering College as a project car but the students let me down so I had to move it over to CEME to these guys http://classracing.org.uk/ who are a lot better.
I found the oil cooler now, so Class Racing are just trying to work out if they can mount it without a sandwich plate -anyone got any tips?
One of the carbon door's skin has split so they are going to try a repair with resin adhesive. We are also considering getting some thicker perspex and cutting it with a suitable bandsaw for the windows. The guys are hoping to respray the car in due course.


0 user(s) are reading this topic
0 members, 0 guests, 0 anonymous users


