could some one please take a picture of their top engine steady for me please as i don't have one and would like to know how they attach and where they attach to. It would be a great help with some pictures. Also what is the ultimate top engine steady like on an MPI and what does it look like in situe? Regards Blue

Top Engine Steady
Started by
blue blood
, Aug 09 2010 09:02 AM
13 replies to this topic
#2

E-Tizzle
-

- Members
-

- 901 posts
One Carb Or Two?
- Local Club: Essex Mini Club
Posted 09 August 2010 - 09:16 AM
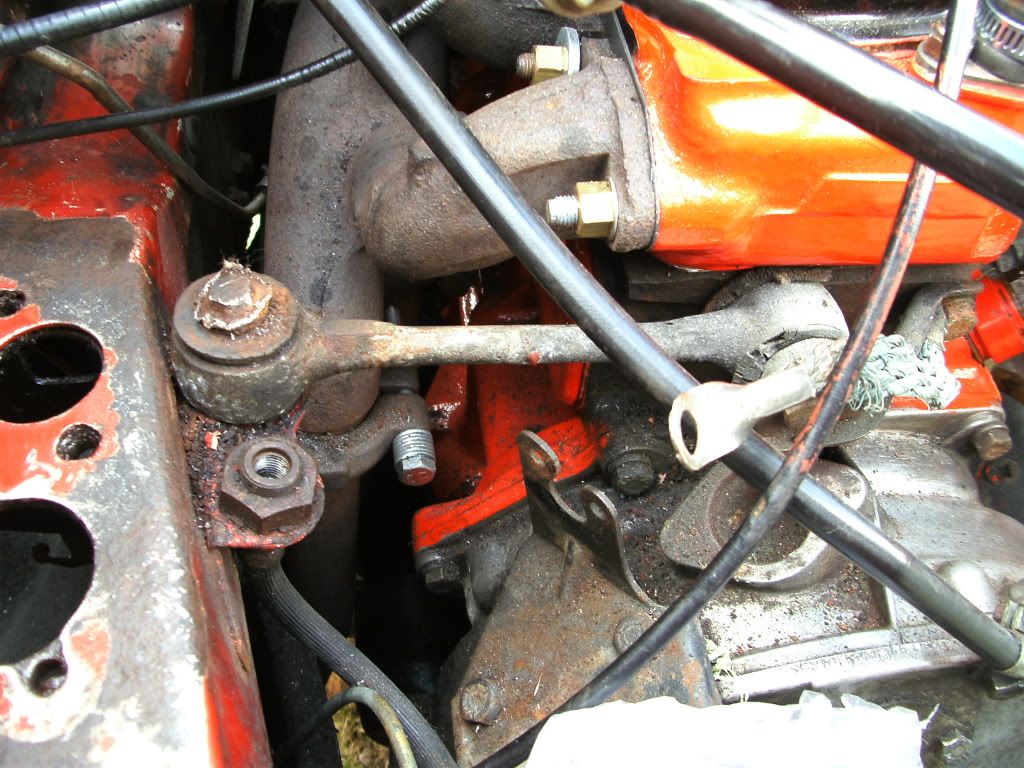
its attached at the engine with one bolt, and at the other end by one bolt on the bracket
#3
samsfern
-

- Members
-
- 5,243 posts
Likes Rovers, loves Jeremy Kyle
- Location: Ringwold, kent
- Local Club: medway mini club/medwaymonkeys
Posted 09 August 2010 - 09:50 AM
there should be a bracket on the engine side, as well, rather than just the one bolt through the steady bar, the bracket also has one, otherwise the bolt will eventually shear off, leaving some thread stuck in the block. Youll understand what i mean when someone uploads a pic.
#4
E-Tizzle
-
- Members
-
- 901 posts
One Carb Or Two?
- Local Club: Essex Mini Club
Posted 09 August 2010 - 09:56 AM
you can see the engine bracket on the first picture
#5
dmdangermouse
-

- Members
-
- 407 posts
Speeding Along Now
- Local Club: Staffs Minis
Posted 18 August 2010 - 07:26 PM
Im trying the replace the bushes, i've done the lower steady bar but i cant get to the bolt to the body on the upper steady!
How does everyone else undo it?
How does everyone else undo it?
#6
E-Tizzle
-
- Members
-
- 901 posts
One Carb Or Two?
- Local Club: Essex Mini Club
Posted 18 August 2010 - 08:56 PM
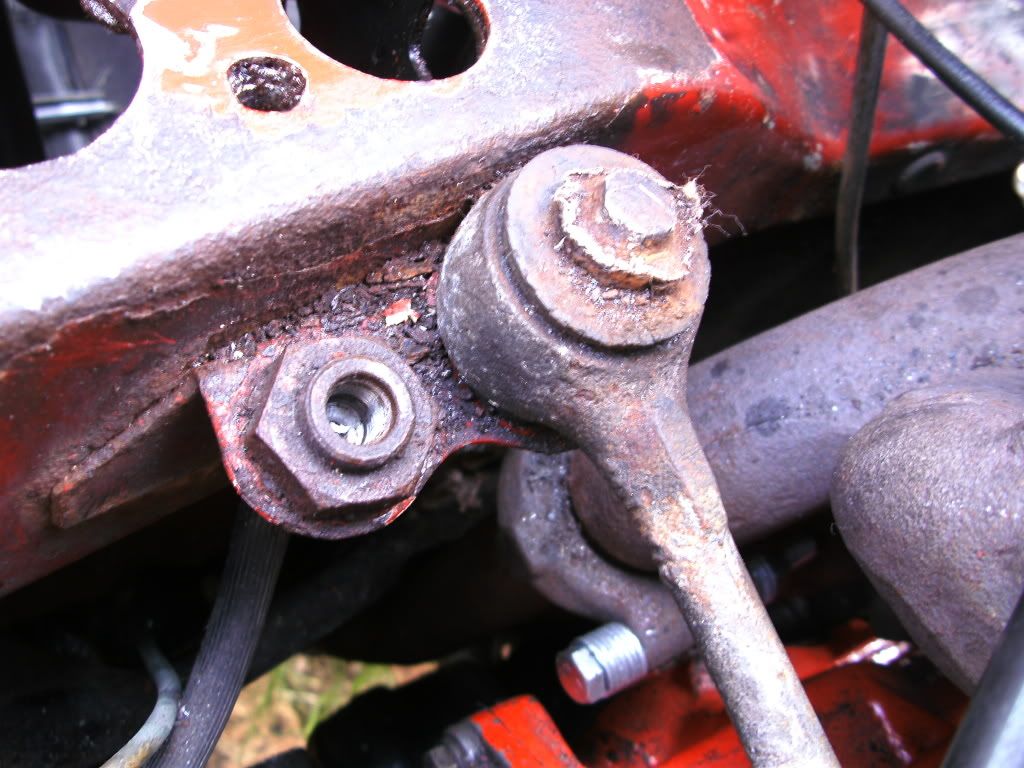
as you can see on my first and second picture the nut was seriously mashed up.
so what i did was hold the top with a pair of molegrips (as tight as i could get them) and undo underneath with a spanner.
it takes a long time for me because my rubber still had a bit of spring init so when i undid the nut it would turn back about half way, which was annoying, prob took me about 10 mins of turning to take it off.
#7
Frazer stuart
-

- Noobies
-
- 41 posts
On The Road
- Location: Buckinghamshire
Posted 15 September 2017 - 12:29 PM
Okay mini experts, noob here in need of help! I'm changing the top engine steady bushes on my spi, but I can't get the bolt out of the engine end. It hits the breather on the clutch housing before it is out enough to move the steady. And I can't move the breather because the brake servo is in the way of the 2 bolts which hold that on. and I really don't want to mess with my brakes...
There must be something simple which I'm missing here but I can't find a way round it???
Any help would be greatly appreciated.
There must be something simple which I'm missing here but I can't find a way round it???
Any help would be greatly appreciated.
#8
AeroNotix
-

- Noobies
-
- 267 posts
Mini Mad
- Location: Krakow (Blackpool, originally)
Posted 15 September 2017 - 12:43 PM
Remove the clutch breather. With some messing about you can do it without removing the breather. You should be able to remove the breather without taking anything else off.
#9
Alpenflitzer
-

- Members
-
- 396 posts
Speeding Along Now
- Location: Near Steyr
- Local Club: no
Posted 17 September 2017 - 01:11 PM
I take off the breather on my SPI and there is enogh room for the change. Not to forget, it is alsways helpful to support the engine a little when taking off the bolts.
#10
Alpenflitzer
-
- Members
-
- 396 posts
Speeding Along Now
- Location: Near Steyr
- Local Club: no
Posted 17 September 2017 - 01:12 PM
Has anyone a photo form a third engine steady which is mounted from waterthermostat to the firewall. I can not imagine how this is fixed.
#11
nicklouse
-

- TMF+ Member
-
- 17,935 posts
Moved Into The Garage
- Location: Not Yorkshire
- Local Club: Anonyme Miniholiker
Posted 17 September 2017 - 01:25 PM
Has anyone a photo form a third engine steady which is mounted from waterthermostat to the firewall. I can not imagine how this is fixed.
the DSN one?
does not fit LHD cars.
Edited by nicklouse, 17 September 2017 - 01:56 PM.
#12
Northernpower
-

- Members
-
- 2,409 posts
Mr. 7-Port
- Name: Graham
- Location: North Yorkshire (God's County)
- Local Club: Its out there somewhere
Posted 17 September 2017 - 01:31 PM
Have look at the 3rd post down. http://www.theminifo...-today/page-461Has anyone a photo form a third engine steady which is mounted from waterthermostat to the firewall. I can not imagine how this is fixed.
#13
Frazer stuart
-
- Noobies
-
- 41 posts
On The Road
- Location: Buckinghamshire
Posted 19 September 2017 - 06:15 PM
Ah okay I'll have to fiddle around a bit more and get that breather off. Thanks guys.
Alpenflitzer - The engine end of the 'ultimate engine steady' fits between the thermostat housing and the head I think, So you need gaskets either side at the engine end! Ive seen a few guys on here warn against it as if fitted incorrectly, or if the engine moves, it could lead to a pretty bad coolant leak!
Alpenflitzer - The engine end of the 'ultimate engine steady' fits between the thermostat housing and the head I think, So you need gaskets either side at the engine end! Ive seen a few guys on here warn against it as if fitted incorrectly, or if the engine moves, it could lead to a pretty bad coolant leak!
#14
Alpenflitzer
-
- Members
-
- 396 posts
Speeding Along Now
- Location: Near Steyr
- Local Club: no
Posted 06 October 2017 - 03:38 PM
Thanks for your decision help. I think I will stay with the two originals and change rubbers every 5000 km.


0 user(s) are reading this topic
0 members, 0 guests, 0 anonymous users


