Just another thought Mike, if I was doing this job, (& probabaly will one day). As long as the tunnel is complete I would weld two floor halves to your tunnel. There are heritage & after market options with inner & outer sills. I think you might find fitting the floor starter & gear change quite tricky on a rod change tunnel.


My Mk1 Mini Rebuild
Started by
minimikej
, Sep 26 2010 06:48 PM
202 replies to this topic
#16

jagman.2003
-

- Members
-

- 1,307 posts
One Carb Or Two?
- Location: In the shed.
- Local Club: Owner of my own club of Minis
Posted 02 December 2010 - 08:28 AM
#17
matty...
-

- Traders
-
- 605 posts
Super Mini Mad
- Location: Oxfordshire
- Local Club: Turbominis
Posted 03 December 2010 - 04:03 PM
Ive just fitted an M-machine complete mk1 floor, and it was spot on.
They also give discount if you have it un-primed (about 10% I think it was).
They also give discount if you have it un-primed (about 10% I think it was).
#18
minimikej
-
- Members
-
- 346 posts
Speeding Along Now
- Location: Derbyshire
Posted 07 December 2010 - 01:02 PM
Cheers Jagman & Matty
I think I'll go for the m-machine full floor pan. If I take the two half sections I don't think I'll get as good a finish, and whilst I'm not particularly lazy, I think I'll make better progress this way given the tiny amount of spare time I get these days.
So, in the meantime I now have a mk3+ right hand floor section for sale including the inner sill which I bought a few years ago when the project looked a lot smaller , excellent unused condition if anyone wants one. I'd be looking for about £60 for it.
Cheers
Mike
I think I'll go for the m-machine full floor pan. If I take the two half sections I don't think I'll get as good a finish, and whilst I'm not particularly lazy, I think I'll make better progress this way given the tiny amount of spare time I get these days.
So, in the meantime I now have a mk3+ right hand floor section for sale including the inner sill which I bought a few years ago when the project looked a lot smaller
, excellent unused condition if anyone wants one. I'd be looking for about £60 for it.Cheers
Mike
#19
minimikej
-
- Members
-
- 346 posts
Speeding Along Now
- Location: Derbyshire
Posted 20 April 2011 - 09:57 AM
Hi folks.
Been a while since I got any time to work on the mini. I've now acquired a full M-Machine floor pan, and heritage rear bulkhead and boot floor, wheelarches etc etc.
Chopped some more out yesterday:
Been a while since I got any time to work on the mini. I've now acquired a full M-Machine floor pan, and heritage rear bulkhead and boot floor, wheelarches etc etc.
Chopped some more out yesterday:
Attached Files
-
 IMAG0105.jpg 2.32MB
76 downloads
IMAG0105.jpg 2.32MB
76 downloads
-
IMAG0106.jpg 1.53MB
56 downloads
#20
jagman.2003
-
- Members
-
- 1,307 posts
One Carb Or Two?
- Location: In the shed.
- Local Club: Owner of my own club of Minis
Posted 20 April 2011 - 12:03 PM
No messing about there..! The rear seat squab is one of the only bits I left in. Keep up the good work.
#21
minimikej
-
- Members
-
- 346 posts
Speeding Along Now
- Location: Derbyshire
Posted 20 April 2011 - 01:02 PM
Cheers,
Actually feeling a lot better about the project now that the old rust and bad repairs are gone. Originally I was in 2 minds as to whether to replace the wheelarches. Glad I made the decsion now - turns out they were only tack-brazed in place!
Looks like the whole back panel has been replaced before by someone too. I've got 3 layers in the vertical seams in places...... Let's hope that's not just blue-tacked on like the wheelarches...
#22
minimikej
-
- Members
-
- 346 posts
Speeding Along Now
- Location: Derbyshire
Posted 07 May 2011 - 04:57 PM
Hi again,
Had a couple of hours this morning to trial fit the new rear subframe, boot floor and inner wheel arches.
The o/s pattern wheelarch fitted much better than expected, although I suspect that having a floppy boot floor helped enormously. Expecting a harder job on the other side.
Once the boot and wheelarches are aligned I will trial fit the rear bulkhead and temporarily pop-rivet them all in place in anticipation of a long day with the spot and mig welders.
Still have to remove both rear quarters and the boot hinge panel but these can come later as I'm short of reference points.
Attached Files
-
IMAG0150.jpg 1.43MB
92 downloads
-
IMAG0147.jpg 1.03MB
71 downloads
-
IMAG0148.jpg 1.49MB
63 downloads
-
IMAG0149.jpg 1.25MB
95 downloads
#23
Pitcrew6464
-

- Members
-
- 1,673 posts
Camshaft & Stage Two Head
- Location: uk
- Local Club: mini 7 racing club
Posted 08 May 2011 - 06:36 AM
great project big progress going on with the new panels!! do you want to sell me that rear bulkhead cover (round black) please 
#24
minimikej
-
- Members
-
- 346 posts
Speeding Along Now
- Location: Derbyshire
Posted 08 May 2011 - 02:55 PM
great project big progress going on with the new panels!! do you want to sell me that rear bulkhead cover (round black) please
Hi,
Is it the old rear bulkhead that I chopped out that you want? It's a bit knocked-about, but if you're only wanting to swap bits of detail over it would prob be ok. Where are you based?
Cheers,
Mike
#25
Pitcrew6464
-
- Members
-
- 1,673 posts
Camshaft & Stage Two Head
- Location: uk
- Local Club: mini 7 racing club
Posted 09 May 2011 - 07:59 AM
great project big progress going on with the new panels!! do you want to sell me that rear bulkhead cover (round black) please
Hi,
Is it the old rear bulkhead that I chopped out that you want? It's a bit knocked-about, but if you're only wanting to swap bits of detail over it would prob be ok. Where are you based?
Cheers,
Mike
ive sent you a message
#26
minimikej
-
- Members
-
- 346 posts
Speeding Along Now
- Location: Derbyshire
Posted 14 May 2011 - 05:54 PM
Hi,
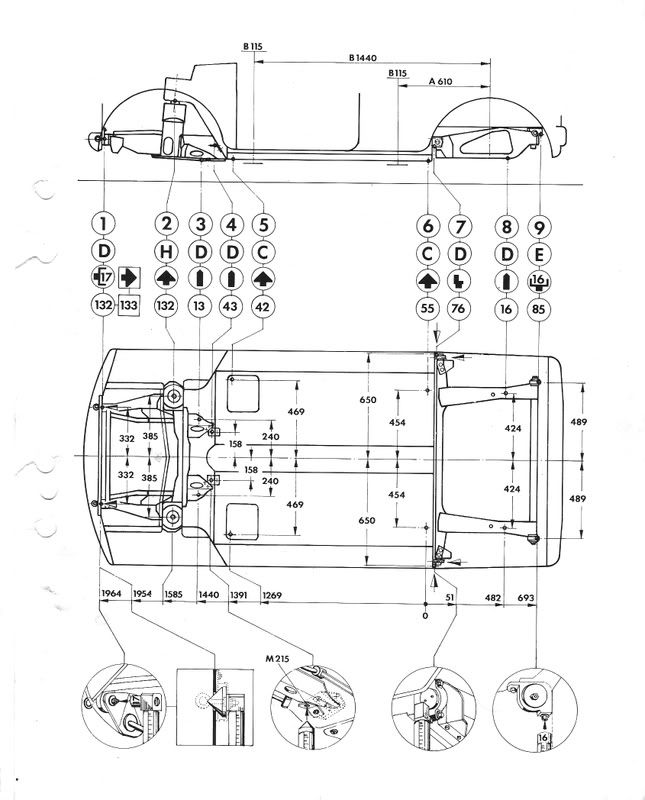
I was browsing either this forum or the mk1 forum the other day and came across a technical drawing showing all the subframe mounting points and dimensions. Can't for the life of me find it now!!
Can anyone help? It's not the usual one that you find on the internet, had depictions of special tools that fit inside the various bolt holes and stuff.
Cheers,
Mike
#27
minimikej
-
- Members
-
- 346 posts
Speeding Along Now
- Location: Derbyshire
Posted 17 May 2011 - 03:53 PM
Hi,
I was browsing either this forum or the mk1 forum the other day and came across a technical drawing showing all the subframe mounting points and dimensions. Can't for the life of me find it now!!
Can anyone help? It's not the usual one that you find on the internet, had depictions of special tools that fit inside the various bolt holes and stuff.
Cheers,
Mike
Gah, found it. A very very interesting diagram for those of us whose cars are already banana shaped and can't be used for reference points
 /
/http://i819.photobuc...lignment3-1.jpg
#28
minimikej
-
- Members
-
- 346 posts
Speeding Along Now
- Location: Derbyshire
Posted 31 May 2011 - 08:14 AM
Morning, brief update.
Managed to get a total of 5 hours work on the mini in the last 3 weeks so not huge progress, but still.
Removed the boot hinge panel and replaced with the Heritage one. Quite pleased with the (unfinished) results so far, but what a struggle; could have really done with some extra pairs of hands!
I've not welded right up to the vertical seam yet because I wanted a bit of wriggle room when it came to lining up the bumper bolt holes. A bit of persuasion and things seem ok -
2 questions:
1. Someone, somewhere on this forum mentioned something about the subframe mounting holes being 3/8" out on some reject Heritage panels, does anyone know any more about it? Tried a complicated search but gave up.
2. I've got the lower right hand boot hinge corner repait from M-Machine in primer going spare if someone wants it for a few quid?
Cheers,
M.
Attached Files
-
IMAG0177.jpg 1.51MB
55 downloads
-
IMAG0176.jpg 1.4MB
25 downloads
-
IMAG0178.jpg 1.1MB
29 downloads
-
IMAG0158.jpg 1.55MB
31 downloads
-
IMAG0159.jpg 1.39MB
23 downloads
-
IMAG0175.jpg 1.22MB
46 downloads
-
IMAG0174.jpg 1.32MB
53 downloads
#29
minimikej
-
- Members
-
- 346 posts
Speeding Along Now
- Location: Derbyshire
Posted 02 June 2011 - 01:04 PM
Well I've spent a good couple of hours now staring at the shell trying to work out what to do next. I had just about decided to put the rear back together to get some rigidity back before the floor comes out but then looked at all of the side panels objectively.
Near side composed thus:
Doorstep and lower rear quarter consist of a repair panel slapped over the top of the old doorstep. Rear quarter seems to have some offcuts of a wheelarch repair stuck from the inside. So I've no confidence that the wheelarch is the right shape to starft with. Hence I don't want to use it to poisition up the nsr inner wheelarch.
The doorstep/innersill join has 4 layers in places
Offside composed thus:
Doorstep is a repair section, seems ok rust wise but not let in very nicely and looks a mess. Rear quarter salvageable but would need lower repair and a rear seam repair at least.
My plan was to tackle the nearside rear quarter next using a mk3 pattern panel I had lying around, but the fit does not look good. And I would have to trim it down to fit the mk1 and I've nothing to join it to that I trust at the bottom. If I line it up against the sill the wheel arch is a mile out and the tail of the panel sits too low. If i line it up against the window opening, the sill join does not line up. So a genuine mk1/2 panel required here.
I took some measurements from various places and now have no confidence that the rear sibframe mounting points (repair sections on the heelboard) are in the right place. So I don't want to rely on them when lining up the new complete floorpan.
So the problem seems to be that I need to replace all the side panels but can't attach them along the sill line because I'm replacing the floor. And I can't replace the floor because I have no confidence in the positioning of the doorsteps and rear quarter repairs. So I'm a bit stuck.
My current thoughts are to get the shell braced in its current shape and just go for the rabbit, floor out and try to line things up anew.
Anyone else been in this situation?
Cheers
M
#30
matty...
-
- Traders
-
- 605 posts
Super Mini Mad
- Location: Oxfordshire
- Local Club: Turbominis
Posted 02 June 2011 - 03:39 PM
Yep been in that situation...my whole shell was like that! Lol
I would fit the rear bulkhead back in position as the dimensions of that aren't critical, but it will only really fit in one position, and that will help with the rigidity ALOT!
You can't fit the rear quarters until the floor is in because you need to fit the stiffener panles where the rear bins are and wheel arch closing panels before the quarter goes on.
I wouldn't worry too much about the door step panel, as that can be fited after the floor.
Have a look at my build thread to see what order I did mine. Doing the floor first worked well, as it acted like a good datum point. if you've got a good straight rear subby you could use that to help position the floor, along with the front subframe mount holes.
http://mk1-forum.net...c.php?f=6&t=659


0 user(s) are reading this topic
0 members, 0 guests, 0 anonymous users


