Attached Files
-
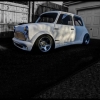
 DSC00658.JPG 769.89K
136 downloads
DSC00658.JPG 769.89K
136 downloads
-
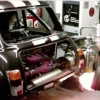
DSC00661.JPG 798.69K
186 downloads


Speeding Along Now

Posted 14 August 2011 - 03:06 PM
DSC00658.JPG 769.89K
136 downloads
DSC00661.JPG 798.69K
186 downloads
Fantasy F1 Winner 2011
Posted 15 August 2011 - 01:13 PM
Speeding Along Now
Posted 15 August 2011 - 06:23 PM
Edited by benmoffat, 15 August 2011 - 06:24 PM.
Speeding Along Now
Posted 01 January 2012 - 05:46 PM
IMG_0534.JPG 190.66K
33 downloads
Stage One Kit Fitted

Posted 02 January 2012 - 11:42 AM
Speeding Along Now
Posted 02 January 2012 - 12:25 PM
Edited by benmoffat, 02 January 2012 - 12:27 PM.
Stage One Kit Fitted
Posted 02 January 2012 - 12:54 PM
Speeding Along Now
Posted 04 February 2012 - 11:18 AM
IMG_0872.JPG 422.64K
83 downloads
IMG_0873.JPG 494.01K
53 downloads
IMG_0874.JPG 513.01K
43 downloads
IMG_0875.JPG 534.54K
41 downloads
IMG_0876.JPG 543.84K
40 downloads
Camshaft & Stage Two Head
Posted 07 February 2012 - 08:13 AM
Mini Mad

Posted 08 February 2012 - 09:06 PM
One Carb Or Two?
Posted 24 October 2012 - 08:03 PM
Stage One Kit Fitted
Posted 11 May 2013 - 08:47 PM
Speeding Along Now
Posted 11 May 2013 - 09:02 PM
Hi Luke.
Basically no progress since last update. Been so busy with work and moving house I just haven't had time for it.
And I have come to the conclusion that I don't want to do any more work on the mini at all. I have just had enough. After minimal progress since I bought the kit, I have realized in nearly 2 years I have achieved nothing under my own merit. So I am planning on sending it away in a couple of weeks for someone to finish.I need to get it on the road and just hope it will be worth it in the end.
Edited by benmoffat, 01 July 2013 - 06:35 PM.
Speeding Along Now
Posted 13 March 2017 - 01:47 PM
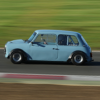
I hadn’t realised how long it had really been since I last posted on here!
The Mini is finally built and registered. Although it is on the road there is still some work needed. I’ve got to finish the interior, and I also am having trouble getting it to run properly.
I am running the T4 Volvo engine with DTA S40 ecu. Is anyone on here running the same set up? I was wondering if anyone had a map available for this ecu that I could use to get it going properly. There is a base map in there at the moment but it only really starts and runs up to about 3000 rpm, I don’t think it’s tuned above that.
Hopefully if I can install one from someone else using this same engine it will be a good starting point.
Also can anyone recommend a rolling road/dyno/DTA mapping person in the south west? Any help would be greatly appreciated, just need to get over these last few hurdles to be able to drive it this summer!
Thanks
Camshaft & Stage Two Head
Posted 16 March 2017 - 04:41 PM
I hadn’t realised how long it had really been since I last posted on here!
The Mini is finally built and registered. Although it is on the road there is still some work needed. I’ve got to finish the interior, and I also am having trouble getting it to run properly.
I am running the T4 Volvo engine with DTA S40 ecu. Is anyone on here running the same set up? I was wondering if anyone had a map available for this ecu that I could use to get it going properly. There is a base map in there at the moment but it only really starts and runs up to about 3000 rpm, I don’t think it’s tuned above that.
Hopefully if I can install one from someone else using this same engine it will be a good starting point.
Also can anyone recommend a rolling road/dyno/DTA mapping person in the south west? Any help would be greatly appreciated, just need to get over these last few hurdles to be able to drive it this summer!
Thanks
Pictures please.....
well done on getting it on the road!!


0 members, 0 guests, 0 anonymous users


