 Are the oversills going to come off?
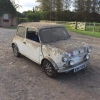
1979 Clubman Estate!
Started by
mini_legend
, Apr 06 2011 02:36 PM
74 replies to this topic
#31

benb12
-

- Members
-

- 1,483 posts
One Carb Or Two?
- Local Club: Medway Mini Club
Posted 24 April 2011 - 10:03 PM
Looks like a good project Are the oversills going to come off?
Are the oversills going to come off?
#32
mini_legend
-
- Members
-
- 395 posts
Speeding Along Now
- Location: Hull
- Local Club: Outcast Car Club
Posted 24 April 2011 - 10:10 PM
Not initially. I want them off, but i'm going to focus on getting a rust free mini everywhere else, lots of nasty holes to contend with,then I'll tackle the sills!!, ohh and a front end 
J K
J K
#33
mini_legend
-
- Members
-
- 395 posts
Speeding Along Now
- Location: Hull
- Local Club: Outcast Car Club
Posted 27 April 2011 - 06:25 PM
Yay progress, all be it little bits!
need to order the rear RH floor quarter first, get that sorted, then plating and further panel replacing can begin! Think doors need a little work, not far off re skin, but might be ok without after further investigation. Problem is rear doors. The underneaths are ok to repair, and you can get skins for the bottoms, but the tops of mine, well LH is manky, and I'm not sure if you can reskin the top half???? Any advice would be appreciated
Runners are fine, both rear windows slide, be it with a bit of force, nicely.


Shocks removed all round, came off remarkably easily!!


Only like this on LH inside runner part

Seatbelts out, and seat bracket removed on RH rear ready to cut the floor out, when new one is ordered

Quarter bumpers off, absolute PIGS!!! Ended up grinding one bolt off, drilling the bolt out of the bumper gradually and will be re tapped, if the bumper cleans up well enough to be re fitted

Perfect new battery seating, extra strength on top of the new floor

Plating Metal for small patching

Finally, and it doesn't show on this pic well, but don't you just love looking at the floor, through the holes in the crossmember!! Lot of bad rust under the crossmember

That's about it for now!!
Enjoy reading and let me know what you think
JK
need to order the rear RH floor quarter first, get that sorted, then plating and further panel replacing can begin! Think doors need a little work, not far off re skin, but might be ok without after further investigation. Problem is rear doors. The underneaths are ok to repair, and you can get skins for the bottoms, but the tops of mine, well LH is manky, and I'm not sure if you can reskin the top half???? Any advice would be appreciated
Runners are fine, both rear windows slide, be it with a bit of force, nicely.
Shocks removed all round, came off remarkably easily!!
Only like this on LH inside runner part
Seatbelts out, and seat bracket removed on RH rear ready to cut the floor out, when new one is ordered
Quarter bumpers off, absolute PIGS!!! Ended up grinding one bolt off, drilling the bolt out of the bumper gradually and will be re tapped, if the bumper cleans up well enough to be re fitted
Perfect new battery seating, extra strength on top of the new floor
Plating Metal for small patching
Finally, and it doesn't show on this pic well, but don't you just love looking at the floor, through the holes in the crossmember!! Lot of bad rust under the crossmember
That's about it for now!!
Enjoy reading and let me know what you think
JK
Edited by mini_legend, 27 April 2011 - 06:56 PM.
#34
minidream94
-
- Members
-
- 1,233 posts
One Carb Or Two?
Posted 27 April 2011 - 06:41 PM
youve posted the last picture twice jon :L
looks good though fella
looks good though fella
#35
mini_legend
-
- Members
-
- 395 posts
Speeding Along Now
- Location: Hull
- Local Club: Outcast Car Club
Posted 27 April 2011 - 06:54 PM
Got both minis garaged now after the garage tidy out courtesy of my loving parents


Betty is the project and Winston is my 92 city e
JK
Betty is the project and Winston is my 92 city e
JK
#36
mini_legend
-
- Members
-
- 395 posts
Speeding Along Now
- Location: Hull
- Local Club: Outcast Car Club
Posted 27 April 2011 - 06:57 PM
Sorted nick 
Cheers pal
JK
Cheers pal
JK
#37
mini_legend
-
- Members
-
- 395 posts
Speeding Along Now
- Location: Hull
- Local Club: Outcast Car Club
Posted 29 April 2011 - 08:44 PM
Us owners always say buy a mini with the best bodywork you can, and worry about the engine. Well, I knew the engine ran, (once we wired it up correctly) but had it just running on tickover today and jesus it isn't looking/sounding good! The engine is smoking even in the short few seconds it was running and its tapping like a bitc*!! Haven't had a full strip down yet, as I don't have a standard rad yet, still using the huge one. Gonna get it properly cooled and tappets set properly etc etc and see what comes of it.
I'm really hoping that it turns out to be ok, as its a rare 1098, and I would really like to keep it. Might end up buying a 1275 to stick in for a while, as it'd be cheaper than a rebuild (budget mini man I am ) but will get it rebuilt to go in, later on
JK
I'm really hoping that it turns out to be ok, as its a rare 1098, and I would really like to keep it. Might end up buying a 1275 to stick in for a while, as it'd be cheaper than a rebuild (budget mini man I am
) but will get it rebuilt to go in, later on JK
#38
mini_legend
-
- Members
-
- 395 posts
Speeding Along Now
- Location: Hull
- Local Club: Outcast Car Club
Posted 14 May 2011 - 05:25 PM
As we all know grinding rotten panels out and creating smooth edges for new ones to fit is childsplay!! If only lol. Had no updates for a while, but not really got much done, but I have now, after some Himley Hall investments! My sister is also on study leave, so I can get parts ordered for postage wohoo.
Good days work today then, where to start! Fitted rad and filled up (will be coming off for paint etc, but just while we do diagnostics) had engine running, runs well, but has so little fuel it run whilst the easy start is been sprayed then cuts out. Might be needing new 1098, but it's long way off, body work calls! lol.
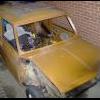
Got the front doors off and out the way, they'll get sorted out once body work is rot free!! From Himley I also got some floors, so work began today on them! pics speak louder than words so i'll just let you look


We have specific roles on the mini! well not really, but as I'm still learning to do bits like weld, my dad welds, I get covered in Sh*t grinding, painting filling etc etc etc!! lol

Drivers Sill off

Rear bin first patch!!!

Front Drivers floor out, the hard work is getting the new one to fit, by the looks of it, part of the previous floor is still around the edges, so I'm grinding and then placing to see how much more to take back, and repeating, few brown trouser moments especially when the grinding disc smashed, fortunately not into me!!

So, tomorrows plan is hopefully get the outer patch of rear bin weld ground, smoothed, rust beatered, painted .... Front floor fully ground out, and new floor welded in place
Woohoo!
Shopping list is now, passengers front floor (all 4 in total ) rear valence (the whole lot) and two sill ,RH and LH !!! SPEND SPEND SPEND££££ lo l
JK
wohoo. Good days work today then, where to start! Fitted rad and filled up (will be coming off for paint etc, but just while we do diagnostics) had engine running, runs well, but has so little fuel it run whilst the easy start is been sprayed then cuts out. Might be needing new 1098, but it's long way off, body work calls! lol.
Got the front doors off and out the way, they'll get sorted out once body work is rot free!! From Himley I also got some floors, so work began today on them! pics speak louder than words so i'll just let you look
We have specific roles on the mini! well not really, but as I'm still learning to do bits like weld, my dad welds, I get covered in Sh*t grinding, painting filling etc etc etc!! lol
Drivers Sill off
Rear bin first patch!!!
Front Drivers floor out, the hard work is getting the new one to fit, by the looks of it, part of the previous floor is still around the edges, so I'm grinding and then placing to see how much more to take back, and repeating, few brown trouser moments especially when the grinding disc smashed, fortunately not into me!!
So, tomorrows plan is hopefully get the outer patch of rear bin weld ground, smoothed, rust beatered, painted .... Front floor fully ground out, and new floor welded in place
Woohoo!
Shopping list is now, passengers front floor (all 4 in total
) rear valence (the whole lot) and two sill ,RH and LH !!! SPEND SPEND SPEND££££ lo lJK
#39
mini_legend
-
- Members
-
- 395 posts
Speeding Along Now
- Location: Hull
- Local Club: Outcast Car Club
Posted 15 May 2011 - 06:30 PM
Didn't get the floor in today, thanks to student finance application taking fourmillion years! ahhhh lol. done now tho, now I know HOW poor i'm gonna be lol.
Got a few piccies of the bits done tho
More coming out of this arch, but ran out of time today

Floor fits well, needs welding in now

Rear bin work


Needs rubbing down, small filler over a weld for aesthetics

External arches


Post

That's all for now, let me know what you think, and any advice is more than welcome
Cheers
JK
Got a few piccies of the bits done tho
More coming out of this arch, but ran out of time today
Floor fits well, needs welding in now
Rear bin work
Needs rubbing down, small filler over a weld for aesthetics
External arches
Post
That's all for now, let me know what you think, and any advice is more than welcome
Cheers
JK
#40
mini_legend
-
- Members
-
- 395 posts
Speeding Along Now
- Location: Hull
- Local Club: Outcast Car Club
Posted 15 May 2011 - 06:34 PM
Looks like a good project
RH over sill is off and ready for the Bin men
, might actually weigh it in hahaha, the amount I'll have once I've cut all floors out etc, the price of steel lol.but the other is coming off too, for 4.5 inch sills
USed them on my saloon and they wer alright to work with.
JK
#41
mini_legend
-
- Members
-
- 395 posts
Speeding Along Now
- Location: Hull
- Local Club: Outcast Car Club
Posted 19 May 2011 - 07:35 PM
Engine Ancillaries stripped. Carb, manifolds etc not off yet, but will be coming off.

Floor tac'd in

Treated myself to a auto darkening mask

So, just a few bits done now, but taking shape steadily, well, less shape really lol.
Ohhh, and the engine is fine, running beautifully now fuel is in (which will need draining now ) so the strip down goes ahead knowing it works Compression test proved perfect, all 4 cylinders the same, tappets perfect
JK
click here to see here running
Floor tac'd in
Treated myself to a auto darkening mask
So, just a few bits done now, but taking shape steadily, well, less shape really lol.
Ohhh, and the engine is fine, running beautifully now fuel is in (which will need draining now
) so the strip down goes ahead knowing it works Compression test proved perfect, all 4 cylinders the same, tappets perfect JK
click here to see here running
Edited by mini_legend, 19 May 2011 - 07:56 PM.
#42
mini_legend
-
- Members
-
- 395 posts
Speeding Along Now
- Location: Hull
- Local Club: Outcast Car Club
Posted 29 May 2011 - 05:07 PM
Been a while, but there is more progress.
Floor 1 of 4 is in! wooohoo lol. But more and more is unearthed with this mini, not big things just more rust and sh'tty holes really lol. ahh well, heres some pics


the next one to be done! arghhh lol

From underneath

And been doing a fair bit of engine cleaning up too, compare to earlier pics and its a million times better, well in my opinion anyhow
Before

as of now, but obviously not complete , and the rocker is just still on to keep dust and dirt out, will be ground back to bare metal and left, much like the gearbox and sump

Rad stripped and then sprayed, and fan cleaned up nicely, and bracket painted

Manifold sprayed with aluminium VHT paint

hopefully get the back drivers floor (the worst) out next weekend, and make a start on assessing the fun its gonna be fitting the new one lol. Hard to fit new metal, when most of it has to come out lol.
Happy reading, and as always, I appreciate to hear what you think, or any tips
JK
Floor 1 of 4 is in! wooohoo lol. But more and more is unearthed with this mini, not big things just more rust and sh'tty holes really lol. ahh well, heres some pics
the next one to be done! arghhh lol
From underneath
And been doing a fair bit of engine cleaning up too, compare to earlier pics and its a million times better, well in my opinion anyhow
Before
as of now, but obviously not complete , and the rocker is just still on to keep dust and dirt out, will be ground back to bare metal and left, much like the gearbox and sump
Rad stripped and then sprayed, and fan cleaned up nicely, and bracket painted
Manifold sprayed with aluminium VHT paint
hopefully get the back drivers floor (the worst) out next weekend, and make a start on assessing the fun its gonna be fitting the new one lol. Hard to fit new metal, when most of it has to come out lol.
Happy reading, and as always, I appreciate to hear what you think, or any tips
JK
#43
blacktulip
-

- TMF+ Member
-
- 6,221 posts
Crazy About Mini's
- Location: Braintree
Posted 29 May 2011 - 10:51 PM
wow this clubby estate looks like mine and its the same year, except yours in a lot more solid than mine. i should be making a start on mine soon
#44
mini_legend
-
- Members
-
- 395 posts
Speeding Along Now
- Location: Hull
- Local Club: Outcast Car Club
Posted 30 May 2011 - 08:43 AM
wow this clubby estate looks like mine and its the same year, except yours in a lot more solid than mine. i should be making a start on mine soon
I just spotted your project about 5 minutes ago, will comment so I can follow mate. It will be a good comparison for each of us. What time scale do you have on yours?? i thought mine was a state, just bought all this lot last night, won't be quick work, but engine is all but ready to go back together, so I can keep it running throughout the winter. However, petrol tank will be coming off when floors are done, to do rear valence!! Sooooooo much work, I mmust be mental lol
MS16L - DOOR STEP SHAPED PANEL MK3 LH
MS25L - FRONT FLOOR PAN L/H PRESHAPED
MS23 - VALANCE CENTRE APRON VAN & ESTATE MS52R - VALANCE APRON CORNER R/H VAN AND ESTATE
MS52L - VALANCE CORNER APRON L/H VAN AND ESTATE
14A9026 - SILL PANEL R/H VAN&ESTATE mk3 profile 4" wide 14A9027 - SILL PANEL L/H VAN&ESTATE MK3 profile 4" wide
GTG101MS - ORIGINAL SHAPE THERMOSTAT GASKET
AJM601 - MANIFOLD GASKET INLET/EXHAUST
AEC2083 - GASKET 1.5" CARB TO MANIFOLD
GFE6003MS - OIL FILLER CAP BREATHER TYPE NON GENUINE
GTS106 - THERMOSTAT 88 C
GUG705009VC - GASKET ROCKER COVER EXCEPT 11 STUD HEAD
GRC102 - RAD CAP 7LB SHORT NECK 850
£126 well spent lol
This on top of the 3 other floors I already had yay. All the panels I need to finish the body work. Ohh wait, roughly £400 worth of clubman front panels lol
JK
#45
woodenman23
-

- Noobies
-
- 299 posts
Mini Mad
Posted 30 May 2011 - 08:59 AM
Good, luck with all that.
There seem to be a fair few clubby estate projects at the moment, a good thing keeping the breed alive.
The front panels for a clubman are so expensive, I have just had to fork out for every single front panel.
There seem to be a fair few clubby estate projects at the moment, a good thing keeping the breed alive.
The front panels for a clubman are so expensive, I have just had to fork out for every single front panel.


0 user(s) are reading this topic
0 members, 0 guests, 0 anonymous users


