don't lose that p clip on number 1 spark plug 


Project Zippy - Mk1 1981 Midas Project.
Started by
MrBounce
, Aug 03 2011 09:51 PM
714 replies to this topic
#466

jonlad
-
- TMF+ Member
-

- 313 posts
Speeding Along Now
- Location: Cheshire
Posted 04 December 2017 - 07:06 PM
#467
MrBounce
-
- TMF+ Member
-
- 2,562 posts
Up Into Fourth
- Location: The Manroom in Ipswich
Posted 31 December 2017 - 12:38 PM
There will be precious little work done on Zippy in the next month or so as we have the delights of a house move to sort out. That said, I have managed to do one small thing I have wanted to do since buying the car: sort the fuel cap properly. The problem I had wasn't the cap itself - I'd reconditioned it by giving it a coat of fresh paint and replacing the knackered foam with some fuel-proof rubber. That said, it wasn't perfect and the seal was knackered. All the Triumph TR7 specialists do not stock a new seal for the big cap (this was only used on the early TR7 fixedhead models for about 18 months) and I have never been able to find one on the bay of e. I then decided to search on the TR7 forum on the off chance. It turns out that one of the members has indeed commissioned new ones at the decent price of £12.50 including delivery. So a brief email exchange and some excellent work by Postman Pat saw the new items on my doormat yesterday.
Fitting was relatively straightforward (although getting the screws undone is awkward as you have to angle the screwdriver), and it was eventually all back together and looking VERY smart. I shall report more once Zippy has been moved to his new home.
New seal and foam backing obtained from the extremely helpful TR7 forum

Old seal really was in a dreadful state

All fitted back together on the bench

And a view from the front. Lovely.

#468
MrBounce
-
- TMF+ Member
-
- 2,562 posts
Up Into Fourth
- Location: The Manroom in Ipswich
Posted 20 January 2018 - 02:50 PM
As there 's an imminent house move in the Bounce household, Zippy needed to go to a "temporary new home" as I really didn't want to juggle all the fun of moving house along with the delights of car/trailer interfacing on the same day. What did I do in this situation? Call on my car-friendly mates, that's what. So Mr T, the Man of the Chair & Plank all popped round with a Volvo and a trailer plus the necessary muscle to get it up the ramps. Typically we'd chosen the worst possible day for all this - it was absolutely chucking it down. All that was needed was the kettle and a tub of Roses to keep everyone happy.
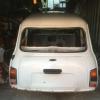
Zippy was easy enough to get out of the garage, down the driveway and on to the ramps, mainly because I currently live on a hill, but also because of the fact that he weighs about the same as a crisp packet with wheels. He was soon up in the trailer and strapped down. Given that the trailer was specifically designed for Mini transportation, and Zippy's that little bit longer, it was a tight squeeze length-wise but all was soon sorted. I will get him back one we've moved in to our new pad.
Out of the soon-to-be-old garage.

Belligerent orange Midas ignores driveway sign in pouring rain.

In the trailer and strapped down. Time for a voyage!

It was a bit tight in there!!

Edited by MrBounce, 20 January 2018 - 02:56 PM.
#469
MrBounce
-
- TMF+ Member
-
- 2,562 posts
Up Into Fourth
- Location: The Manroom in Ipswich
Posted 16 February 2018 - 05:02 PM
New house (well bungalow, actually), new garage, new home for Zippy.

#470
MrBounce
-
- TMF+ Member
-
- 2,562 posts
Up Into Fourth
- Location: The Manroom in Ipswich
Posted 28 March 2018 - 12:49 PM
Hi guys and gals.
I don't want you all to think that I've been doing nothing over the past few weeks or ignoring my project. There's been a massive amount of work needed to sort the garage, I've been on holiday and I have now just come out of hospital after contracting pneumonia. I hope to be able to give you an update on Zippy in about 2 weeks once I feel a bit more like me, but for now Mrs Bounce says I've got to stay inside and get better. So in the meantime I will be fighting this infection with more drugs than Lance Armstrong ever had, and most likely looking at loads of silly things on YouTube. I have deliberately left the credit card in the wallet otherwise I would be surfing the net to buy car stuff I don't need...
See you soon 
#471
jonlad
-
- TMF+ Member
-
- 313 posts
Speeding Along Now
- Location: Cheshire
Posted 28 March 2018 - 05:42 PM
Get well soon MrBounce!
Hope you have a speedy recovery and can get back to the project soon!
#472
jonny f
-

- Members
-
- 1,485 posts
One Carb Or Two?
- Location: Surrey
- Local Club: Boxhill Mini Club
Posted 31 March 2018 - 12:33 AM
Get well soon fella.
#473
MrBounce
-
- TMF+ Member
-
- 2,562 posts
Up Into Fourth
- Location: The Manroom in Ipswich
Posted 07 April 2018 - 02:41 PM
Well I have to say a big thank you to all for your good wishes. I can confirm that Pneumonia is pretty horrible and don't recommend it to anyone! I am now back on to "light duties" and as such have been doing a bit in the Manroom again. Whoop!
One thing I really disliked about Zippy was that half of the fuel tank is held on my screws. My first thought was having a spreader plate with captive nuts, but this is nigh on impossible to achieve due to the area being an enclosed box section. Instead I have gone for a "belt and braces" approach of Rivnuts and epoxy resin. I didn't want them to fall out as the fibreglass is quite thick here, so out came the tank, followed by a bit of drilling. I then applied epoxy resin to the holes and the Rivnuts before fitting them as normal. I doubt they'll go anywhere...
Staying on the subject of fuel, Zippy will be running a Facet Electric Fuel Pump, and I needed to find myself a fuel pressure regulator to keep things as they should be. I found one from an awesome seller on eBay (yes they DO exist!), and once it arrived I just needed to find somewhere to put it. I decided that as there's precious little room under the bonnet, under the wiper motor on the bulkhead would be a perfect place. Some CAD with a Jaffa Cake box saw it replicated from a scrap of steel, and some more quick work with the drill saw all the appropriate holes sorted. A trial fit worked really well, so now it's drying off having been painted. Next job will be sorting some fuel pipes.
Tank out - to sort the fixings

Rivnut trial fitted before adding epoxy resin

Fuel Pressure Regulator - I need to put this somewhere

Bracket concocted from scrap steel

Trial fit - looking good. Bracket now in paint.

#474
MrBounce
-
- TMF+ Member
-
- 2,562 posts
Up Into Fourth
- Location: The Manroom in Ipswich
Posted 14 May 2018 - 07:01 PM
Let's talk about horns. Initially I wanted to use a set of air horns on Zippy, but from what I remember you cannot use just an air horn on a car of his age, so I would either have to use a standard horn or a combination of both that and an air horn. This lead me to another problem (normal with this car) - space. There is not a lot. Having decided that a decent loud "normal" horn would be the best way forward, my brother bought me a pair of high/low tone horns from CBS. I have tested them. All I need to say is that "Holy **** they're rather noisy". I will not be needing air horns.
Now, where to put them?? My initial thought was somewhere close to the radiator, but with the fan and the oil cooler in place, space is at a premium. So I concentrated on higher up in the engine bay. The offside inner wing fairly close to the bulkhead provided an adequate empty area, so a bit of measuring saw a CAD template made. This was turned into steel, drilled and bent to shape, before being painted. A couple of rivnuts and all was ready to go on. I'm happy. Wiring will follow.
A suitably empty space for the loud pair.

Jaffa Cake Box + Steel

Paint!

Rivnuts

And finally, HORNS!

#475
MrBounce
-
- TMF+ Member
-
- 2,562 posts
Up Into Fourth
- Location: The Manroom in Ipswich
Posted 01 June 2018 - 10:33 AM
I've been fed up with the lack of progress this year, so I felt that if I sorted out the seat mounts, I could then sort out carpets and actually start feeling like I've actually got somewhere and have something to show for it. The trouble with an old kit car built by someone else means that any changes usually need a complete re-think or rework, which is why things have taken a while - it's not simply a matter of bolting stuff back together. Anyway, I digress. The buckets I have acquired are flat-bottomed and although I can bolt runners to the bottom of them, there's then no clearance for them to clear the carpet. And so began the simple but rather fiddly job of creating something.
The solution was easy - a long bit of 2"x 2" box section steel. Once I'd measured the runners, out came the hacksaw and 2 blades later I had 4 bits ready to be drilled. How I coped before I got myself a pillar drill I'll never know - it's potentially the most useful power tool I have in the garage. My initial plan was to weld captive nuts inside so I could simply bolt the runners in but there's no clearance to get a spanner in to tighten up the bolts. In fact you can't actually move the bolt head through 360 degrees once it's home, so I went back to more conventional methods.
I then realised that the runners themselves needed clearance on the seat base due to the adjusters, which meant I needed spacers and longer bolts. I popped to the local bolt shop (yes we have one!!) and grabbed 8 bolts and 8 spacers for the grand total of £1.30. I like to support my local business, even if it does mean taking a 5-mile detour to avoid the traffic from the local Agricultural Show (and there was a lot!).
I've now drilled the other side of the 2x2 to accept bolts to go through the floor. Next job, measuring, drilling, fitting, and sitting. Maybe then I can take advantage of this good weather and make some carpets...
Flat bottomed seat - no good for clearance

Runners - also flat (ish)

Length of 2x2 to give appropriate clearance

Longer bolts and spacers from the helpful local bolt shop

And happily bolted to the seat

#476
MrBounce
-
- TMF+ Member
-
- 2,562 posts
Up Into Fourth
- Location: The Manroom in Ipswich
Posted 03 June 2018 - 02:48 PM
Right now, I am in the process of filling the imaginary swearbox in the garage (there's no point in me actually having one as it would always be full and I'd never have any spare cash). I have discovered a slight issue with the seat mods that I have done. I trial fitted them in the car - they looked great. I then sat in them. I don't fit. It turns out, that at 5ft 8 1/2" of superbly proportioned (ahem) height, I am too tall for the current configuration. A Midas is indeed a VERY small place to be.
I will therefore try to fit them using the just runners and without the additional box section steel I spent half an afternoon fitting. To quote Bill Murray in Ghostbusters: "Motherpusbucket".
#477
MrBounce
-
- TMF+ Member
-
- 2,562 posts
Up Into Fourth
- Location: The Manroom in Ipswich
Posted 01 July 2018 - 08:08 PM
I have decided that I will come back to the seat issue. It has bugged me for a while, so much so that I shut the Midas in the garage, enjoyed the sunshine a bit and sulked about the Midas. A lot.
Whilst trying to figure out something else to do to get some motivation back, I turned my attention to the front lights. Well, the headlight covers, to be more precise. Now mine were in a real state - they were not attached to the car properly when I got it - just jammed in place and there were holes from where some form of fixing had been used and had long since disappeared. Time to repair and rejuvenate!
I made some tape-covered cardboard sections up and fixed them over the holes, then out came the chopped strand mat (cut into appropriate sections) and the last of the resin I had on the shelf. Luckily I had enough to sort the holes, and once dry I was able to easily peel off the card. A little bit of filler followed, then my favourite thing - sanding.*
I then needed to line them up correctly and make some holes. Using the existing holes in the bodywork, I was able to mark the fresh fibreglass then make a hole in it for an appropriate fixing other than a blinking self-tapper (it seems that the previous owner put them EVERYWHERE). A coat of primer then followed. Once this is dry I shall paint them properly in satin black. At least it'll dry quickly - it was close to 30 degrees in front of the garage...
Headlight covers as found - lots of holes and imperfections.

Midway through fibreglassing

Marked for drilling (the white dot in the middle)

Bigger hole made

Test fitting

And a coat of primer

*This is as far from the truth as you can get...
Edited by MrBounce, 01 July 2018 - 08:17 PM.
#478
Udo
-

- Members
-
- 1,670 posts
Camshaft & Stage Two Head
- Location: Lincoln
Posted 02 July 2018 - 12:00 PM
Are you putting something into the fiberglass of the surround to put a thread into, Rivnut or similar?
#479
Ken555
-

- Noobies
-
- 59 posts
Stage One Kit Fitted
- Location: Aberdeenshire
Posted 02 July 2018 - 08:05 PM
Do you know what runner those are ?
Looks like the same as I have in the GTM and I need replacements.
#480
Udo
-
- Members
-
- 1,670 posts
Camshaft & Stage Two Head
- Location: Lincoln
Posted 03 July 2018 - 11:13 AM
Do you know what runner those are ?
Looks like the same as I have in the GTM and I need replacements.
I sold Bounce the runners, they came on my car when bought so don't know where they originate from


1 user(s) are reading this topic
0 members, 1 guests, 0 anonymous users


