Jump to content


Photo
- - - - -

Project Zippy - Mk1 1981 Midas Project.


  • Please log in to reply
714 replies to this topic

#541 MrBounce

MrBounce

    Up Into Fourth

  • TMF+ Member
  • PipPipPipPipPipPipPipPipPip
  • 2,562 posts
  • Location: The Manroom in Ipswich

Posted 28 December 2019 - 04:26 PM

There are very few things that make me REALLY angry in this world. Without getting political, such things as excuses for human beings who steal from old people, drunk drivers and people who take and never say thank you. But the one thing that REALLY grates my plums? Me, and my ability to think far ahead without checking things first.
 
I have been doing more minor bits of dashboard work. First thing was the top area around the dials. I had managed to cut it slightly different to the lines I'd drawn, which meant too much was cut off. A little bit of work saw me add some back on using cardboard guides coated in tape and some P40. A bit back-street garage, but seeing as this "bit" will be covered anyway, it'll be fine once sanded to shape. After a short search on the interwebs I have also managed to get hold of 4 brand new Mini rocker switches - for headlights, fogs, brake test and hazards. The connections for these are already in the wiring loom so it should be no trouble fitting these.
 
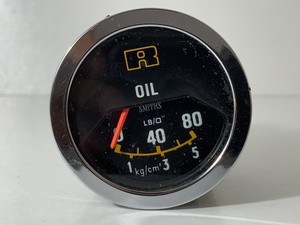
I then moved on to the set of Jaguar gauges. My plan here was to use the oil pressure gauge, clock and voltmeter. There was no need for the others as they were already part of the speedo cluster. So I set about taking apart the pack, expecting to find 5 separate gauges. No such luck. Had I done my research, I would have realised that they're all integrated into a large plastic cluster. Instead of having what I wanted, I am going to have go back to square one and get some separates. Its all my own fault - I didn't do my research carefully enough. Assumption is the mother of all *******-ups and all that. I therefore stamped my feet, put another couple of quid in the swear box and locked the garage.
 
Making sure that the bits I accidentally cut off are put back on. Much filing and sanding will follow.
 
xXk75aR.jpg
 
Ooooh! New switches!
 
HtZoY52.jpg
 
Jag gauges ready to be taken apart...
 
uUDdpRb.jpg
 
...only to reveal they're not what I thought they were. Nuts.
 
4OXKA4B.jpg


#542 KTS

KTS

    Up Into Fourth

  • TMF+ Member
  • PipPipPipPipPipPipPipPipPip
  • 2,257 posts
  • Location: Herts

Posted 29 December 2019 - 10:52 AM

just a thought, but would a cut and shut to convert it to a 3 gauge pod be an option ?  


#543 Ethel

Ethel

    ..is NOT a girl!

  • TMF Team
  • PipPipPipPipPipPipPipPipPipPipPip
  • 25,406 posts
  • Local Club: none

Posted 29 December 2019 - 11:07 AM

They're too purty to cut up  :wub:  (if it fits)


How about putting a rev counter in a 2 clock binnacle if you're using a Mini speedo? Or you could shuffle 'em about and repurpose a couple of the holes with rotary switches, vents.....


#544 MrBounce

MrBounce

    Up Into Fourth

  • TMF+ Member
  • PipPipPipPipPipPipPipPipPip
  • 2,562 posts
  • Location: The Manroom in Ipswich

Posted 02 January 2020 - 09:58 PM

A different point of view is often a good thing. I went to see my friend to help him with some minor work on his VW Type 2 - removing and replacing the steering track rod (it's very long!) and taking off the exhaust back box, which was blowing, dented and just plain nasty. Easy work once the balljoints had been split.
 
I picked his brains about what to do with the dashboard and he had a look in his (pretty large) stash of Mini bits. Out came a 3-pod clock (admittedly missing a needle on the rev-counter) and an oil pressure gauge. I will need to source a voltmeter at some point but he also gave me a few different ideas of where to put stuff. More planning is afoot. And more sanding, drilling and filing!!
 
A bit of a different perspective, but new parts and ideas have certainly helped  :mrcool:
 
sPhnXUv.jpg


#545 GraemeC

GraemeC

    Crazy About Mini's

  • TMF+ Member
  • PipPipPipPipPipPipPipPipPipPip
  • 7,313 posts
  • Location: Carnforth

Posted 03 January 2020 - 07:46 AM

I might have a spare voltmeter - I’ll have a shufty through my box of gauges.


Edited by GraemeC, 03 January 2020 - 07:47 AM.


#546 MrBounce

MrBounce

    Up Into Fourth

  • TMF+ Member
  • PipPipPipPipPipPipPipPipPip
  • 2,562 posts
  • Location: The Manroom in Ipswich

Posted 05 January 2020 - 04:45 PM


I might have a spare voltmeter - I’ll have a shufty through my box of gauges.


Thank you Graeme - no rush though!

 
I popped back in the garage this afternoon for some gentle dashboard work. Or gauges, if you prefer. But today of course was one of those days where if anything was going to go wrong, it would. Allow me to elaborate.
 
The rev counter I now have has no needle on it. I figured I could easily fix it by removing the speedo needle from the clocks I already have. SO out came my gentle plastic trim removal tools and I started gently persuading it out. It was very tight and very stubborn. Eventually, it gave up and let go. Or so I thought. Nope, it had snapped the little prong that the needle sits on. Great. 
 
I managed to get the prong out of the needle with some gentle work with some needle nose pliers, then set about putting it on to the rev counter. And I ran into yet another issue. At some stage Austin / Austin Rover / The Rover Group or whatever they were called that week had changed their design oh so slightly. The outside diameter of the old-style needle? 3mm. The diameter of the hole it had to go into in the newer-style clocks? Yup, 2mm. I thought I would be clever and gently file it down using a needle file (geddit?!). Did this work? Nope. All it did was collapsed the plastic so now I can't use it at all. It was at this point that I shut the garage door and walked away.
 
Anyone got a 90s Cooper-style rev counter going cheap?
 
Rev counter came without a needle
 
2AH0jx6.jpg
 
So I thought I would be clever, and use the needle from my other speedo. Instead I broke bits and got frustrated.
 
JMZOdRn.jpg


#547 KTS

KTS

    Up Into Fourth

  • TMF+ Member
  • PipPipPipPipPipPipPipPipPip
  • 2,257 posts
  • Location: Herts

Posted 05 January 2020 - 06:39 PM

..might be worth messaging MiniJosh92 to see if he's got anything ?


#548 MrBounce

MrBounce

    Up Into Fourth

  • TMF+ Member
  • PipPipPipPipPipPipPipPipPip
  • 2,562 posts
  • Location: The Manroom in Ipswich

Posted 16 February 2020 - 05:07 PM

I have decided that I do not like gauges. Or, more specifically, old gauges in various states of "Nope". I have decided to revert to my initial plan of the two-gauge pod in the dashboard, as I have had enough of man-sausaging about with trying to sort a working 3-pod rev counter. I do have a 52mm rev counter, which has never been used. I just thought that perhaps a 3-podder would have been easier. Sadly, today they are not as easy to come by, and when they do turn up they're often silly money. I can practically buy a digital speedo for some of the prices asked. I shall leave those overpriced Cooper items to the originality fans. Also, with the youngest being 20 years old, condition is not always going to be the best, especially with the ones I don't have to give my left plum for.
 
I thought that it would be pretty easy to simply transfer the innards of a GT rev counter into the pod of a 90s Cooper rev counter. Sound easy? it isn't. The plastic pods they mount in are different. The actual body of the rev counter is different (and by some margin). And, to all insult to injury, the printed circuit boards are massively different. So I will continue with a 2-pod set of clocks and use my smaller rev counter.
 
I turned my attention to the two other small gauges I have. The voltmeter I have (which looked great cosmetically) was not so great inside when I went to clean it. In fact it may have been stored in a small pool of water for some time. So that's in the bin. I am also not keen on the oil pressure gauge I have acquired. So I am once again on the lookout for some different items, and I have got no further with my dashboard. Nuts.
 
1275GT casing is similar but different enough to 90s Cooper casing to make it unworkable.
 
Wutof8b.jpg
 
Cooper Rev counter innards extremely different to 1275GT innards. PCBs are different too. 
 
MaI0o9A.jpg
 
Even the two smaller gauges were no good. Don't like the look of the Oil Pressure Gauge and the Voltmeter, although cosmetically nice, was scrap inside.
 
cXtRFSI.jpg


#549 Udo

Udo

    Camshaft & Stage Two Head

  • Members
  • PipPipPipPipPipPipPipPip
  • 1,670 posts
  • Location: Lincoln

Posted 18 February 2020 - 03:06 PM

Bounce I have a oil pressure gauge and a voltage gauge in my spares


Matching pair, 52mm diameter, if i remember correctly even have some orange on them, smiths dials, do have a "R" on the face as "think" they came out of a reliant ???


Chrome bezels


were working when taken from mine for digital


#550 Udo

Udo

    Camshaft & Stage Two Head

  • Members
  • PipPipPipPipPipPipPipPip
  • 1,670 posts
  • Location: Lincoln

Posted 18 February 2020 - 03:11 PM

s-l300.jpg


Look like that


#551 MrBounce

MrBounce

    Up Into Fourth

  • TMF+ Member
  • PipPipPipPipPipPipPipPipPip
  • 2,562 posts
  • Location: The Manroom in Ipswich

Posted 21 February 2020 - 08:05 PM

OOOH Yes please! Have dropped you a Pm and we'll sort something out. Thanks Udo  :D  :D  :D


Well as I was so annoyed with the dashboard work, and I'd got an expenses claim approved at work (a rare thing in my job...), I did a bad thing and ordered a few things from Mini Spares, because, well, you know, THE EXCITEMENT OF GETTING A BIG BOX! One thing that's bugged me was the lack of an exhaust. The original Midas exhaust from the factory from what I understand is a bit of a pea shooter and the likelihood of finding one is somewhat small. And having waited for a secondhand exhaust to experiment on for FAR too log, I figured it was time to do something. So I bought a twin box RC40. Now, I know this is not likely to fit properly, but I figure that with a little bit of adjustment (cutting and welding here and there) and maybe a couple of extra bits of pipe, I should be able to sort something that is perfectly usable and isn't a complete Frankenstein of a system.
 
Other things in the box were an oil pressure pipe and adaptor, an exhaust fitting kit and a pair of 3mm spacers for the rear wheels - if I go down the route of 165 tyres I want to be sure of clearance. Finally, Tink gave me a special prezzie - an aircraft-style switch, which I will probably use for the fuel pump. Epic.
 
Voltmeter bolt was so rusted on to the stud, that instead of it coming free, it ripped the inside out. I thought it was undoing too easily...
 
SkIIri4.jpg
 
BIG Mini Spares box, which included...
 
jsX0BqL.jpg
 
...An RC40 twin box system and fitting kit...
 
SAU3gdZ.jpg
 
...an oil pressure pipe and adaptor...
 
1MPzWIg.jpg
 
...and a pair of 3mm spacers for additional clearance without the need for new studs.
 
UF3r1Rf.jpg
 
Plus Tink gave me this awesome switch. I think I should put a transfer on it. But what???
 
niGTIDx.jpg

Edited by MrBounce, 21 February 2020 - 08:08 PM.


#552 panky

panky

    Camshaft & Stage Two Head

  • Members
  • PipPipPipPipPipPipPipPip
  • 1,776 posts
  • Location: Cheshire
  • Local Club: Northwest Casual Classics

Posted 22 February 2020 - 12:08 PM

Bombs away


#553 MrBounce

MrBounce

    Up Into Fourth

  • TMF+ Member
  • PipPipPipPipPipPipPipPipPip
  • 2,562 posts
  • Location: The Manroom in Ipswich

Posted 22 March 2020 - 09:54 PM

It would appear that I could be about to have more time on my hands given the likelihood of being sent home from work due to health concerns. As such I spent a day or so clearing up my mess in the garage and then turned my attention to the mess of gauges and similar gubbins on the workbench. I knew that unless I pay through the nose for them, I am not going to get a Cooper-style set of clocks, so as I already have a 52mm Rev Counter, I would continue with that and use the 2-pod gauges I had already cut a hole for. Trouble was, the 15 or so years that they'd been in a box in a garage had left them in a bit of a filthy state.
 
What to do? I am nothing if not careful when I don't have a power tool or hammer in my hands (I recently counted that I have 17 hammers so I suppose this could count as dangerous), so I thought I'd take everything apart and give it all a good clean. Step one - remove all bulbs from the back of the pod. A simple gentle twist 7 times and they were all out. Then it was time to remove the printed circuit board. These are no longer available, so I needed to be really diligent. They're kept in place by three different means - there's a number of screws holding it down, the bulbs as previously mentioned and then there's a bunch of locator pins which the pcb fits on. I removed the screws one by one, and found that there were 2 that were different sizes to the others. This also released the entire fuel and temperature gauges within the pod. Once I'd removed all the screws I spent a LONG time gently prising the pcb off over the locator pins. 
 
Once it was off, I got out the electrical contact cleaner and spent several minutes making it look a lot more like it did when it left the factory. I also set about the pod itself with a rag, some white spirit and some cotton buds. It took a while, but eventually it looked a lot cleaner. There were 2 strange little brackets that had come out from behind the temp/fuel gauges, and I figured out these were to do with the different sizes screws. They could only go back in one way, so once I'd realised this, "refitting was the reversal of removal". 
 
Now I have a nice clean set of gauges, I need to start messing about with the dashboard again.
 
Dirty clocks with bulbs removed
 
aiaNj6s.jpg
 
They're FILTHY!
 
ENNhXPm.jpg
 
Pod staring to look a little better
 
lyA7FWe.jpg
 
PCB in the process of being cleaned, thanks to...
 
gTkxsBE.jpg
 
...this wonderful stuff!
 
2wG6IWI.jpg
 
Odd little brackets which fitted behind the fuel & temp gauges and used the smaller screws.
 
XuWHGc6.jpg
 
And ain't she pretty??
 
D1Ln7Tq.jpg


#554 MrBounce

MrBounce

    Up Into Fourth

  • TMF+ Member
  • PipPipPipPipPipPipPipPipPip
  • 2,562 posts
  • Location: The Manroom in Ipswich

Posted 03 April 2020 - 01:12 PM

I went to have a look at doing a test fit of the exhaust to see what needs modifying and where. As is normal with this car, I came across an immediate problem, mainly due to the delights of eBay. As I didn't have the funds to pay for a new Maniflow LCB manifold, I managed to get hold of one via eBay, which helpfully came to me with a Y-piece connector. I didn't look at it that closely when it arrived a few years ago, so when I finally clapped eyes on it again, I quickly realised that it wasn't a Maniflow item. This is not a problem in itself as it fits the LCB prefectly well.
 
However when it came to attaching the front pipe of the RC40 exhaust I've bought, it did not work too well. In fact it was virtually impossible. I measured the diameter of the pipes and found the difference between the inside of the Y-piece and the outside of the RC40 to be 0.1mm, which is not a lot of clearance. All the decent Y-pieces available had slots in the end of the pipe to aid fitment. Mine did not. So out came the angry grinder and I cut 3 small slots in the end, filing them afterwards to remove any burrs. This enabled a little expansion where it was needed and I was able to fit the front pipe in. It is a very close fit, but it shouldn't (hopefully) cause any great issues. I will report back on how the initial fitment of the RC40 goes.
 
Inside diameter of the Y-piece...
 
2lvAQ8X.jpg
 
...and external diameter of the front pipe left virtually no clearance
 
TyZAwOv.jpg
 
A touch of the angry grinder later led to success!
 
w2TwX4M.jpg


#555 MrBounce

MrBounce

    Up Into Fourth

  • TMF+ Member
  • PipPipPipPipPipPipPipPipPip
  • 2,562 posts
  • Location: The Manroom in Ipswich

Posted 04 April 2020 - 01:59 PM

Just a very quick further update as I had half an hour spare in the garage: I have lightly put together the RC40 exhaust on the bench, and as it stands it looks like it might not be too far off fitting. Obviously it will need some creative input re mounts and whether it will point in the right direction, but I have to say I am quite surprised and pleased. Doubtless tomorrow I will be full of woe and anger...
 
TRx2B3i.jpg


0 user(s) are reading this topic

0 members, 0 guests, 0 anonymous users