Jump to content


Photo
- - - - -

Mr Flash - 1992 Standard City


  • Please log in to reply
153 replies to this topic

#31 rob963

rob963

    Speeding Along Now

  • Just Joined
  • PipPipPipPipPip
  • 350 posts
  • Location: Bristol

Posted 30 April 2012 - 09:34 PM


just get a supercharger and twin webers.. they're cheap... :whistling:


Haha yeah, real real cheap...
Massively cheap ;D
although I do like superchargers, over turbos anyway... :D


either twin turbo's or superchargers, dont like lag :mmkay:
Although im not to sold with the whining sound.. :shy:


Haha no it has to be said, lag sucks, which is why I would rather keep it naturally aspirated, also, less parts to go wrong on it.. :shifty:
Hmm ya see, I actually much prefer the whine of a supercharger of the suckiness of the turbos, and turbos also make the car quieter generally and you lose some of the engine tone...
That said, it does have to be the right tone of whine, prefer deep to tinny/high whines... :shy:


I've always preferred the deep muscle car sound compared to... a formula 1 car sound for example, although.. i do like the sound of straight cut gears. I'm a bit just weird haha :proud:

what does make that deep tone? how much lift the cam has? or does that just make it sputtery?....so many questions.. :ohno: hehe


Oh yeah for sure, Muscle car of high revving speed machine... :D
yeah straight cut gears do have quite a nice sound to them, I like it too, maybe we are both just weird... or cool, I prefer to think cool :shades:
I am not entirely sure, but I have a feeling that it might be to do with the actual size of the supercharger, as a bigger one would need to spin slower to force the same amount of air in? possibly..?
I am sure there'll be someone else who knows much much better than me :ohno:
Yeah there are lots of questions, and when they are all answered, there'll be even more! :whistling:

#32 The.Yellow.Mini.Guy

The.Yellow.Mini.Guy

    Mini Mad

  • Noobies
  • PipPipPipPip
  • 146 posts

Posted 30 April 2012 - 09:56 PM

I agree we're just cool.. :lol:

Yeah good point :proud:

Yeah haha we just think of the idea's and let others show us how to do them! :shifty:

#33 rob963

rob963

    Speeding Along Now

  • Just Joined
  • PipPipPipPipPip
  • 350 posts
  • Location: Bristol

Posted 30 April 2012 - 10:48 PM

I agree we're just cool.. :lol:

Yeah good point :proud:

Yeah haha we just think of the idea's and let others show us how to do them! :shifty:


Haha yeah definitely cool! :gimme:
Other peoples opinions may differ but hey :w00t:

That's just the only thing i could really think of that would make some form of sense... :teehee:

Haha that is certainly the best plan for the time being, until I know enough, then I can advise others as to how many thousands of problems they'll run in to along the way :whistling:

#34 The.Yellow.Mini.Guy

The.Yellow.Mini.Guy

    Mini Mad

  • Noobies
  • PipPipPipPip
  • 146 posts

Posted 01 May 2012 - 01:02 AM

Can't wait for the day when i don't need to ask for help haha :lol:

#35 rob963

rob963

    Speeding Along Now

  • Just Joined
  • PipPipPipPipPip
  • 350 posts
  • Location: Bristol

Posted 01 May 2012 - 06:13 PM

Can't wait for the day when i don't need to ask for help haha :lol:


Haha I know, neither can I,
I also can't wait to be able to give advice out to others :proud:
Although, I think it is quite a long way of as of yet... >_<

#36 rob963

rob963

    Speeding Along Now

  • Just Joined
  • PipPipPipPipPip
  • 350 posts
  • Location: Bristol

Posted 03 May 2012 - 10:32 PM

Right, so this is a re-post due to the silly hackers >_<

Anyway, Tuesday, I got hold of my new gear knob and handbrake handle from my friend, and fitted them relatively quickly :proud:
They came from Minispares, so hopefully they'll last relatively well..
Pickies:
Posted Image

Posted Image

And then yesterday morning, lots of things happened,
I went to collect a parcel that I missed due to an exam, and got another shiny thing to attach:

Posted Image

And so promptly attached it to him :shades: :

Posted Image

I also made some progress with my annoying chromy pedals, I found that my feet had a tendancy to slip off them if either my shoes or the pedals were wet..
Until now, they have defeated me as the nuts that held them on were typically a size that I didn't have a spanner in :wacko:
but I found that I had a 7mm socket and that seemed too work a treat :thumbsup:
However, they are still a mystery, they look like this:

Posted Image

and they say 'John Cooper' in handwriting on each of them, anyone know what they are from/for? apart from the obvious pedal covers that is.. :teehee:
These got replaced with standard rubber ones from Minispares, so my feet don't slip any more :shifty:

Aswell as all this happening, I received this in the post from Amazon:

Posted Image

as I don't really want to be rear-ended again, and hopefully this'll help :proud:

So there's another long and picture heavy update from me :teehee:

#37 rob963

rob963

    Speeding Along Now

  • Just Joined
  • PipPipPipPipPip
  • 350 posts
  • Location: Bristol

Posted 13 May 2012 - 01:16 PM

Sooo, not updated this for a little bit of time,

I finished my exams on Friday :highfive:
before this, I had to make quite a large order from Minispares (for me anyway, maybe not compared to others.. :teehee: )
the first thing out of this order that I fitted, was the clear indicator set. which I certainly prefer them to the orange ones.
As some of you may have seen, I gave the orange lenses that I took off to J322OverTheTop.
Time for some Picies:
Posted Image

Posted Image

During the next week, I have got a fair few jobs to get done before London to Brighton next weekend :teehee:
I have to wire in and install a whole audio system, as there is currently nothing in him :ermm:

The cigarette lighter (phone/satnav charger)

The third high-level brake light at the back, I've had this for a while, just never had a chance to get it installed as of yet.

I also have to replace the brake pads, which came as part of the Minispares order, as they are squealing like piggies on relatively light braking. But I have also finally gotten a Haynes manual along with some Copper Grease so I'll get them done tomorrow, and make a start on the rest of the stuff too. :D
Got a friend to come over and help me fathom the electrical system, as i just don't understand it :dontgetit:
I'll probably update tomorrow and see if I find other problems whilst changing things over, With more pictures, Fingers crossed it'll all go smoothly :errr:
Quick picture of all the parts that need to be fitted this week:
Posted Image

And here is the rest of the stuff that came in the Minispares order that'll need to be fitted at some point...
Posted Image

Apart from the Vacuum pipe, I didn't realise that the vacuum gauge comes with the pipe that it needs to be fitted. >_<

EDIT: I also adjusted the mixture on the carb to stop it popping slightly and improve the way it idles, I am slowly learning :D

Edited by rob963, 13 May 2012 - 02:56 PM.


#38 rob963

rob963

    Speeding Along Now

  • Just Joined
  • PipPipPipPipPip
  • 350 posts
  • Location: Bristol

Posted 23 May 2012 - 09:05 AM

So it's been a while since an update on him...

firstly, the excuse. I was busy getting him ready for L2B, hence the pictures in the last thread with all of the parts that needed to be fitted... after this I haven't technically been at home for more than an hour... :shy:

Secondly, L2B was brilliant! (Even if it did take quite a lot longer to get there than we were anticipating.... Don't ask >_< )
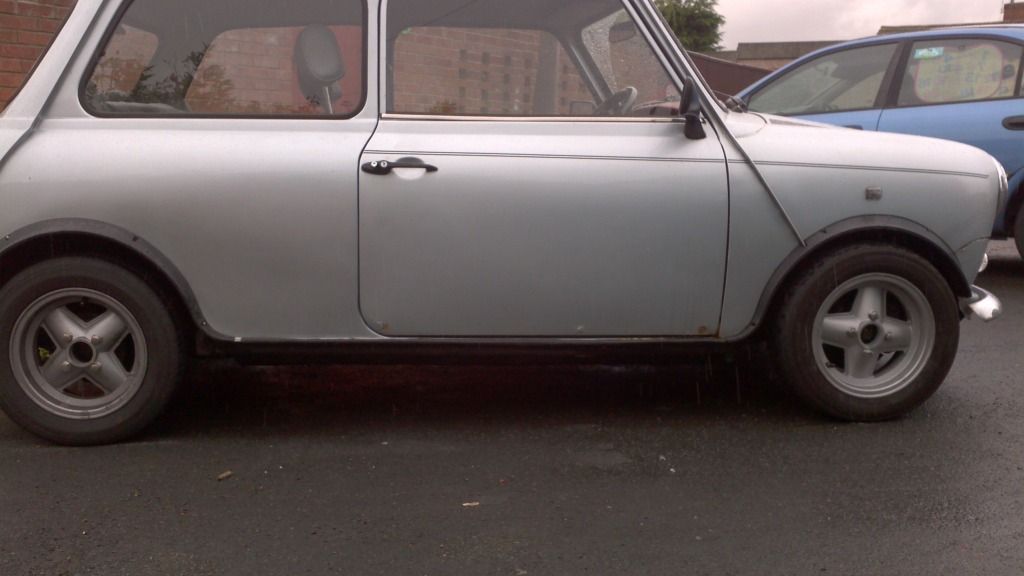
And I picked up these!
Posted Image
Posted Image
:lol:

They came from a guy on here called 'icedaddyuk' who was very friendly (and had a nice clubby estate) :proud:
I am going to paint the spokes black at some point but leave the outside of the rim in silver, 2 of them still need to have a little attention given to stripping them completely and then they'll be ready to paint (properly, can't remember the exact order and how many layers, but I'm sure there is something on here about it :teehee: )

I also thought I'd treat him to some bling seeing as he had done so many miles without a single falter :gimme:
so yesterday afternoon, the insides of the doors went from this:
Posted Image

to this:
Posted Image

Although the lock surrounds baffled me completely, the little plugs and screws supplied didn't seem to make the plate stay on regardless of how it was attached O_O
so if there is any advice on this, it would be much appreciated :shades:

I seem to be going all over the time scale so I may as well reverse to before L2B,
All of the parts in this picture:
Posted Image

bar the 4'' speakers next to the 6x9's were fitted before L2B :shifty:

These are the old brake pads, retaining clips and split pins:
Posted Image
Posted Image

Here is the old aerial :ohno: :
Posted Image
Posted Image


and the new aerial fitted (which has since fallen apart and no longer works :cry: ) - It refused to stand up straight anyway >_< so I'll have to replace that again sometime :goaway: :
Posted Image

That all managed to take a whole day to do with the help of a friend and a fair few people stopping to talk about how they used to have a Mini and they loved it,
so a couple of days later I got my friend back and we got the rest done, this included;
The ciggy lighter (charger device) :teehee:
Posted Image

All wired into the fuse box as that was the easiest to access :shy:

A new stereo system:
Posted Image
Posted Image

which included the speaker board made by yours truly ^_^ (although it is held on by some R-clips from Halfords :dontgetit: )
We also discovered that the speakers at the back of the car worked so instead of having the extra hassle before L2B of trying to make some speaker pods for the front, we just wired them in :angel:
although at some point, I will do the speaker pods :1eye:
We also had quite a lot of trouble with the earth as when we tested it, we just used electrical tape to tape it to the lower dash rail (the metal bit obviously) and it worked fine,
but as soon as we put it on the ring connector and bolted it in, it stopped working :xxx:
so we had to start from the ground up and take baby steps to make sure it still worked every step of the way.
It did but I don''t understand as to why it stopped working with the first ring connector :unsure:

Anyway, that's all for now, going to be trying to put a stage one kit on over the summer, I've already got all the parts for it (had most of them before the crash)
can't wait, after it's been rolling roaded hopefully it'll run really nicely ^_^

Rob

#39 rob963

rob963

    Speeding Along Now

  • Just Joined
  • PipPipPipPipPip
  • 350 posts
  • Location: Bristol

Posted 04 June 2012 - 09:33 AM

So,
Another update,
Finally... :D
I have been busy for a while again, but I have finally found time to start painting the other wheels, they are currently in-between layers of paint :shifty:
but anyway,
I found something nice on fleabay:
Posted Image
Posted Image
Posted Image
Posted Image

It's a 12G940 which apparently came of a working 1275 engine got it for £40 :proud:
Although I did have to go a fair way to pick it up and my stupid satnav took me down some stupidly thin roads on which I had to stop rapidly several times :goaway:
But hey, eventually (when I have the monies) I'll get some work done on the exhaust valves to allow it to be fitted to my 998 :lol:
So many plans... so little money O_O

In other news, I had my front wheels off the other day to check my brake disks and for some reason,
the wheel nuts for my Pepperpots at the front are now completely shot so they refused to go back on properly.
So this is the solution I came up with:
Posted Image

And I really quite like the Revos on there... :shifty:
soon there will be 4 on there :shades:

However I also didn't realise that this would happen:
Posted Image
>_<
looks like I'll have to find some wider arches, possibly at Bristol Mini Day (which I have yet to receive the tickets for O_O )

Anyway, time for another coat of paint on the wheels :D

Bye for now

#40 rob963

rob963

    Speeding Along Now

  • Just Joined
  • PipPipPipPipPip
  • 350 posts
  • Location: Bristol

Posted 06 June 2012 - 05:42 PM

So today I managed to get tyres fitted across town, get back and fit the new wheels to flash,
then get back into town in time to pick up my girlfriend from the exam I dropped her in to
All in the time of 2 hours! Quite pleased with myself to be honest, even though it was tipping it down >_<
anyway, piccy!
Posted Image

I'll get more tomorrow probably as that picture doesn't really do them complete justice, but I will say that they do fill the arches better now :thumbsup:

And I have some plans :shifty:
I'm going to be travelling up to Redditch to visit J322OverTheTop as he'll be helping me fit my stage one kit from Saturday into Sunday as no doubt it'll take longer than expected, as always >_<
and I have new disks along with a couple of other things on their way to me now, mainly because the disks are ever so slightly warped and judder slightly when braking from high speeds O_O

That is all for now,
I'll update after the weekend to let anyone who can be bothered to listen how it went ;D

#41 rob963

rob963

    Speeding Along Now

  • Just Joined
  • PipPipPipPipPip
  • 350 posts
  • Location: Bristol

Posted 11 June 2012 - 08:21 AM

So I promised some more pictures last time, and so I deliver! ;D
Posted Image
Posted Image
Posted Image

So it has been a busy week,
this arrived in the post:
Posted Image

and with everything opened:
Posted Image

and now all I have left to fit out of all that are the brake disks and pads as the rest got fitted over the weekend,
so I finally have a working aerial now! :proud:
some of the changes:
from this:
Posted Image

to this:
Posted Image

And from this:
Posted Image

to this:
Posted Image

over the weekend, the main aim was to fit the stage one kit that has been sitting around in my room since march :mmkay:
and it went very smoothly apart from a tiny blow from the Y-Piece and sheering a bolt on said same item, both of which are now sorted :D
PIccies:
Posted Image

Posted Image

I also managed to get my vacuum gauge fitted at the same time! :lol:
Posted Image
Posted Image

I know it's in a bit of an odd place, it is only till I make and install my own centre console when it will go into there :shifty:

and decided to replace my HT leads and spark plugs (yes I checked the gaps) :proud:
Posted Image

doing my ball joints, brake disks and pads today :proud:
that's all for now :proud:

#42 rob963

rob963

    Speeding Along Now

  • Just Joined
  • PipPipPipPipPip
  • 350 posts
  • Location: Bristol

Posted 11 June 2012 - 06:53 PM

So today I got both the ball joints and the brake disks and discovered that 2 of them were loose, they are now much tighter :proud:
the brake disks were mullered and now they are nice and shiny and new :D
Posted Image

Although it hasn't stopped the slight rattling on the front end >_<
so that will be investigated more tomorrow...

I also have discovered that he needs a really big tune up,
Below 2.5-3k rpm, it struggles quite a bit O_O
After that though it pulls really really well!
overall, quite chuffed at how the stage one kit has gone on :shades:

That's all for now,
I'll try to update tomorrow with what i discover about the rattling...

#43 rob963

rob963

    Speeding Along Now

  • Just Joined
  • PipPipPipPipPip
  • 350 posts
  • Location: Bristol

Posted 13 June 2012 - 07:39 AM

So, I haven't discovered what the little rattle is :(
Although Mak said it could be knuckle joints?
If so, I'm confused as they were done in January :(

In other news, finally got my tickets for Bristol mini day! :D
Hopefully I'll see some of you there!

And my brakes are now much much better and I have replaced my vacuum advance pipe this morning :D

Rob

Edit: the vacuum advance pipe needed replacing as I broke it putting me stage one kit on, but when I took it off, the dizzy connection for it fell apart anyway :(

Edited by rob963, 13 June 2012 - 07:41 AM.


#44 rob963

rob963

    Speeding Along Now

  • Just Joined
  • PipPipPipPipPip
  • 350 posts
  • Location: Bristol

Posted 29 June 2012 - 12:24 AM

So again I have left this for quite a while without an upate...

A few things have happened, although it isn't much....

At some point in the past, there was Bristol Mini Day, where I spent more money than was probably sensible too...
But I did need a new throttle cable, as me old one was a bit sticky... >_<
hey ho, it's now much much smoother :D
Posted Image
not that you can really tell it's new >_<

I also decided to buy a new badge for him, which may not be the right one, but I really like it and wanted this one to begin with :shades: :
Posted Image
(changed the winged type to this... )

I also bought a new switch panel (5 hole rather than my 4) and took it to the sticky fingers stand to get some stickers:
Posted Image
(including the one for the switch panel)

I also got some spacers for the rear wheels, as they were a little further in than the front and it was a tad annoying for me :shy:
so they are more even now:
Posted Image
Posted Image

the day after Bristol Mini Day, I went to a Rolling Road (Slark Race Engineering) and a quick needle change and timing tune, and he was driving happy as larry!
(before it struggled below 3k rpm - now it sings and goes much better :D )
However, he did insist that I replace my air filter as me old one was falling apart, so I went for a K&N:
Posted Image
Posted Image

And seeing as I decided on the interior being blue and grey, I also got a blue brake pedal cover:
Posted Image

switched from the red one previous:
Posted Image

So I have managed to get the new switch panel in finally, took long enough:
Posted Image

Although when I was taking the old one off, I didn't realise it was just two nuts, so I went through the whole rigmarole of getting the clip off the choke cable and the nut off the heater cable,
only to discover that I also needed to take these off >_<
Posted Image

the one I got off ended up like this :shy: :
Posted Image

it was a huge PITA trying to get the nuts back in the right place (many dents/cuts in my hand)
must have spent about half an hour like this:
Posted Image
:blink:

And now, some thing else that needs sorting:
Posted Image
>_<

stupid arch breaking off :(

However,
I have now decided that I want to get it on 10'' wheels,
which won't be cheap, but I'm going to need new arches anyway due to the wheels sticking out,
so I might as well go for it now, especially with the group buy on the conversion to 7.5'' disks going on,
it all seems to be falling into place! :D
anyway,
enough rambling,

that's all for now

hopefully soon there'll be more interesting things to update on ;D

Rob

#45 The Otter

The Otter

    The artist formally known as j322overthetop

  • Members
  • PipPipPipPipPipPip
  • 620 posts
  • Location: Midlands

Posted 29 June 2012 - 12:41 AM

Nice progress, glad to see you're set on 10's! I think you should take all the plastic arches off and run it archless for a while, looks nicer that way ;D I told you that ******* switching panel would be a fun job, good to see you've got it sorted now and all the switches are in the middle where they should be :teehee:

Keep up the good work :D


0 user(s) are reading this topic

0 members, 0 guests, 0 anonymous users