 But I do enjoy ready the build threads and day dreaming, keep up the good work!


Mini Cooper 998 Screamer Nut And Bolt Rebuild
Started by
MikaRaymond
, Nov 08 2012 11:09 PM
1842 replies to this topic
#76

Jasonc
-

- Members
-

- 183 posts
Mini Mad
- Location: Hampshire
Posted 09 January 2013 - 10:32 AM
I am by far no expert - truth be I don't own a mini...yet... But I do enjoy ready the build threads and day dreaming, keep up the good work!
But I do enjoy ready the build threads and day dreaming, keep up the good work!
#77
domdee
-

- Members
-
- 1,183 posts
Formally known as dominicdee
- Location: hull
- Local Club: hull clubs on FB
Posted 09 January 2013 - 10:46 AM
looking great so far. looking forward to the rest of the build
#78
Petrol
-

- Members
-
- 967 posts
One Carb Or Two?
Posted 09 January 2013 - 11:29 PM
Thanks guys, I will post as much info as I can and hope it helps
Cleaned all of the black celly paint off the rear valence with thinners. If anyone knows a better way of removing it I would love to know as it's a bit messy using thinners. After a wipe down with panel degreaser, I sprayed it with 2K etch, then applied filler to hide the spot welds

We may be skimping on the panels, most of them are Magnum but we are not skimping at all on the products to try to reduce corrosion, this is Sikaflex seam sealer

Might not look pretty but for steel to rust you need 2 things, oxygen and moisture. What I did was pump the seam sealer as far as I could into the joint. Removing any voids will increase the life of the shell. I have also bought 2L of 2k Tahiti blue non metallic paint. Most primers are porous and the plan is to paint the shell with it as I go to stop it rusting through the porous primer
Also note I have not plugged the hole on the NS of the valence for the loom. This hole will be used to inject box section wax later
Thanks for looking
Pete
Cleaned all of the black celly paint off the rear valence with thinners. If anyone knows a better way of removing it I would love to know as it's a bit messy using thinners. After a wipe down with panel degreaser, I sprayed it with 2K etch, then applied filler to hide the spot welds
We may be skimping on the panels, most of them are Magnum but we are not skimping at all on the products to try to reduce corrosion, this is Sikaflex seam sealer
Might not look pretty but for steel to rust you need 2 things, oxygen and moisture. What I did was pump the seam sealer as far as I could into the joint. Removing any voids will increase the life of the shell. I have also bought 2L of 2k Tahiti blue non metallic paint. Most primers are porous and the plan is to paint the shell with it as I go to stop it rusting through the porous primer
Also note I have not plugged the hole on the NS of the valence for the loom. This hole will be used to inject box section wax later
Thanks for looking
Pete
#79
Noah
-

- Members
-
- 4,136 posts
Up Into Fourth
- Location: NE London/Essex
- Local Club: Essex Mini Club
Posted 09 January 2013 - 11:35 PM
Looks good, I'm not refitting the closing panels as in my opinion they just trap water, just seam sealing and stone chipping then filling with dintrol LOL.
#80
Petrol
-
- Members
-
- 967 posts
One Carb Or Two?
Posted 10 January 2013 - 12:34 AM
The closing panels are important to the strength of the shell. They are very close to the rear subframe mounting points. Since handling will be important on this car, I have decided to keep them. As far as rust goes, I'm pretty sure it won't be a problem 
#81
Petrol
-
- Members
-
- 967 posts
One Carb Or Two?
Posted 17 January 2013 - 10:58 PM
Work on the shell has ground to a halt due to the weather. Got a few other bits done though
Pedal box

Old brake backplate looked like this. Water penetrated the seam

New backplate seam sealed and sprayed with 2K paint

New parts often come with a bit of chassis black on them. This is basically a coat of cellulose but offers little protection long term. Shotblasted it off, primed with 2K etch followed by 2K colour

I now have quite a lot of parts finished like this

The Hi Lo's are alloy which will corrode over time. I primed these with 2K etch followed by 2 coats of silver basecoat and finally a couple of coats of clearcoat

Thanks for looking
Pete
Pedal box
Old brake backplate looked like this. Water penetrated the seam
New backplate seam sealed and sprayed with 2K paint
New parts often come with a bit of chassis black on them. This is basically a coat of cellulose but offers little protection long term. Shotblasted it off, primed with 2K etch followed by 2K colour
I now have quite a lot of parts finished like this
The Hi Lo's are alloy which will corrode over time. I primed these with 2K etch followed by 2 coats of silver basecoat and finally a couple of coats of clearcoat
Thanks for looking
Pete
#82
Wigeon Incognito
-

- Noobies
-
- 294 posts
Mini Mad
- Location: Essex
- Local Club: Essex Mini Club
Posted 18 January 2013 - 12:50 PM
I've followed this one from the start and it's looking great! I'm still amazed you managed to do as much work as you did on the shell given the weather you were working in.
#83
Petrol
-
- Members
-
- 967 posts
One Carb Or Two?
Posted 18 January 2013 - 11:22 PM
Thanks Wigeon Incogneto. The shell is my main worry. I have fitted panels before but never done a full on resto on a shell. I just hope I have something to fit all bits to!
I was wire brushing in the snow today! Gave the rear hubs a wire brush before soaking in Deox C

I will give these a quick bead blast to get rid of the last of the rust before priming. You need to be quick on with the primer with cast parts, they start to rust pretty quick. This is the front hub soaking in Deox

Cones masked up ready to put some proper protection on. The steel bands rust pretty quick so I will spray them with zinc primer and a couple of coats of 2K

I was wire brushing in the snow today! Gave the rear hubs a wire brush before soaking in Deox C
I will give these a quick bead blast to get rid of the last of the rust before priming. You need to be quick on with the primer with cast parts, they start to rust pretty quick. This is the front hub soaking in Deox
Cones masked up ready to put some proper protection on. The steel bands rust pretty quick so I will spray them with zinc primer and a couple of coats of 2K
#84
Wigeon Incognito
-
- Noobies
-
- 294 posts
Mini Mad
- Location: Essex
- Local Club: Essex Mini Club
Posted 18 January 2013 - 11:45 PM
When you're spraying, are you using rattle cans? I've thrown in the towel and arranged for somebody to do the welding for me but inspired by your efforts I'd like to refurbish my parts in a similar way whilst the shell is away.
#85
Noah
-
- Members
-
- 4,136 posts
Up Into Fourth
- Location: NE London/Essex
- Local Club: Essex Mini Club
Posted 18 January 2013 - 11:46 PM
When you're spraying, are you using rattle cans? I've thrown in the towel and arranged for somebody to do the welding for me but inspired by your efforts I'd like to refurbish my parts in a similar way whilst the shell is away.
I too would be interested in the way you're refurbing parts. I was just going to use, Etch primer and stone chip.
#86
Petrol
-
- Members
-
- 967 posts
One Carb Or Two?
Posted 19 January 2013 - 10:36 PM
You might find this useful
Refurbing parts is easy and remember, a car is just a lot of parts. If you can do one part, you can do them all. I’m using 3 different primers.
Weld through - Rattle can (Bilt Hamber etchweld) The name says it all.
Electrox – Spray gun but rattle cans available, again by Bilt Hamber is a zinc rich primer. This is great to use on previously corroded metal. It can be really difficult to remove every microscopic piece of rust, even after bead blasting there can still be rust dust in the air. It works by sacrificing itself to kill any rust. Obviously the better the preparation, the longer it’s going to last. One my S14 refurb, I had everything triple blasted in separate booths to reduce the chance of rust dust on the components but I still primed everything with Electrox.
Max Meyer 2K etch primer – Spray gun only. This will be used to prime all of the new parts and the “outside of the shell” The drawback with Electrox is that it’s quite soft and needs a protective coating - more about that later.
Some info on coatings.
Most car parts – subbys suspension etc are sprayed with chassis black. This is a one coat covering and doesn’t last very long. Most pressed parts have sharp edges and it’s difficult to get a good coating of paint on the edges. Think of it like trying to spray the cutting edge of a razor blade. The result is rust starts to form along the edges then works it’s way under the paint. Powder coating is notorious for this. I have bought a new rear subby and was offered a powder coated one but immediately ruled it out. The other problem with it is rust travels underneath it and you can’t see it.
Another area where rust starts is on welds. The second you weld you have rust, the heat accelerates this process and spot welds are notorious especially on aftermatket panels. More often than not they spray straight over the welds – rust included!
Electroplating is another process mainly used on nuts, bolts and areas that require a high level of strength. This is not Electrocoat or E-Coat but a zinc coating. Like Electrox, the zinc coating is quite soft so to harden it they passify it. This is done by dipping it into a solution to harden the zinc resulting in the golden yellow colour. This is also a sacrificial method but it doesn’t tend to last.
Water pump pulley for example

Not too clever here

I am going to show exactly how I refurb parts. I will use the pulley and this bracket as it covers everything. Cast steel, mild steel, painted and electro plated stuff.

First job is to degrease them. I use this plant pot and a paint brush

I use this, it's about the best I have tried. It's also fantastic at removing carbon from internal engine components

I always wash the solution off in very hot soapy water. The hotter the better and I find washing up liquid works fine
This is the adjustment bolt and there is a very slight trace of the original plating on it. The rest is badly corroded

Wired up so I can drop it into the de-rusting tank. I use Bilt Hamber Deox C mixed at about 10:1 ratio

These need wire brushing before dipping. Deox does not remove paint and removing the excess rust will extend the life of the tank.

This is the Deox solution in a builders bucket. I fasten the wire to the handle so it's easy to get the parts out. You can see it's already started to work in the time it's taken me to post this.

As always there are many ways to refurb stuff but this technique works for me. I will post up the next steps when they are done.
I hope this is useful.
Pete
Refurbing parts is easy and remember, a car is just a lot of parts. If you can do one part, you can do them all. I’m using 3 different primers.
Weld through - Rattle can (Bilt Hamber etchweld) The name says it all.
Electrox – Spray gun but rattle cans available, again by Bilt Hamber is a zinc rich primer. This is great to use on previously corroded metal. It can be really difficult to remove every microscopic piece of rust, even after bead blasting there can still be rust dust in the air. It works by sacrificing itself to kill any rust. Obviously the better the preparation, the longer it’s going to last. One my S14 refurb, I had everything triple blasted in separate booths to reduce the chance of rust dust on the components but I still primed everything with Electrox.
Max Meyer 2K etch primer – Spray gun only. This will be used to prime all of the new parts and the “outside of the shell” The drawback with Electrox is that it’s quite soft and needs a protective coating - more about that later.
Some info on coatings.
Most car parts – subbys suspension etc are sprayed with chassis black. This is a one coat covering and doesn’t last very long. Most pressed parts have sharp edges and it’s difficult to get a good coating of paint on the edges. Think of it like trying to spray the cutting edge of a razor blade. The result is rust starts to form along the edges then works it’s way under the paint. Powder coating is notorious for this. I have bought a new rear subby and was offered a powder coated one but immediately ruled it out. The other problem with it is rust travels underneath it and you can’t see it.
Another area where rust starts is on welds. The second you weld you have rust, the heat accelerates this process and spot welds are notorious especially on aftermatket panels. More often than not they spray straight over the welds – rust included!
Electroplating is another process mainly used on nuts, bolts and areas that require a high level of strength. This is not Electrocoat or E-Coat but a zinc coating. Like Electrox, the zinc coating is quite soft so to harden it they passify it. This is done by dipping it into a solution to harden the zinc resulting in the golden yellow colour. This is also a sacrificial method but it doesn’t tend to last.
Water pump pulley for example
Not too clever here
I am going to show exactly how I refurb parts. I will use the pulley and this bracket as it covers everything. Cast steel, mild steel, painted and electro plated stuff.
First job is to degrease them. I use this plant pot and a paint brush
I use this, it's about the best I have tried. It's also fantastic at removing carbon from internal engine components
I always wash the solution off in very hot soapy water. The hotter the better and I find washing up liquid works fine
This is the adjustment bolt and there is a very slight trace of the original plating on it. The rest is badly corroded
Wired up so I can drop it into the de-rusting tank. I use Bilt Hamber Deox C mixed at about 10:1 ratio
These need wire brushing before dipping. Deox does not remove paint and removing the excess rust will extend the life of the tank.
This is the Deox solution in a builders bucket. I fasten the wire to the handle so it's easy to get the parts out. You can see it's already started to work in the time it's taken me to post this.
As always there are many ways to refurb stuff but this technique works for me. I will post up the next steps when they are done.
I hope this is useful.
Pete
Edited by Petrol, 19 January 2013 - 10:46 PM.
#87
Wigeon Incognito
-
- Noobies
-
- 294 posts
Mini Mad
- Location: Essex
- Local Club: Essex Mini Club
Posted 20 January 2013 - 12:36 AM
Pete, that's fantastic and I'm following this process with interest.
Thank you very much for taking the time to put a step by step guide together like this - hopefully I'll be able to replicate the process on my build.
Thank you very much for taking the time to put a step by step guide together like this - hopefully I'll be able to replicate the process on my build.
#88
4V8s
-

- Noobies
-
- 38 posts
On The Road
- Location: Kingston
Posted 20 January 2013 - 12:56 AM
Very useful indeed, keep them coming!
Just read through this entire post - as I have recently bought a '97 mpi in a similar state to yours - some bits not so bad, some bits worse. I too am not skilled (yet) at welding. I bought a mig welder and all the gear a few years ago but never used it. This car will be the one I learn on so really interested in your thread and will be following it with interest!
With suspension parts, subframes etc, i'll be honest I dont have the time to spend doing all the thorough work you do, so I take them to a local place that blasts them, phosphor etch primes them and then powder coats them, but I take your point on sharp edges. So far so good though and they look good when done. If it makes sense to do so depending where they fit, I then also cover them with Dinitrol black underbody wax for extra longevity.
I like your approach regarding ridding of rust and then trying to do things to ensure it wont come back! I do the same, I cant stand the idea of undergoing a lot of work only for the thing to start rusting again!
For example, I cant beleive it but the sills on mine look like yours - yet they were already replaced once (according to the reciepts I have with the car) in 2006 by a well known Surrey based mini "specialist". How can they have holes through them already just 6 years later?!!!! So when they are done this time, I will take similar steps to you, and then wax inject etc, because this car will be a keeper for one of my children hopefully to drive and enjoy in times to come.
Im just starting really on my dismantling to see whats needed - things take me a lot longer because I have 3 kids under 6, a naging wife, and 6 other cars to attend to all at the same time! But I love it.
And I somehow feel, and predict, that although you say this is your last rebuild - its in your blood! maybe you take time out for a bit, then you get bored and the addiction bites, and you cant help yourself! And you clearly have a very good skill for it.
Good luck with the rest of the work - it will certainly be a great car when done!
ps - I also make quite a lot of use of POR 15 products, and dintrol stuff. If used right, they seem to do a good job of dealing with, and resisting rust
Edited by 4V8s, 20 January 2013 - 12:59 AM.
#89
Petrol
-
- Members
-
- 967 posts
One Carb Or Two?
Posted 21 January 2013 - 04:36 PM
No prob.
This is how the parts came out from the Deox dip. Note that Deox has removed the electro plating

A quick shotblast and ready for primer. Bit held up with the weather at the mo

I read somewhere that the Rover Mini's were E-Coated and there is certainly evidence of it on the shell. It appears that it hasn't penetrated the seams to coat the spot welds. This could explain why they corrode so quickly. As far as fitting new sills they just weld them on and spray underseal on the outside. I think the key to stopping the rot is box section wax but it needs to get right into the seams.
Pete
This is how the parts came out from the Deox dip. Note that Deox has removed the electro plating
A quick shotblast and ready for primer. Bit held up with the weather at the mo
I read somewhere that the Rover Mini's were E-Coated and there is certainly evidence of it on the shell. It appears that it hasn't penetrated the seams to coat the spot welds. This could explain why they corrode so quickly. As far as fitting new sills they just weld them on and spray underseal on the outside. I think the key to stopping the rot is box section wax but it needs to get right into the seams.
Pete
Edited by Petrol, 21 January 2013 - 04:37 PM.
#90
Petrol
-
- Members
-
- 967 posts
One Carb Or Two?
Posted 21 January 2013 - 11:03 PM
I think the key to stopping the rot is box section wax but it needs to get right into the seams.
Pete
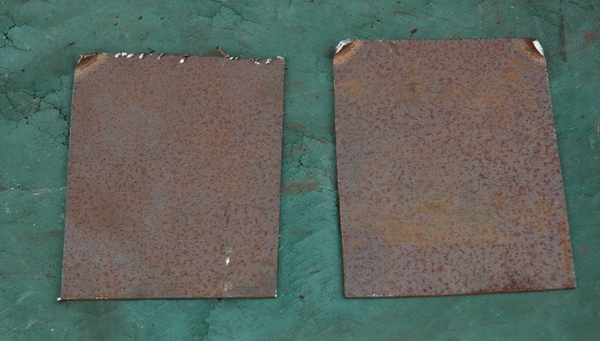
On that note I have never been happy with Waxoyl. It's just too thick to get a good finish even when thinned. Heating it up is pointless - as soon as it hits the metal it cools leaving an uneven finish. A good finish is very important in box sections. Waxoyl leaves an orange peel finish at best and this holds water. Then the water evaporates and re condenses leaving the box section at 100% humidity. The thicker the product the less searching it is. Waxoyl is that thick, even when thinned, it has no capillary action and this what you need on a Mini with all the seams. I did a comparison test between Waxoyl and Dynax some time ago.
Started the test with plates of very slightly corroded steel
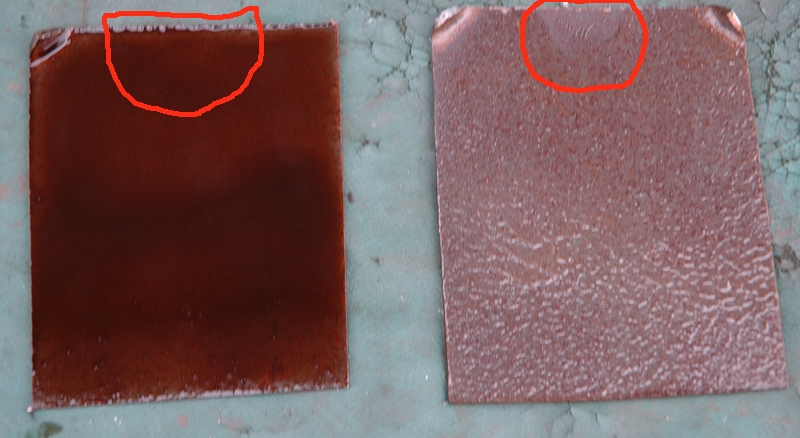
Dynax on the left - Waxoyl on the right. I tried to get a good finish with the waxoyl but failed as you can see. It's also interesting to note that when I moved the 2 sample pieces, my thumbprint remained on the waxoyl but the Dynax was thin enough to cover the area.
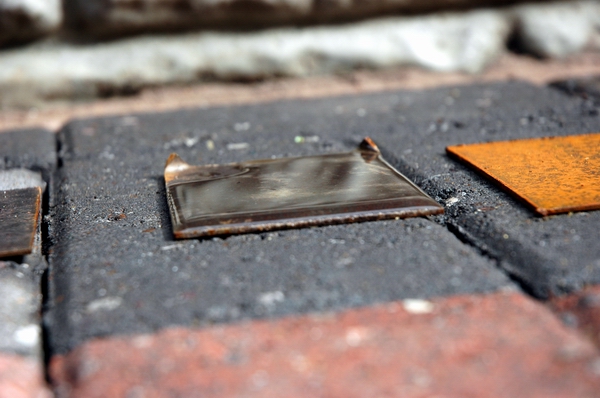
Surface tension holding water on the waxoyl plate the morning after. It didn’t rain overnight also notice the plate on the right, this had no protection at all.
The plates a month later after spraying with a salt solution
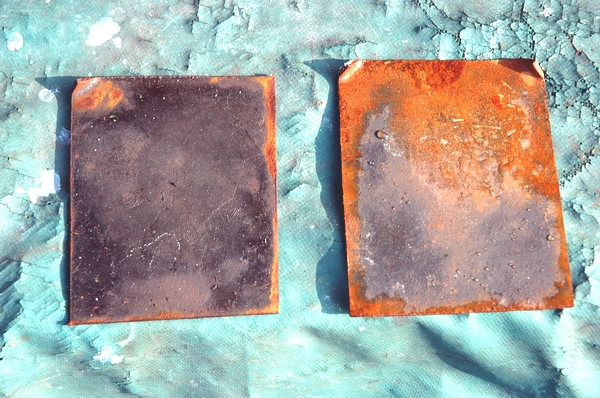
After 6 weeks and the wax removed with solvent, Dynax on the left
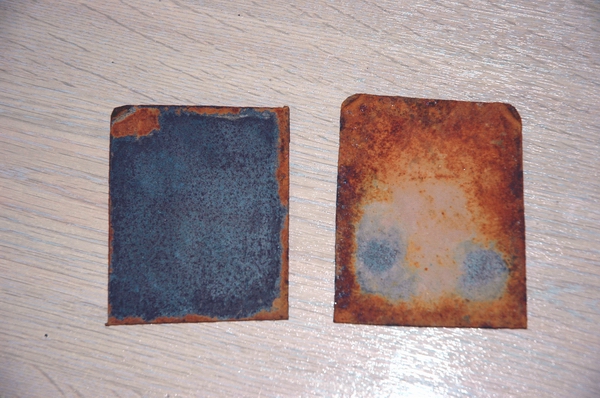
Pics say it all and the untreated plate was in better condition than the Waxoyl treated plate.
The Mini is a 50's design and seams are the main rust problem - you weld the seams, it rusts immediately and then it's just a matter of time.
I have also heard of E Coating problems after refurbing a shell. Long story but the seams are too deep for this process to work properly.
I'm pretty sure that with a proper box section wax that's thin enough to search into the seams, and with a thorough application, a shell can be built that will last. Well that's my plan. Roll on spring then I can get stuck in proper!
Hope you find this info useful and as always, all comments welcome
Best
Pete


4 user(s) are reading this topic
0 members, 4 guests, 0 anonymous users


