Jump to content


Photo
- - - - -

Mini Cooper 998 Screamer Nut And Bolt Rebuild


  • Please log in to reply
1842 replies to this topic

#91 4V8s

4V8s

    On The Road

  • Noobies
  • PipPip
  • 38 posts
  • Location: Kingston

Posted 21 January 2013 - 11:24 PM

well I dont know how Dinitrol compares but so far im happy. They do an ML wax version, which is very runny by comparison, specifically designed for that purpose to run into seams and gaps. Maybe try that and possibly assist with air gun pressure afterwards (ie compressed air into box section and / or jet of air directed at wax into seam iff access is possible).

Used a lot of dinitrol on my '67 mustang and 77 firebird. whereas older work I did on my '94 Rover 200 I used heated up waxoil, and so far so good with that too in areas where I had started having problems.

Dont bother with Dinitrol RC800 though. its crap (the aerosol rust converter / primer. maybe its rc900, cant remember now but one of them.)

Edited by 4V8s, 21 January 2013 - 11:26 PM.


#92 Jasonc

Jasonc

    Mini Mad

  • Members
  • PipPipPipPip
  • 183 posts
  • Location: Hampshire

Posted 23 January 2013 - 12:34 PM

The refurb parts look as good if not better than new! Really looking forward to reading more on your resto!

#93 Petrol

Petrol

    One Carb Or Two?

  • Members
  • PipPipPipPipPipPipPip
  • 967 posts

Posted 23 January 2013 - 11:16 PM

4V8s, Thanks for the info. Everyone has their fave products. I like Dynax as I tested it and for me, it does the job. I have never tried Dinitrol. I tried POR and didn’t like it. The best protection for chassis components is epoxy mastic. I bought some of that from rust.co.uk and didn’t like it as it wasn’t black – more of a very dark brown and gave satin finish. I prefer a full black gloss.

Thanks Jasonc, they should be better protected, proper primer and 2k gloss is much better than chassis black straight on bare metal. Had a massive paint run tonight – 5 hours of spraying and have most of the suspension / brackets finished. Never sprayed in such cold weather before – 0C and had to add more thinners to get the paint to flow out properly.

Couple of pics

Cones done

Posted Image

Radius arms

Posted Image

Front hub

Posted Image

Rear hub

Posted Image

Steering arm

Posted Image

Cheers,

Pete

#94 Petrol

Petrol

    One Carb Or Two?

  • Members
  • PipPipPipPipPipPipPip
  • 967 posts

Posted 25 January 2013 - 09:42 PM

Cleaned up the front subframe tonight, looks in good condition

Posted Image

Not keen on self tappers into mild steel so I have tapped them 3/16" UNF. I will be using stainless cap screws

Posted Image

Brake pipe clips will be replaced with P clips, again using stainless bolts

Posted Image

I mentioned rust starts on welds....

Posted Image

Also on edges, lack of paint means it's got under and starting to spread. Best way to rectify this is to radius the edges.

Posted Image

Pete

#95 RawlinsGTR

RawlinsGTR

    Formally known as Dog

  • Members
  • PipPipPipPipPipPipPip
  • 1,046 posts
  • Location: Sevenoaks, Kent

Posted 25 January 2013 - 09:57 PM

This thread is brilliant for info ^^

Looking good, will be watching for more :)

The main reason I wanted to post though was because I wanted to say.. you have MASSIVE hands! :proud:

#96 Petrol

Petrol

    One Carb Or Two?

  • Members
  • PipPipPipPipPipPipPip
  • 967 posts

Posted 27 January 2013 - 06:45 PM

The main reason I wanted to post though was because I wanted to say.. you have MASSIVE hands! :proud:


Either that or the parts are small

Continuing with my "how I refurb parts"

After Deox C I shotblast. Since all the rust has gone it doesn't take long and provides an excellent key for the primer. This is what I use to blast and the media is glass

Posted Image

Few parts done

Posted Image

These are my spray guns. I don't use the large one much these days. The small one only cost a tenner

Posted Image

Electrox zinc primer is a 1K product and is thinned with xylene. Since the zinc drops to the bottom, I mix up a small amount in a glass jar as it's easy to shake to give it a thorough mix.

Also sprayed the rear valence in 2k colour today. Most primers are porous so this will protect it. There's also some filler in it and I've had problems with filler mapping out in the past. This is when it reacts with the paint. I will now leave this a month or so to see if it's OK

Posted Image

Posted Image

Thanks for looking

Pete

#97 ba-tat

ba-tat

    Stage One Kit Fitted

  • Noobies
  • PipPipPip
  • 53 posts

Posted 27 January 2013 - 11:53 PM

Just the most detailed and excellent thread. I look for it, and learn something every time I read.

Edited by ba-tat, 27 January 2013 - 11:53 PM.


#98 Petrol

Petrol

    One Carb Or Two?

  • Members
  • PipPipPipPipPipPipPip
  • 967 posts

Posted 28 January 2013 - 08:33 PM

Only happy to help ba-tat.

This is one of the brackets sprayed in 2k. Best way to spray 2k is a very light dust coat first, leave for 10 mins then another light coat. After another 10 mins apply a coat until you see the paint flow out to a smooth finish. 2K is much better than 1K products but you do need the right safety equipment.

Posted Image

Bonnet lip is shot

Posted Image

Removed

Posted Image

Bonnet stiffener to skin seams split

Posted Image

Syringe is best way to apply Deox Gel

Posted Image


Posted Image


Posted Image

Back of bonnet only has E-coat on - no paint!

Posted Image

Pete

Edited by Petrol, 28 January 2013 - 08:33 PM.


#99 Petrol

Petrol

    One Carb Or Two?

  • Members
  • PipPipPipPipPipPipPip
  • 967 posts

Posted 28 January 2013 - 11:42 PM

On a mission tonight! The boot lid was one of the panels that looked good. The bottom seam was seam sealed

Posted Image

Not much rust in there. The top however needed a bit of sorting

Posted Image

Decided to split the seams

Posted Image

The plan was to stop when the rust stops.... I think you know where this is going

Posted Image

Didn't manage to get the skin off because of this spot weld hidden behind the hinge

Posted Image

Had a look behind the boot skin and this was interesting

Posted Image

Seems to me that the E-Coat didn't penetrate the seam fully.

Makes me think..... If you buy a new shell from Heritage at £6K, is it properly E-Coated? Somehow I doubt it.

Looks like I need a new boot skin.

Can of worms... Yes but I didn't expect this!

Pete

#100 Jasonc

Jasonc

    Mini Mad

  • Members
  • PipPipPipPip
  • 183 posts
  • Location: Hampshire

Posted 29 January 2013 - 12:03 PM

Looking good mate.

Love the detail that you go into on this thread!

#101 Petrol

Petrol

    One Carb Or Two?

  • Members
  • PipPipPipPipPipPipPip
  • 967 posts

Posted 29 January 2013 - 10:58 PM

Thanks Jasonc, if you don't get rid of the rust, it will only come back to haunt you later. Much easier when the car is in bits.....

I also found another couple of spot welds holding the boot skin on

Posted Image

I am obsessed with rust in seams O_O I guess this is understandable when you look at the state of things

Posted Image


Fixable though

Posted Image

Started cleaning the loom up with white spirit

Posted Image

Decided to bin all of this very poorly made wood trim

Posted Image

And go for the proper Min look with paint on the top of the doors ;D Holes welded up and filled

Posted Image

Pete

#102 Noah

Noah

    Up Into Fourth

  • Members
  • PipPipPipPipPipPipPipPipPip
  • 4,136 posts
  • Location: NE London/Essex
  • Local Club: Essex Mini Club

Posted 29 January 2013 - 11:18 PM

What wood trim? They often sell for £50...

Bit more money to put towards the project :)

#103 Petrol

Petrol

    One Carb Or Two?

  • Members
  • PipPipPipPipPipPipPip
  • 967 posts

Posted 30 January 2013 - 11:09 PM

Thanks very much Noah, I will sell them on ebay when the car is finished.

Stripped the black paint from the back of the door skin with thinners and primed with Electrox zinc. It's a bit thick here because I used the spray gun to force it up the seam

Posted Image

The skin is welded to the door frame, rather than drill the skin, which can be tricky, I decided to use a cutting disk in an angle grinder to cut slots.I'm hoping this will be a neater job

Posted Image

Door frame is more or less ready for the skin

Posted Image


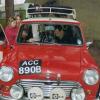
When removing decals, it's best to apply heat from the back

Posted Image

The idea is to heat the adhesive not the vinyl. By heating from the back it softens the adhesive before the vinyl.
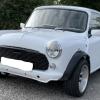
Original paint

Posted Image


Have to say I am seriously impressed with the finish. I have seen more orange peel on new Audi's than this!

Thanks for looking and as always, all comments welcome.

Pete

#104 Noah

Noah

    Up Into Fourth

  • Members
  • PipPipPipPipPipPipPipPipPip
  • 4,136 posts
  • Location: NE London/Essex
  • Local Club: Essex Mini Club

Posted 30 January 2013 - 11:23 PM

Alot of the paint can often be saved with a good paint correction from a D/A or rotary :) If you were on a cheaper resto, I'd say machine polish the roof and bonnet as these can quite easily be saved! :D

Edited by Noah, 30 January 2013 - 11:26 PM.


#105 4V8s

4V8s

    On The Road

  • Noobies
  • PipPip
  • 38 posts
  • Location: Kingston

Posted 31 January 2013 - 12:00 AM

out of interest, as you have painted the rear valance already, how will you then weld this to the boot floor / rear hinge panel lip when the time comes? Or do you expect to do some refinishing there and the paint youve applied now was just to check over time for any reaction?


0 user(s) are reading this topic

0 members, 0 guests, 0 anonymous users