Even i'm excited for you! Amazing work!


Mini Cooper 998 Screamer Nut And Bolt Rebuild
Started by
MikaRaymond
, Nov 08 2012 11:09 PM
1842 replies to this topic
#1441

Steve220
-

- Members
-

- 4,895 posts
Up Into Fourth
- Location: Shropshire
- Local Club: BMC
Posted 24 March 2018 - 09:47 AM
#1442
Richie83
-

- Members
-
- 1,494 posts
One Carb Or Two?
- Location: Somerset
Posted 24 March 2018 - 05:12 PM
Getting there Pete. Nice work as usual.
#1443
Petrol
-

- Members
-
- 967 posts
One Carb Or Two?
Posted 05 April 2018 - 10:23 PM
Thanks guys, I'm getting there. Now the rolling shell is almost finished I will be making a start on the engine soon but have a few questions about the wheels....
I want to fit 5 X 10" rims with 165 / 70 Yoko A032 tyres. From what I remember 6 X 10's can tramline a bit.
I want Minilite style rims but they have to fit over the 7 1/2" disks and 4 pot calipers I have. I also want them to fill the Mini Special arches.... More than fill them for that ever so slightly cheeky look.
I have been told that Minator rims are very light which will keep the UN-sprung weight down but will the ET of these fill the arches?
Copy and paste...
Here we have a set of 4 genuine Minator silver alloy wheels, suitable for Classic Mini
Size 5 x 10
ET 19
PCD 101.6
Thanks
Thanks
Pete
#1444
superzorg1000
-

- TMF+ Member
-
- 7 posts
Just On Tickover
- Location: Fareham
Posted 07 April 2018 - 09:23 AM
Hi Pete, not sure of it will, but this website might come of some use. If you have the measurements of your current wheels (poke/ET, etc.) it's a useful comparison tool. Hope this helps in some way.
#1445
timmy850
-

- TMF+ Member
-
- 2,997 posts
Up Into Fourth
- Location: NSW, Australia
- Local Club: MITG
Posted 08 April 2018 - 05:32 AM
The Mini 1100 Special wheels are listed here as being 10x5 with an offset of 15.5 (and of course use the same Mini Special wheel arches as you)
http://www.wheeldictionary.net
The ones you've listed are offset 19, which will be 3.5mm further set in under the arches.
 29911867403_2256a17996_b.jpg 71.21K
3 downloads
29911867403_2256a17996_b.jpg 71.21K
3 downloads
If you space out the 5x10 wheels to be as wide as 6x10 wheels you'll probably have the same amount of tram-lining anyway?
Edited by timmy850, 08 April 2018 - 05:36 AM.
#1446
Petrol
-
- Members
-
- 967 posts
One Carb Or Two?
Posted 10 April 2018 - 09:06 PM
Hi Pete, not sure of it will, but this website might come of some use. If you have the measurements of your current wheels (poke/ET, etc.) it's a useful comparison tool. Hope this helps in some way.
Thanks, that helped a lot.
The Mini 1100 Special wheels are listed here as being 10x5 with an offset of 15.5 (and of course use the same Mini Special wheel arches as you)
http://www.wheeldictionary.net
The ones you've listed are offset 19, which will be 3.5mm further set in under the arches.
If you space out the 5x10 wheels to be as wide as 6x10 wheels you'll probably have the same amount of tram-lining anyway?

Brilliant thanks very much, just what I needed. I remember driving my old Mini with 6X10 wheels and felt it tramline a bit so your probably right. The offset on the 5X10's is about as far as I want to go for a road car. I'll get a set of the Minators and see how it goes.I might put some small spacers on and take it from there. Again thanks
With the rolling shell sorted, it's time to start on the engine.
I swapped the pistons / rods around to get the best deck height. They are within 2 thou and the highest piston is flush with the top of the block

I measured the volume above the piston and its about 1cc. Remember there is a void between the piston and the top ring. I will use this to calculate the head chamber volume for the CR.
Some of the oil feed holes in the block don't line up with the holes in the shells. A restriction like this will reduce the flow of oil to the shell and make the pump work harder. A friend of mine told me what you're trying to do is turn the wheels not make heat. Reducing any losses like this are worth having.

I used a burr in a dremel to elongate the hole in the block to match the shell


I had to drill and tap the block to take the new oil pump

Then removed the core plugs to clean the galleries out.
Drilled first to weaken them

Then pulled them out

There are 2 on 998's and 4 on 1275's.
Pete
#1447
Petrol
-
- Members
-
- 967 posts
One Carb Or Two?
Posted 12 April 2018 - 07:51 PM
To remove boring / honing cutting fluid, it's best to use paraffin or detergent. WD40 won't shift it.
Block sprayed with engine degreaser. I poured it into all the oil galleries too.

Shower head removed and mat in bath

Hot water pumped through galleries

I got the whole block hot then dried it off with an airline. As soon as it was dry I sprayed WD 40 everywhere including down all the oil galleries

The cam I'm using was designed by David Vizard. In order to get the best out of it I'm using pressed steel rockers since these have the correct lift ratio for the cam. Different types of rockers have slightly different lifts. Even the forged S rockers are different from the sintered and pressed steel ones. 1.3 or even worse, 1.5 roller rockers would also ruin the profile of the cam.
Pressed steel rockers are pretty bullet proof especially if you beef em up a bit. Tig welding across the top

And a couple of blobs on the bottom

Makes them as strong as anything.
I have cleaned the pads up with 1500 wet and dry to remove any indentations. The high lift cam will use more of the pad than a stock setup

#1448
TobyM2018
-

- Noobies
-
- 100 posts
Mini Mad
- Location: Chorley
Posted 12 April 2018 - 08:12 PM
Nice Pete. Great detail as Always!
I'm taking notes... curious to hear more about the cam
I'm taking notes... curious to hear more about the cam
Edited by TobyM2018, 12 April 2018 - 08:17 PM.
#1449
Petrol
-
- Members
-
- 967 posts
One Carb Or Two?
Posted 15 April 2018 - 09:28 PM
I'll post the spec of everything when I build the engine. I'm waiting for a few parts so in the meantime.....
I bought this Mk3 distributor splash guard but it doesn't fit because I have a later front panel.
They certainly do the job and I'm not keen on those that go over the front of the engine so I decided to make my own.
Cardboard template

Two sheets of 1mm steel, waxed with mold release agent

This is prepreg carbon. The resin is infused in the carbon

Cut to shape and 5 layers on a sheet of steel. I rolled the carbon to ensure there was no air trapped between the layers

Next sheet of steel placed on top

The right way to do this is to bag and vacuum the part during the heating process which cures the resin. I don't have any of that so I puts some weight (sockets) in a flat bottomed Pyrex dish. This will put a bit of pressure on the layered up prepreg

Put it on top and baked it for 4 hours at 130C

Prepreg is much easier to work with than sheets of carbon fabric. There's no mixing of resins and it's much easier to handle.

#1450
Richie83
-
- Members
-
- 1,494 posts
One Carb Or Two?
- Location: Somerset
Posted 16 April 2018 - 09:04 PM
did it smell in the oven?I'll post the spec of everything when I build the engine. I'm waiting for a few parts so in the meantime.....
I bought this Mk3 distributor splash guard but it doesn't fit because I have a later front panel.
They certainly do the job and I'm not keen on those that go over the front of the engine so I decided to make my own.
Cardboard template
Two sheets of 1mm steel, waxed with mold release agent
This is prepreg carbon. The resin is infused in the carbon
Cut to shape and 5 layers on a sheet of steel. I rolled the carbon to ensure there was no air trapped between the layers
Next sheet of steel placed on top
The right way to do this is to bag and vacuum the part during the heating process which cures the resin. I don't have any of that so I puts some weight (sockets) in a flat bottomed Pyrex dish. This will put a bit of pressure on the layered up prepreg
Put it on top and baked it for 4 hours at 130C
Prepreg is much easier to work with than sheets of carbon fabric. There's no mixing of resins and it's much easier to handle.
#1451
guywilko
-

- Noobies
-
- 46 posts
On The Road
Posted 18 April 2018 - 05:35 PM
Car looks great!!
Which sub is that plse?
#1452
Petrol
-
- Members
-
- 967 posts
One Carb Or Two?
Posted 21 April 2018 - 08:00 PM
There was no smell from curing the carbon.
The Sub is an Alpine SWE-122 8". The best thing about it is it's light and doesn't take up much space.

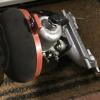
I bought 5 rims. I'm not fitting a carpet in the boot so it will be nice to see a proper spare

These look just about right

They also clear the 4 pot calipers..... Just!

#1453
1330RG
-
- Just Joined
-
- 219 posts
Mini Mad
- Location: southampton
Posted 22 April 2018 - 06:15 PM
Stunning quality work as always!
#1454
Petrol
-
- Members
-
- 967 posts
One Carb Or Two?
Posted 24 April 2018 - 08:27 PM
Thanks but I chipped a piston ring  Had to buy a new set so now I can start building the engine.
It's best to fit sealant to gaskets and core plugs, particularly the oil plugs.

Best not to get sealer inside the gallery so put the plug in first followed by a bead around it

Knocked in

Engine oil on the pistons and rings.
Graphogen on the crankshaft journals

Also on the shells

The tab washers on the big ends are very soft. This can lead to the bolt working loose so I ditched them and used lock and seal.

All torqued up.
End float on crank is 2 1/2 thou

#1455
Marco1972
-

- Members
-
- 822 posts
One Carb Or Two?
- Location: Birmingham
Posted 24 April 2018 - 10:14 PM
Hi Pete
Not sure if your still using Photobucket but all I can see is the image code
I’m having the same problem myself when I post
Mark
Not sure if your still using Photobucket but all I can see is the image code
I’m having the same problem myself when I post
Mark


0 user(s) are reading this topic
0 members, 0 guests, 0 anonymous users


