thanks guys for all comments,and also thanks for watching my build thread...there is alot yet to come

Therapist-My 76 Mini
Started by
Niko-mini1275
, Dec 20 2012 11:23 AM
128 replies to this topic
#31

Niko-mini1275
-
- Members
-

- 175 posts
Mini Mad
- Location: dubrovnik,croatia
Posted 17 January 2013 - 05:43 PM
#32
Niko-mini1275
-
- Members
-
- 175 posts
Mini Mad
- Location: dubrovnik,croatia
Posted 18 January 2013 - 08:33 AM
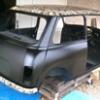
so, to go back to the sills story...after a lot of fiddling and tweaking they finally came into place :


all cut,drilled,primed and ready to go on the car :


welded,grinded,primed :


same thing,other side :


all cut,drilled,primed and ready to go on the car :


welded,grinded,primed :


same thing,other side :


#33
fattail95
-

- Members
-
- 873 posts
One Carb Or Two?
- Location: East Sussex
Posted 18 January 2013 - 09:30 AM
Fantastic! Will be watching this closely 

#35
Niko-mini1275
-
- Members
-
- 175 posts
Mini Mad
- Location: dubrovnik,croatia
Posted 18 January 2013 - 11:28 AM
i better not show u my view out the window,cars are unrecognizable,everything is covered in white!!!
thanks for the support!
thanks for the support!
#36
Niko-mini1275
-
- Members
-
- 175 posts
Mini Mad
- Location: dubrovnik,croatia
Posted 22 January 2013 - 09:15 AM
had to correct some of the previous owner's bad decisions :

i used that anti-rust liquid to soak everywhere on the underside of the car,to stop rust from spreading

welded that piece of sheet metal that was there all the time,it was ok and it fitted the hole ;)

after i grinded it down i started to cover it with the thick coat of primer :


i used that anti-rust liquid to soak everywhere on the underside of the car,to stop rust from spreading

welded that piece of sheet metal that was there all the time,it was ok and it fitted the hole ;)

after i grinded it down i started to cover it with the thick coat of primer :

#37
Niko-mini1275
-
- Members
-
- 175 posts
Mini Mad
- Location: dubrovnik,croatia
Posted 23 January 2013 - 10:28 AM
some patchwork and holes filling :


primed and ready to start work on the rear walance :


primed and ready to start work on the rear walance :

#38
Niko-mini1275
-
- Members
-
- 175 posts
Mini Mad
- Location: dubrovnik,croatia
Posted 25 January 2013 - 07:25 AM
trial fit first :


then the real deal...first stone chip protection from the inside and on hard-to-reach places :


all done&ready to move on :


time to start working on the front side!


then the real deal...first stone chip protection from the inside and on hard-to-reach places :


all done&ready to move on :


time to start working on the front side!
#39
minimikej
-

- Members
-
- 346 posts
Speeding Along Now
- Location: Derbyshire
Posted 25 January 2013 - 08:40 AM
Fantastic work there. The shots of the shell on its side down the sill really highlight that the sides to a mini are not actually parallel! That was news to me when I did mine
#40
Niko-mini1275
-
- Members
-
- 175 posts
Mini Mad
- Location: dubrovnik,croatia
Posted 29 January 2013 - 08:39 PM
first i had to remove front panel and left hand wing,they were all dented and rusted so i figured it was wiser just to get new rather than try to repair the original..this was how it looked like:


then test fitted the whole front end to see how those non genuine parts actually fit and it turned out they were just fine!


even with the bonnet on:


then test fitted the whole front end to see how those non genuine parts actually fit
and it turned out they were just fine!

even with the bonnet on:


#41
Niko-mini1275
-
- Members
-
- 175 posts
Mini Mad
- Location: dubrovnik,croatia
Posted 31 January 2013 - 07:53 PM
hehe my thread has 1275 views 
so,fitting the front end continues...proper cooling hole for the 1275 engine :


frame for the headlight was eaten away from rust so we made a new one using bits from the original one and the one from donor car:

zinc sprayed,as good as new

and after a whole day of work this is how we deal with accumulated stress!left hand side front wing(what is left of it)

#42
Marco1972
-

- Members
-
- 822 posts
One Carb Or Two?
- Location: Birmingham
Posted 31 January 2013 - 08:04 PM
Ha ha looking good
You can't beat a bit of metal therapy......
Keep up the good work its coming along great..
You can't beat a bit of metal therapy......
Keep up the good work its coming along great..
#43
Niko-mini1275
-
- Members
-
- 175 posts
Mini Mad
- Location: dubrovnik,croatia
Posted 02 February 2013 - 04:58 PM
thats why its called therapist...metal therapy all the way working on it makes me not to think about everyday problems...
working on it makes me not to think about everyday problems...
#44
Niko-mini1275
-
- Members
-
- 175 posts
Mini Mad
- Location: dubrovnik,croatia
Posted 11 February 2013 - 09:36 AM
time to talk custom....
i know every mini is different in some way,but i wanted to make mine in the way it suits me.as i am pretty tall and i think the proper way to sit in a mini is to sit low i had to make some custom changes.the rear seat and the pockets had to go out !!! ashtray as well:

also,the cross member:
 [/URL
[/URL
as we found some rust beneath it,had to do something about it...wire brushed and soaked with anti rust liquid:


and new,lower,custom made cross member came in,all trimmed and welded into place!


[URL=http://imageshack.us/photo/my-images/210/fotografija0718.jpg/]
i know every mini is different in some way,but i wanted to make mine in the way it suits me.as i am pretty tall and i think the proper way to sit in a mini is to sit low i had to make some custom changes.the rear seat and the pockets had to go out !!! ashtray as well:

also,the cross member:
[/URLas we found some rust beneath it,had to do something about it...wire brushed and soaked with anti rust liquid:
and new,lower,custom made cross member came in,all trimmed and welded into place!
[URL=http://imageshack.us/photo/my-images/210/fotografija0718.jpg/]
#45
Niko-mini1275
-
- Members
-
- 175 posts
Mini Mad
- Location: dubrovnik,croatia
Posted 13 February 2013 - 12:21 PM
did holes for the loudspeakers
before:

after:

before:

after:


0 user(s) are reading this topic
0 members, 0 guests, 0 anonymous users


