Jump to content


Photo

Heelboard Alignment Method - Can I Ask Your Opinion....


  • Please log in to reply
9 replies to this topic

#1 antcole

antcole

    Speeding Along Now

  • Members
  • PipPipPipPipPip
  • 307 posts
  • Location: Devon

Posted 01 January 2013 - 02:00 PM

Hello folks and happy new year!
Im at the stage of fitting the heelboard and would like to ask your opinion on my method of aligning it correctly to the front end subframe mount position.

My opinion is that it needs a fixed 'datum' point to be aligned to, to avoid the infamous crabbing effect.
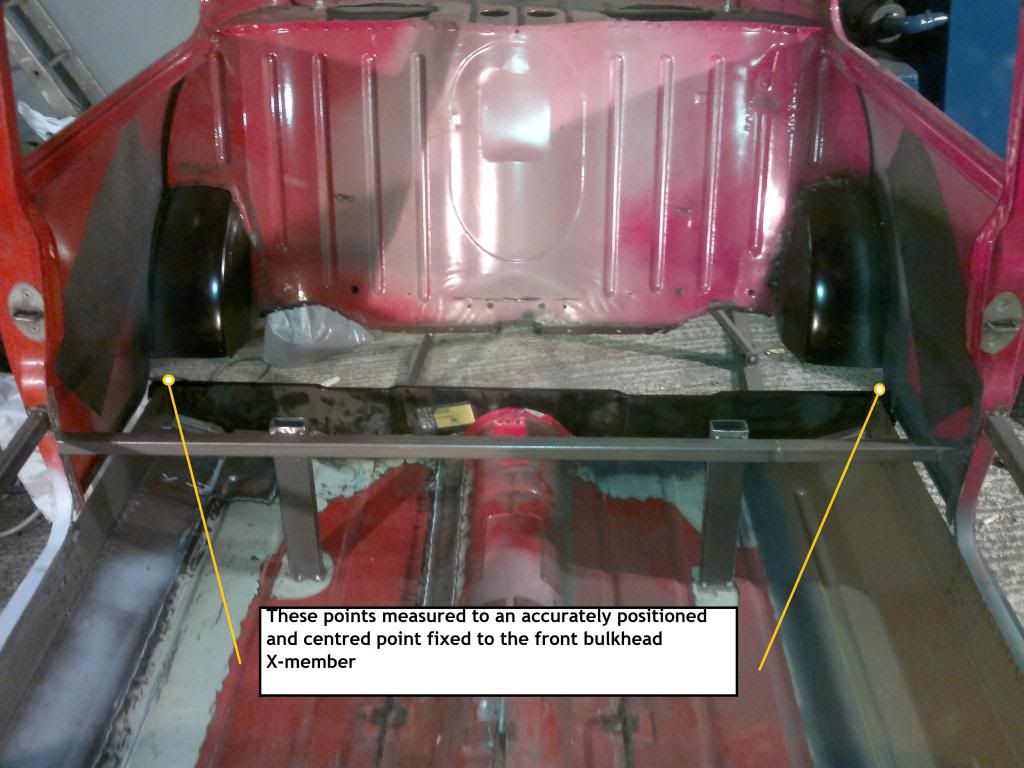
Therefore the main fixed point would be the front subframe mount on the X-member bulkhead.
From this point, if the rear subframe is accurately aligned and square to it, there should be no issues of crabbing or rear end steer.

Since the mini is essentially a hand built shell with no real reference points on the bodywork, then the only fixed place that is relevent is the front subframe and making sure the rear subframe is 'square' to it etc.

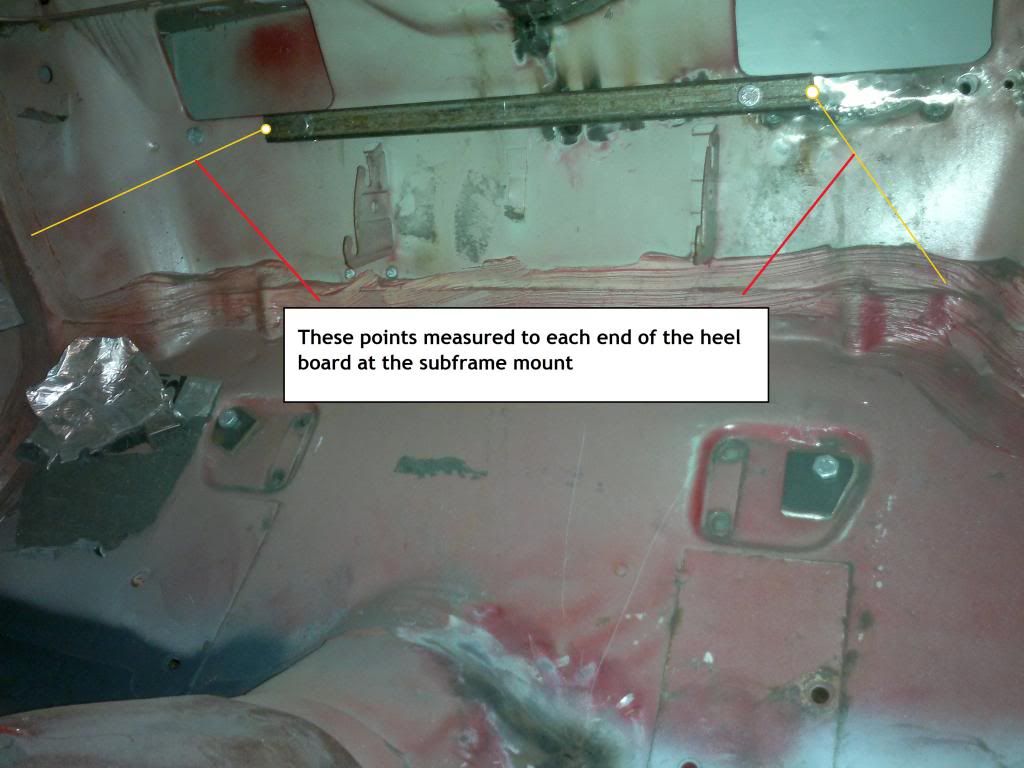
Ive very accurately constructed a piece of steel which is fixed to the front X-member by bolts from the inside and then by running a line or measurement from each end down to the heelboard corners should effectively square the heelboard to it.
At the moment i have 10mm of mis-alignment - left side is 163.5 cm, and the right is 162.5 cm from the measurement point at the bulkhead X-member.
Is 10mm difference going to be a cause for concern or is it acceptable?

Have a look at these pictures to see what im on about -

Posted Image

Posted Image

Posted Image

I hope these explain what im trying to achieve.
Many thanks in advance.

Edited by antcole, 01 January 2013 - 02:01 PM.


#2 skoughi

skoughi

    One Carb Or Two?

  • Members
  • PipPipPipPipPipPipPip
  • 1,199 posts
  • Location: Lerwick
  • Local Club: Shetland classic car club

Posted 01 January 2013 - 02:20 PM

Hi and a happy new year to you! I'm in the procces of doing a "dry build" on my clubman just now to check to see how damaged up my shell is after all my patching. My points are from the mounting points of the rear trailing arms on the rear sub to the upper arm mounts on the front sub. I'm going from the upper arms as these can't be adjusted so to speak and if they're parrallel to the rear arms then the lower adjustable arms can be made equal to each other thus giving equal castor etc. I mounted both subs then I've constructed two steel box sections that I clamp to the underside of the two subs then position them with an engineers square so that they are directly below the mounting holes of the suspension parts mentioned. This means I have two beams that I can easily measure off for checking if the suspension arm mounting holes are parralel and by marking on the beams where the square lines up you can check diagonals, but may be better with a plumb bob and marking on the floor. Then if anything is out then shim the rear sub until things line up. I've been advised that 5mm difference is ok. Have a look on my build thread to see what I'm waffeling on about, I'm on the champers already so this has taken a lot of effort to type out!! O_O

#3 antcole

antcole

    Speeding Along Now

  • Members
  • PipPipPipPipPip
  • 307 posts
  • Location: Devon

Posted 01 January 2013 - 02:43 PM

Hi and a happy new year to you! I'm in the procces of doing a "dry build" on my clubman just now to check to see how f**ked up my shell is after all my patching. My points are from the mounting points of the rear trailing arms on the rear sub to the upper arm mounts on the front sub. I'm going from the upper arms as these can't be adjusted so to speak and if they're parrallel to the rear arms then the lower adjustable arms can be made equal to each other thus giving equal castor etc. I mounted both subs then I've constructed two steel box sections that I clamp to the underside of the two subs then position them with an engineers square so that they are directly below the mounting holes of the suspension parts mentioned. This means I have two beams that I can easily measure off for checking if the suspension arm mounting holes are parralel and by marking on the beams where the square lines up you can check diagonals, but may be better with a plumb bob and marking on the floor. Then if anything is out then shim the rear sub until things line up. I've been advised that 5mm difference is ok. Have a look on my build thread to see what I'm waffeling on about, I'm on the champers already so this has taken a lot of effort to type out!! O_O


Hahaha! Good work, champers is a fabulous way to go mate!

My only problem is the shell is up on a spit at the moment and i cant attach the front subframe.
I also have the rear floorpan cut out too so mounting the rear subframe is tricky too.

If i use a spirit level to level the car at the front subframe mount, then i can use the same to level the heel board.
Im more concerned about the heelboard being square to the front subframe really.

Thanks for the advice, ill have a dig through your thread and get some pointers, thanks for the reply!

Edited by antcole, 01 January 2013 - 02:54 PM.


#4 skoughi

skoughi

    One Carb Or Two?

  • Members
  • PipPipPipPipPipPipPip
  • 1,199 posts
  • Location: Lerwick
  • Local Club: Shetland classic car club

Posted 01 January 2013 - 03:41 PM

Cheers! Champers finished now, had roast beef dinner(thanks my fine wife) and onto the wine! Head starting to get fuzzy again! Onywie, the way I thought about it was the floor, heelboard, subframes and mounting brackets for the trailing arms can and probably are all slightly out, off centre and off level but what matters is where the trailing arms and upper front arms are located.If you're replacing the whole heelboard then you could tack on a straight length of box section about say 300mm longer each side onto the heelboard and place it so it lines up with the bottom of the mounting holes for the subframe mounts then you could use this for leveling the heelboard and measure of it towards the front. I took the time to take my clubman off the spit and fit the front sub when measuring things. With my spit it only takes an hour at most but it's very important I feel to get this right. Everything else on the shell is simply a case of getting things to match up but I feel this needs to be done right. I'm never confident that subframes themselves are truely square so I think you should measure from the suspension mounts not where the sub bolts too. At least with the rear one you can shim it out but the front canna move much. Right enough of this, where's the wine gone? :D
http://www.theminifo...-my-fixerupper/

Edited by skoughi, 01 January 2013 - 03:42 PM.


#5 tiger99

tiger99

    Crazy About Mini's

  • Members
  • PipPipPipPipPipPipPipPipPipPip
  • 8,584 posts
  • Location: Hemel Hempstead

Posted 01 January 2013 - 04:38 PM

The two measurements from one end of your front piece of steel to the same end on the rear do not actually prove anything at all. They can still be equal with various forms of very large alignment error. You need to check that the diagonals, i.e. left front to right rear and right front to left rear are equal. But that does not guarantee correct alignment either. You still need to establish the centre line, and check that the diagonals cross on it.

The centre line passes through the mid point of the rear subframe front fixing bolts and the rear fixing bolts. It also passes through midway between the front subframe tower bolts. The front subframe heelboard bolts are useless for alignment purposes as they are sunject to large tolerances. The teardrop mounts may be usable. But you can't establish the centre line on the shell, as the height varies at each pair of reference points, so it is usual to set the shell upright over a flat floor and project the points downwards on to the floor, which can easily be marked and measured. The height of each should also be checked.

It is known from this forum that many heelboards are made incorrectly, with the subframe displaced to one side, so you may well find a seemingly alarming error that may actually be harmless, so I suggest posting what you find and we can then suggest some more checks accordingly. If the rear subframe is displaced sideways by 10mm, but its heelboard mounts are still at right angles to the centre line, that is acceptable and is not crabbing, however if the centre between the heelboard mounts is right on the shell centre line, but the heelboard is not at exactly right angles, that is crabbing and is far less acceptable.

You really do need to check every jigging point to establish correct alignment.

See here:
http://mk1-performan...ignment_dia.jpg
http://mk1-performan...al_drop_dia.jpg

#6 skoughi

skoughi

    One Carb Or Two?

  • Members
  • PipPipPipPipPipPipPip
  • 1,199 posts
  • Location: Lerwick
  • Local Club: Shetland classic car club

Posted 01 January 2013 - 06:52 PM

Good points Tiger and I appoligise for not stating diagonal measurements, suppose thats what happens when you get advice from a half drunk Shetlander! I suppose there's never enough measurements someone can take, the more the better. The two metal bars I have also have two small bars welded to them for a spirit level to sit on so if the ends are an equal distance from the suspension mounts then you can check if the subs in relation to their mounts are both level and they're a quick way to check if the two subs are parralel. As Tiger states though you also need to do the diagonals. My two bars aren't the be all and end all but they help with a few things! Tiger, you say that you take drops from the tower bolts, why not take drops from the upper arms? I just feel that a front sub in relation to the distance from the tower bolts to the upper arm mounts may not be equal both sides, if you know what I mean, and surely its the suspension mounts that are the important bits and every bit between the front and the back is there just to hold the two ends of the car together, if you know what I mean! So the front center line mark would then come from the suspension components.

#7 antcole

antcole

    Speeding Along Now

  • Members
  • PipPipPipPipPip
  • 307 posts
  • Location: Devon

Posted 01 January 2013 - 07:10 PM

Excellent advice chaps, thank you so much.
I shall check 5 times, cut once as they say. Oh the joys of mini restoration!

Ill post up any findings that may be useful to others.
Thanks again.

#8 tiger99

tiger99

    Crazy About Mini's

  • Members
  • PipPipPipPipPipPipPipPipPipPip
  • 8,584 posts
  • Location: Hemel Hempstead

Posted 04 January 2013 - 01:20 PM

Yes, you can take measurements from the suspension mounts, if a bare subframe is fitted. The only snag is that dimensions are not documented anywhere. If the subframe is on solid mounts, and is straight, there will be no big advantage. I would advise against it if the subframe is rubber mounted, as I know that they move around somewhat.

#9 skoughi

skoughi

    One Carb Or Two?

  • Members
  • PipPipPipPipPipPipPip
  • 1,199 posts
  • Location: Lerwick
  • Local Club: Shetland classic car club

Posted 04 January 2013 - 01:43 PM

Thanks for replying tiger. I'm fitting a bare sub on solid mounts so i feel it will be better to go from the suspension mounts. It wont matter about there being no available measurments as I'll just go with what my car measures once everything ie diagonals etc is equal. To me it won't matter if my wheelbase is +/_10mm as my clubby isn't original anyway. Be prepared for a few pms in the very near future for advice and help!!

#10 tiger99

tiger99

    Crazy About Mini's

  • Members
  • PipPipPipPipPipPipPipPipPipPip
  • 8,584 posts
  • Location: Hemel Hempstead

Posted 04 January 2013 - 11:34 PM

Actually, I seem to recall that the tolerance on the wheelbase is half an inch, so you could actually assemble them on the limit to get noticeably more rear legroom! As you know, the exact wheelbase is nothing to worry about, as long as it is straight, which it will be once you do the diagonal checks. You can even graft in a van floor extension and sills, 4.5 inches, and still have it handle properly, but there would be interesting challenges with the body sides, windows and roof!


0 user(s) are reading this topic

0 members, 0 guests, 0 anonymous users