Jump to content


Photo
- - - - -

84 Mini25 Resto 2.0


  • Please log in to reply
409 replies to this topic

#346 1984mini25

1984mini25

    Crazy About Mini's

  • Members
  • PipPipPipPipPipPipPipPipPipPip
  • 8,781 posts
  • Location: -

Posted 06 December 2017 - 10:41 PM

As the weather has turned far too cold to be able to do anything too involved, I’ve been coming up with a to do list for the next stages of work.
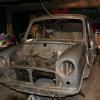
Engine bay,
. Strip and repaint bulkhead and inner wings,
. Degrease and repaint/detail engine and front subframe,
. Go though and re-wrap wiring loom in original grey insulation. As some of the engine bay electrics are getting a little fragile/temperamental,

. Reinstate bulkhead sound proofing and sound proof under bonnet,
. Prime and paint engine bay plastics (probably satin),


Underside,
. Clean and repaint front suspension,
. Clean and stonechip the rest of the underside (really not looking forward to removing old underseal),
. Paint bottom of battery box silver,
. Exhaust? The one current ones been on for the last 8 years and is going a little crusty in places, the baffles in the rear box have also started to go. Although I’m torn between a standard pea shooter or soothing else, but ‘stock’ looking,


Inside,
. Repaint the front seat crossmemebr, something the painter guy couldn’t be bothered to do,
. Repaint the rear bulkhead inside the boot,
. Repaint fuel tank,

. Either keep the patina of the replacement grey carpets or replace with new. I've got a practically new set of black ones I don't want (and can't seam to sell), but don't feel black would look right. I've also tried emailing the same people I bought my replacement grey ones from with no reply. As I really do like the deluxe dark grey velour carpets I currently have, it's just they are starting to wear though and fraying in a few places.


Outside,
. Repaint wheels to a bight silver, my rear tyres are also getting a little on the old side being 05/06 vintage.
. Repaint inside of boot lid, inside both doors and behind the drives a panel/door shut. I’ve also got the n/s rear arch to repaint and the o/s sill strip, the latter being because the painter guy has sanded though my paint and into the plastic (might need a whole new strip) while ‘fixing’ the door step. Just what I wanted with brand new and painted parts.


There’s probably more but I don’t want to be too picky. Although I’m looking into how I can pressure wash the engine bay, underside and suspension (mostly a mix of dirt, grime, oil, flaking paint and rust) without an outside tap or hosepipe. It doesn’t have to be spotless, just remove the worst to make cleaning off what’s left with spirts easier.


Edited by 1984mini25, 26 December 2018 - 10:05 PM.


#347 megamini_jb

megamini_jb

    Crazy About Mini's

  • Members
  • PipPipPipPipPipPipPipPipPipPip
  • 5,491 posts
  • Name: Jamie
  • Location: -

Posted 18 December 2017 - 07:00 PM

Such a awesome 25


Joih8Xn.jpg


65Flluj.jpg


bUskZSV.jpg


#348 1984mini25

1984mini25

    Crazy About Mini's

  • Members
  • PipPipPipPipPipPipPipPipPipPip
  • 8,781 posts
  • Location: -

Posted 19 December 2017 - 04:40 PM

And a few I took.


38427114264_8e8e0fef4e_c.jpg


38427112764_2d47b3e70a_c.jpg


38427111594_4a799ec001_c.jpg


24277174727_a5e1a72b95_c.jpg


25270579438_0e73c46d87_c.jpg


27359146669_a3efe2d03d_c.jpg


25270578948_93a4720a1e_c.jpg


39105691362_b452e567e6_c.jpg


27359145299_232137398c_c.jpg


#349 1984mini25

1984mini25

    Crazy About Mini's

  • Members
  • PipPipPipPipPipPipPipPipPipPip
  • 8,781 posts
  • Location: -

Posted 30 January 2018 - 11:33 PM

Haven’t done a great deal recently, not that I’d planned on using the mini over winter anyways. Well that was the plan, unfortunately a relative was admitted to hospital on Boxing Day and I was left with no option other than to use the mini. As the other available car needs its belts doing (screeching like a goodun (worse when wet/damp) and its too cold to be fixing cars outside) and I didn’t fancy risk being stuck at the side of the road with either a flat battery from having to use the lights, wipers, heater etc, or stuck with a snapped belt and no power steering either. So I ended up having to use the more reliable 33 year old mini instead for the best part of 3 weeks. Thankfully the relative is now out of hospital and on the mend.


But apart from that, and having to try and ignore how filthy the mini was, even though it still looked shiny. I have recently been collecting car cleaning stuff. Something I haven’t really bothered with too much in the past (or at least for the mini) as there never was much point in bothering too much with the rattle can paintwork. Although at this rate I might end up using a noodle mitt (witch I’ve been using for years anyways) and meguiars ultimate wash and wax in place of shower gel.


Working through my list above I bought an stainless exhaust trim on eBay for £7, While trying to decide what to do. And after a lot of faffing around with having to file the exhaust as it was that rusty, although the stainless trim will now probably cause the exhaust to rust more. And shortening it by about an inch and drilling another hole, which I later realised I didn’t really need to do, I’m not completely sold on that it suits the car.


28213704599_5c024cffbf_c.jpg


39094790135_08af42b30b_c.jpg


Bought some show plates I posted about in mini chat


39808600332_be2bc25a19_c.jpg


25967601168_61d31a8cb4_c.jpg


And made a start on attacking another paint blister that’s appeared recently. I’ve carefully removed it with a scalpel to find rust staining behind it. But after sanding it carefully with some 1500 wet and dry glued to the eraser end of a pencil, it doesn’t seem to go through the primer. Which is odd to have a rusty marks between the primer and base coat.

I’ve since built up the level with some primer blobbed in by brush and will sand that back, and either blob some top coat over it or spray it. (and yes I know about the rust along the bottom of the door)


39990238601_3905c40c39_c.jpg


39990238441_3c1eb27615_c.jpg


Then next on the list is this bit of rust that first appeared less than week of getting the car back (only 4 months) and isn’t getting any better. And was one of the issues he wasn’t entertaining on fixing being with it being ‘hidden’ (not the point really and don't expect it), well apart from every time you open and close the door that is. And with the rust in bottom corner of the a panel to also deal with, I might just end up having to take the door back off >_<


25119839977_fbbc14b844_c.jpg


#350 pete l

pete l

    One Carb Or Two?

  • Members
  • PipPipPipPipPipPipPip
  • 1,358 posts
  • Location: East of France

Posted 31 January 2018 - 07:41 AM

Who changed the door skin ?


#351 1984mini25

1984mini25

    Crazy About Mini's

  • Members
  • PipPipPipPipPipPipPipPipPipPip
  • 8,781 posts
  • Location: -

Posted 31 January 2018 - 11:38 AM

Who changed the door skin ?


I did around 2013/14, but it never rusted while spending 3 years outside with noting more than rattle can paint as protection. And the blisters/rust first appeared within a week of getting the mini back...


#352 pete l

pete l

    One Carb Or Two?

  • Members
  • PipPipPipPipPipPipPip
  • 1,358 posts
  • Location: East of France

Posted 31 January 2018 - 02:15 PM

I would say that no zinc primer was used when the lips were closed around the door frame, then no sealer was used either, can't see any on the photos. 


Were the door skins welded around the door frame ? not just around the top, but spot welds all around ? If not, any paint that was acting as a seal will crack and let water in.


#353 1984mini25

1984mini25

    Crazy About Mini's

  • Members
  • PipPipPipPipPipPipPipPipPipPip
  • 8,781 posts
  • Location: -

Posted 31 January 2018 - 06:46 PM

The door skins (both have been replaced) were sealed/bonded before the lip was folded over and then welded. But what the 'painter' has decided to do, grinding down welds, removing sealant etc. I don't know.


My thinking is, as I've had several areas bubble up (when I popped the one above the garage stunk of thinners) is the primer was wet sanded (probably blasted with a hose going by the amount of water I found swimming in the car when it came to being rebuilt) and never dried after properly. So the filler/primer has absorbed moisture witch has then been trapped by the base and top coats, made worse by the fact some areas haven't been painted properly. Some with primer that missed base coat (or is so thin it doesn't exist) and then lacquered, or primer, base and then no clear.


All I can do is some careful digging/sanding, scrape out as much rust as I can, treat it and try and seal it (probably with some rust proofing) and then tough up the paint as best I can.


With the mess he's left the bottom of both doors in (I wouldn't be surprised if they were just thrown in a corner/stuff piled on top etc.) Both will need to be reskinned anyway, and something I'm not going to be doing anytime soon.


#354 1984mini25

1984mini25

    Crazy About Mini's

  • Members
  • PipPipPipPipPipPipPipPipPipPip
  • 8,781 posts
  • Location: -

Posted 02 February 2018 - 05:59 PM

Well that didn't go to plan, went to blob some silver on from the tin I have spare and it reacted/mixed with the primer. So I ended up taking the lot back off with thinners and just blobbing the silver on instead. It will only be temporary anyway.


Then I set about attacking the rust bubbling by the check strap. I ideally wanted to leave this until the summer, but the longer I'm leaving it the worse its getting. And what I'm now left with after carefully scrapping away at the filler and picking out as much rust as i could.


40011463152_e845613b8a_c.jpg


39145450085_34af4f5e17_c.jpg


I can see why he was refusing to even look at it, let alone fix it, *******. If you also look closely, you'll also notice that there's no paint on the back of the a panel, only primer. Pretty good going for someone who removed the doors to paint the door shuts. Still I've blobbed some more paint over it and I'll have to make a more permanent repair when the weather warms up, and I can remove the door to also do behind the a panel.  


Also my new interior light bulbs have finally arrived. I did buy some from china last year, but after 3 months of waiting, they show no signs of ever arriving (or refund). So I've had to buy another load from a different seller.


Standard bulb on the left and my pervious led bulb on the right.


26170770668_1b422a10fe_c.jpg


And now my new led bulb on the left and the old led bulb on the right (same as above)


39145449725_a60f423e3a_c.jpg


Should do a much better job of illuminating the interior through the opaque interior light lens.


Edited by 1984mini25, 02 February 2018 - 06:03 PM.


#355 1984mini25

1984mini25

    Crazy About Mini's

  • Members
  • PipPipPipPipPipPipPipPipPipPip
  • 8,781 posts
  • Location: -

Posted 15 March 2018 - 07:09 PM

I received some news as of almost a week ago thats serious messed with my head (Im not going into detail), But as theres is nothing I can do, Ive chose to keep myself busy.
 
So Ive given the whole mini a quick posh and wax again. Can I say I hate silver? As you cant see how much youre applying to each panel without over applying and wasting to much/making it a sod to remove.

Whipped my n/s front wheel off to sort out my sticking brake calliper. It will need to be sorted/replaced, as the inside face of the disk was very rusty were the piston/pad on that side wasnt moving. But for the time being Ive pushed the pistons out with pieces of wood in place of the brake pads, cleaned up the pistons as best I could with a wire brush, smeared them with copper grease and pushed them back.

Cleaned the overspray off the rear subframe and battery box thats been bugging me and touched up with some stone chip.

And then spent the last 3 days cleaning up my engine bay, giving the engine a wash of all the dirt and body filler dust with some ph. neutral allow wheel cleaner that turns red and it reacts with the dirt. Working it in with a brush, hosing it off with a pump pressure sprayer and mopping up the residue with some towels.
 
Going through cleaning up the fuse box (ok correction wise just dirty) and re wrapping the loom with standard grey insulation instead of the old and rather sticky black stuff Id rapped it in years ago. Although I was expecting to have to rewrap the entire front loom, but it turned out Id original only wrapped the black insulation over the top of the original grey, so all it needed was cleaning with sprits to remove the stick residue and only wrapping with new a few sections.
 
25956496777_a0ddda5b64_c.jpg
 
26958292278_4698828847_c.jpg
 
I also gave the wiper motor cover, bottom section of the air filer box and inner wing ducting a clean, prime and paint using some gloss black rattle cans from poundland, although I did use the last of my stone chip of the inner wing elbow.
 
Touched up the paint were needed on the inner wings (would prefer they werent hammerite but it would take far too much effort to strip back and paint up properly) and engine. And after putting it all back together (and chasing a few electrical issues) Im now left with this. And rather than mess with the hammerite paint on the bulkhead Im looking at one of the bulkhead felt pads to cover it instead.
 
40118943654_7bfe2886a7_c.jpg
 
26958290698_8533a53bba_c.jpg
 
40118943334_3e8c037477_c.jpg
 
Ive also picked up a can of oil and oil filer (I bought two) as it worked out at £3.62 for the pair with euro car parts 35% weekend discount, so that's the next job on the list.

Edited by 1984mini25, 15 March 2018 - 07:30 PM.


#356 1984mini25

1984mini25

    Crazy About Mini's

  • Members
  • PipPipPipPipPipPipPipPipPipPip
  • 8,781 posts
  • Location: -

Posted 20 March 2018 - 09:01 PM

I've recently acquired a pair of these, some might say I over paid for not 100% correct speakers (that I really aren't that bothered about). But seeing as I recently offered someone £50 for a pair witch was refused, I've saved myself £21.


40217477704_a63da7b3e3_c.jpg


40217477054_55353d3d47_c.jpg


And going form the age of the cd player that was screwed to the top of the lower dahs rail (Witch later cost me a replacement lower dash rail) when I bought the mini back in 05, this particular mini has been without these on the rear shelf for at least 20 years.  


Although the speakers in them were shot (pics after their dunking) and need replacing. Luckily though they came apart easily after leaving to soak in some rather warm water.


40899729261_b0b86bb574_c.jpg


40857722392_5302f425cd_c.jpg


And rather luckily, a pair of small pod speakers I'd previously had in the mini were a perfect match to replace them with.


40857721362_59e7da6ebe_c.jpg


40899728631_e107521c90_c.jpg


While i was swapping over the speakers I gave the housings my tried and tested (as in I did virtually all of the black plastic items while the mini was away being painted) of a quick scrub with soapy water, t cut and buff (if you let it dry it stains) and then a final going over with some black shoe polish.


And of course I've since fitted them to the mini, in witch the longer repaired bolt actually helped with being able to use a small bracket/clap to cable tie my lose/excess wiring to. Sound wise, and this could just be me, but the replacement speakers seam to sound better in these housings than they did in their own smaller ones. Or it could be, that these are now, and I'll quote from the sales brochure " Twin rear shelf speaker pods carefully angled for optimum acoustic quality".


Edited by 1984mini25, 28 October 2018 - 09:40 PM.


#357 1984mini25

1984mini25

    Crazy About Mini's

  • Members
  • PipPipPipPipPipPipPipPipPipPip
  • 8,781 posts
  • Location: -

Posted 21 March 2018 - 04:10 PM

Couldn't resist when I popped out earlier.


26068112297_b9382f2232_c.jpg


40899118292_58e88c6206_c.jpg


40232399334_5022be81b6_c.jpg


40899116242_30e8d38516_c.jpg


27069854148_bc36381e15_c.jpg


40899114572_fb2064377e_c.jpg


40941032401_2af9487f41_c.jpg


27069853378_a51f4882fb_c.jpg


40941030941_61eb6a35d7_c.jpg


40941030171_e40c507a68_c.jpg


40941029211_477f0ea298_c.jpg


26068104887_fc976ac060_c.jpg


40046517725_50ab28c4d1_c.jpg


26068103497_ed1dc186d6_c.jpg


39131367920_9cba8014f9_c.jpg


#358 Jared Mk3

Jared Mk3

    Has a small thing but it does make a difference

  • Members
  • PipPipPipPipPipPipPipPip
  • 1,974 posts
  • Location: Kokstad, South Africa
  • Local Club: MOCKZN

Posted 21 March 2018 - 05:11 PM

I really do like this car  =]


#359 1984mini25

1984mini25

    Crazy About Mini's

  • Members
  • PipPipPipPipPipPipPipPipPipPip
  • 8,781 posts
  • Location: -

Posted 21 March 2018 - 05:41 PM

I also did an oil change when I got back. But thought an update of me smacking my hand on the front panel cracking off the sump plug, Dropping the old oil filter full of oil all over the front of the gearbox and subframe, getting the hood of my hoody tangled on the bonnet catch and dribbling fresh oil all over the rocker cover might have been a boring update.


#360 MacGyver

MacGyver

    One Carb Or Two?

  • TMF+ Member
  • PipPipPipPipPipPipPip
  • 1,027 posts
  • Location: Fribourg

Posted 21 March 2018 - 06:43 PM

Oil will keep the engine from rusting! 😂


0 user(s) are reading this topic

0 members, 0 guests, 0 anonymous users