Jump to content


Photo
- - - - -

1964 Mk1 Morris 850


  • Please log in to reply
829 replies to this topic

#661 timmy850

timmy850

    Up Into Fourth

  • TMF+ Member
  • PipPipPipPipPipPipPipPipPip
  • 2,991 posts
  • Location: NSW, Australia
  • Local Club: MITG

Posted 30 July 2020 - 10:53 AM

The PCV system creates a vacuum in the crankcase and sucks all the blowby gases into the intake manifold and burns it & reduce the emissions.


I liked it on this car as it sucks all the fumes away so it isn't so smelly, and the slight vacuum also means less oil leaks. The downsides are the extra air doesn't go through the carb, so it can change the fuel mixture if it's not set up correctly. Also if you have too much air entering the crankcase (like an air leak or an open breather) it will cause more air to go in the engine and give a high idle 


The later factory twin carbs went to a CCV system, which is a lot simpler


#662 Vinay-RS

Vinay-RS

    Put's foolish ideas in peoples heads

  • Members
  • PipPipPipPipPipPipPipPipPip
  • 2,093 posts
  • Location: Cape Town

Posted 30 July 2020 - 11:19 AM

The PCV system creates a vacuum in the crankcase and sucks all the blowby gases into the intake manifold and burns it & reduce the emissions.


I liked it on this car as it sucks all the fumes away so it isn't so smelly, and the slight vacuum also means less oil leaks. The downsides are the extra air doesn't go through the carb, so it can change the fuel mixture if it's not set up correctly. Also if you have too much air entering the crankcase (like an air leak or an open breather) it will cause more air to go in the engine and give a high idle 


The later factory twin carbs went to a CCV system, which is a lot simpler

Thanks, Tim. That makes a lot of sense. I suppose the advantage is that this setup is probably more efficient compared to the crankcase breather setup.


#663 timmy850

timmy850

    Up Into Fourth

  • TMF+ Member
  • PipPipPipPipPipPipPipPipPip
  • 2,991 posts
  • Location: NSW, Australia
  • Local Club: MITG

Posted 10 August 2020 - 03:45 AM

We had a nice run with MITG the other weekend and it was a great sunny day out! I was keeping an eye on the air fuel mixtures with the gauge and it was running really close to the ideal zone. The only area giving me issues at the moment is going up a hill at part throttle, where it would start to lean out a bit. I guess the upside is with the old engine I was always full throttle going up the same hill
50208304133_d3dce65774_b.jpg

50208303943_728ef09c47_b.jpg

50208303798_26e9c915cb_b.jpg

The little stub stacks turned up last week and were nice and quick to install
50208824016_4333e55fa9_b.jpg

#664 timmy850

timmy850

    Up Into Fourth

  • TMF+ Member
  • PipPipPipPipPipPipPipPipPip
  • 2,991 posts
  • Location: NSW, Australia
  • Local Club: MITG

Posted 14 September 2020 - 10:23 AM

I haven't posted in this thread during the last month, so heres a bit of a recap:


I was starting to watch the vacuum gauges on each SU manifold runner I was getting different readings left to right. The RH side was not making as much vacuum at idle and when decelerating. It was also giving different results with the lift pin and I couldn’t get both sides synchronised. I decided to pull them off the engine so that I could inspect them properly on the bench and make sure they were OK. I also wanted to spend a bit more time to get the tune a bit closer as I had the lean problem under certain conditions. I’ve got some yellow SU springs that I thought might help? I was also a bit curious about the health of the engine, so I did a compression check and there was a consistent 180-190psi across all 4.


So for the meantime I put the Dellorto back on as it was running fine before...
50266927961_ae6536e491_b.jpg


I had some vacuum takeoff adapters for the Dellorto that screw into the carb barrels. These also gave the same weird vacuum readings at idle and under deceleration on the RH barrel. I was planning to investigate further during the next few weeks as I was having some time off. I was on the way home from my last day at work it started making a strange noise. I pulled into a petrol station to check what was going on and then it wouldn’t start. I waited an hour or so for the roadside mechanic to turn up (he used to be a BMC mechanic) and he couldn't get the car started either. Another hour wait for a tow truck and I finally got home at 10pm

50310759642_ea1b1e7381_b.jpg


So I asked for a few suggestions and the first check was a compression test - cylinders 4&3 were about 60psi, and 2&1 were above 180psi (the gauge was dropping a bit when I stopped cranking). So that definitely sounded like a gasket blown between 4&3. The strange noise was also back when testing 3&4 - I'm guessing this was the sound of the air going between the cylinders and not out the right way
50329944437_84be5a928f_b.jpg


Yep - definitely blown! Also looks like a leak out from #1 towards the water pump..
50326290992_13f19657f5_b.jpg


After cleaning it all up and adding in a new gasket (lucky I had a spare of everything in the garage) it all looked pretty good. I ended up swapping the plugs and charging the battery up before managing to find the sweet spot for the ignition timing. It now starts up which is a big relief, just a couple of small jobs left to tidy up now. Unfortunately this has meant all my planned jobs for my time off have been delayed again so I can get it back on the road 

50326291532_f0c7200813_b.jpg


#665 timmy850

timmy850

    Up Into Fourth

  • TMF+ Member
  • PipPipPipPipPipPipPipPipPip
  • 2,991 posts
  • Location: NSW, Australia
  • Local Club: MITG

Posted 30 September 2020 - 06:52 AM

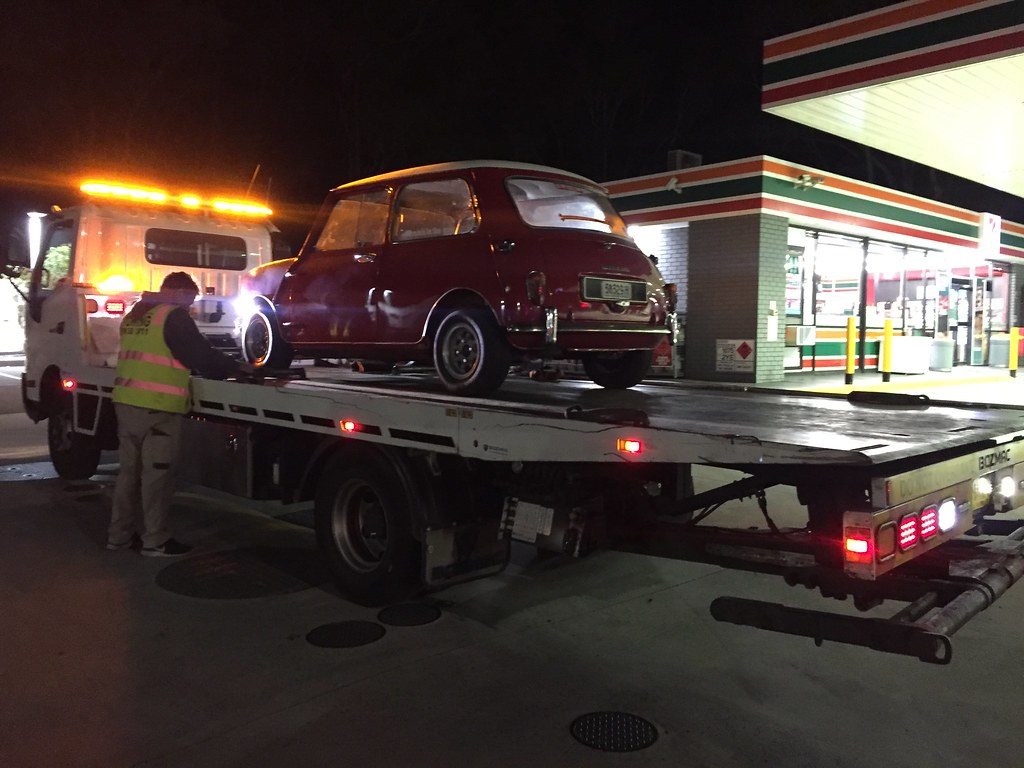
So, after I first got the car started on the 11th I still had a couple of jobs to do:
Fill up the radiator
Add the throttle cable
Connect up the heater hose
Add the overflow bottle
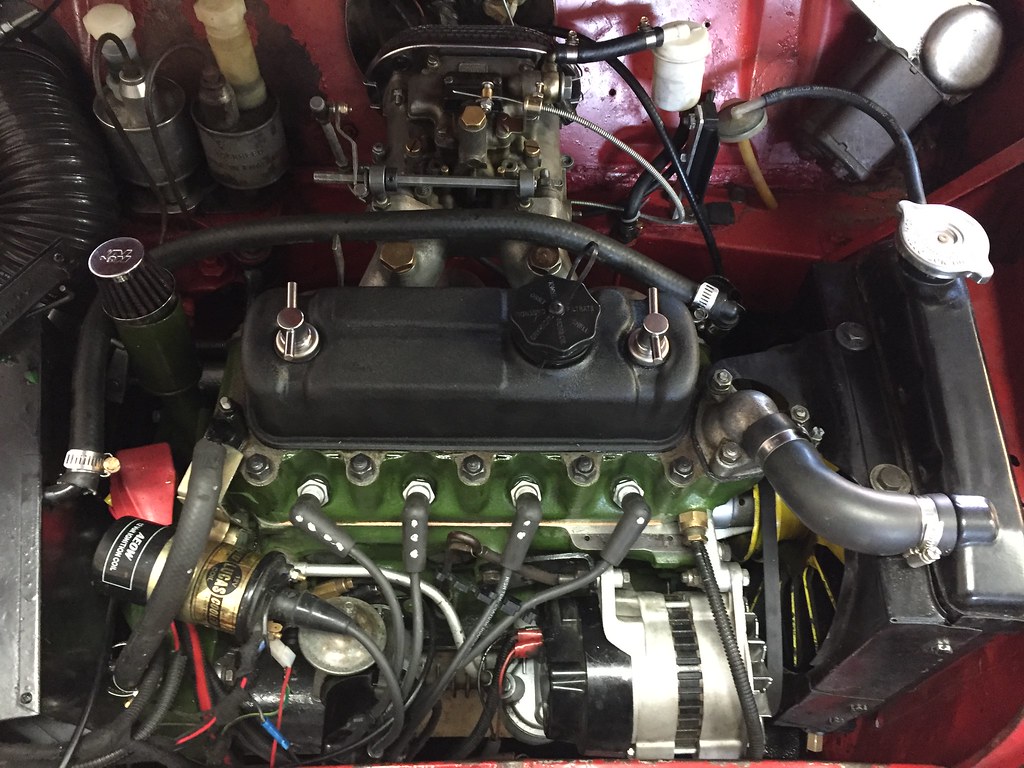
Check the timing, tappet clearances & retorque the head after a heat cycle
For reference the advance timing is set electronically by the accuspark blackbox unit based on the ignition table loaded into it.

I had some time on Wednesday morning to try and sort a couple of things out - first I topped up the radiator and then started the engine to try and bleed the system. It was at this point I noticed that the bypass hose wasn't tight and it was leaking water out. As I went to tighten up both the hose clamps I noticed that one of them was missing and it turned out to be on the floor... It took me about 45 minutes to get a hose clamp unwound, then slipped over the hose and tightened up. After that debacle I thought I'd check the timing - but the car now wouldn't start, and it seemed to be spark or timing. I tried sweeping the dissy around a bit looking for the right spot and it just wouldn't start. I pulled out a plug and cranked it over and the spark was weak and not consistent . I put the battery on to charge for the night and tried to think of some solutions

Thursday I thought I'd start by checking the program in the blackbox unit to see if there were any errors. It all was ok and had the old program I'd loaded, so I did all the same checks on the ignition circuit and still wouldn't start. I also tried with the blackbox bypassed and no change. At this point I was starting to get a bit frustrated!

On Saturday afternoon I went and picked up an 850 block and gearbox from a friend (story for later) and he kindly lent me a working distributor with electronic ignition, working coil and a spare set of leads. I tried every combination of distributor/coil/leads/cap/rotor I had and I still had no luck. The last resort was a set of points that I'd bought, only I needed to buy a condenser.
50367018016_1103c42fe3_b.jpg

Sunday morning I popped into my local independent parts shop and bought another new set of spark plugs and he even had a Bosch condenser with the right part number reference on the shelf! Once I figured out how to wire up the points I thought I'd give it a go at starting. It literally started on the first press of the starter button and had a nice smooth idle. It ran really nicely and had steady timing with the blackbox bypassed (as the mechanical advance is locked out). When I connected the points to the blackbox it started to have issues with the advance as the rpm picked up. I was able to drive it around the block, but for whatever reason the points and blackbox aren't working together.
50366324008_945943dd6a_b.jpg.

During some spare time I wasn't trying to fix the car I did a couple of little jobs. Previously the wheels had a coat of matt black paint, but I wanted to go back to the bare alloy finish. They look pretty cool with the caps on there now :D
50354982411_dd519247a9_b.jpg

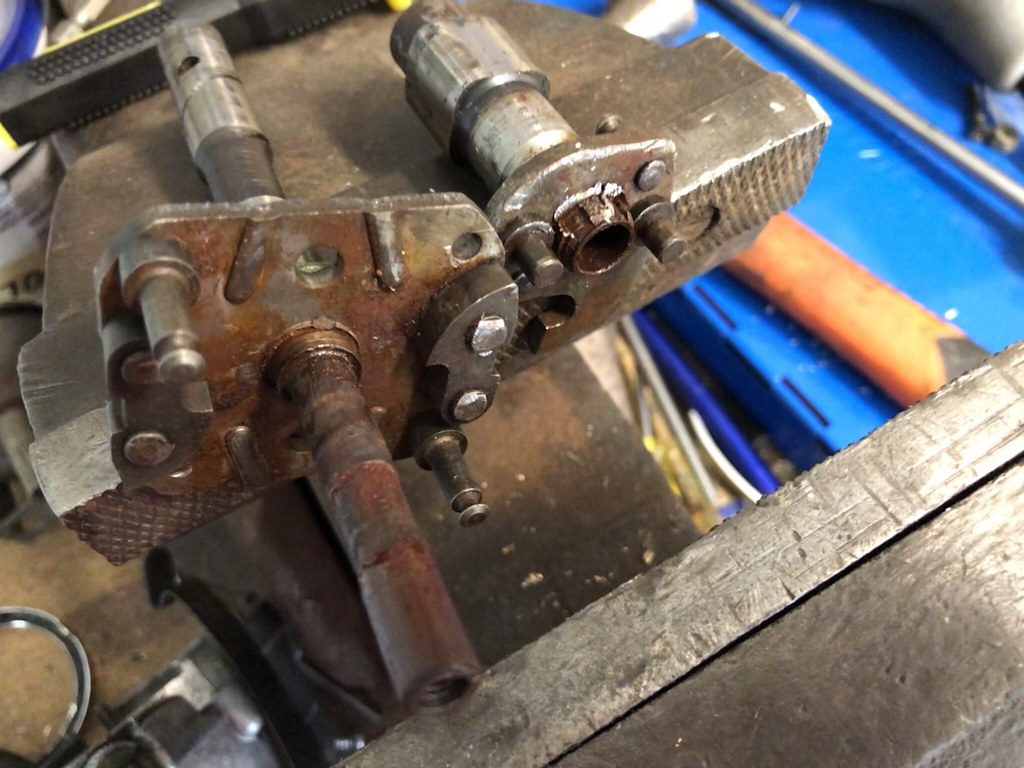
I had a long day working on the car last Thursday, all the quick jobs I had ended up taking forever. The first seemingly simple job was to undo the lock wire and get the advance springs back in the distributor. A couple of minutes later I had it all back in the car and it started up fine. I checked the timing and it was spot on, and the idle was very smooth - the only problem being that I had no advance when I revved up the engine. I pulled it all back out again and found that the advance cam was not rotating at all. I failed miserably trying to get the drive gear off the end of the distributor spindle, and had to go and get a new punch to get it out. Once the spindle was out it took me a bit of time to slowly lever off the advance cam - it was stuck really hard with a combination of solidified grease and rust. Next it was all cleaned up and greased, now it moved smoothly and everything worked as it should. One thing to note before you pull off the advance cam is the position of the drive gear - it is possible to put it on 180 degrees out which is a bit of a pain when you try and start the engine! That all ended up taking about 2 hours.. Yet another part that I now know too much about
50378606522_11a32ee19a_b.jpg

I did an oil change, checked a bunch of the things that I'd messed with in the last few weeks and took it for a decent drive around town to check everything was working as it should. It seemed to drive even better than before, I'm not sure if previously the gasket was on the way out, the timing now is better or if I'm just not used to driving it but it was a bunch of fun. I've got to get my confidence up again, it's hard to get the experience of the sudden head gasket failure out of your head
50377737388_d128babb8d_b.jpg

I also managed a quick wash and vacuum today too, so it's all ready to go for the MITG drive on the weekend.
50378617297_9201f1c89f_b.jpg

On Sunday we had a nice drive out through the Wollondilly Shire. It took us 3 goes to find an open cafe for morning tea, and we ended up at a nice one in Thirlmere. From there on to The Oaks for lunch at the pub.
Attached File  8E98840C-7271-4F43-A609-CE20058CA8CA.jpeg   95.18K   0 downloads

Overall the car did really well. There are a couple of weird noises, one being the speedo cable and the other I need to track down

#666 timmy850

timmy850

    Up Into Fourth

  • TMF+ Member
  • PipPipPipPipPipPipPipPipPip
  • 2,991 posts
  • Location: NSW, Australia
  • Local Club: MITG

Posted 03 October 2020 - 10:49 PM

I did a hot re-torque to the cylinder head studs, and also reset the valve clearances during the week. The weather was really nice on Friday, so I drove the car to work. Everything seems to be working as normal again, and no funny noises which is awesome. Still a couple of jobs to do (as usual)


In other news I've finally taken the leap and bought a disc brake front end. I definitely need to replace the pistons & seals, the rest will get a good clean up and check over to see what can be reused and what needs to be replaced  :D
50414097687_666f5527be_b.jpg


#667 Ell.s

Ell.s

    Stage One Kit Fitted

  • TMF+ Member
  • PipPipPip
  • 85 posts

Posted 04 October 2020 - 07:43 AM

Great thread, lovely mini.

#668 KTS

KTS

    Up Into Fourth

  • TMF+ Member
  • PipPipPipPipPipPipPipPipPip
  • 2,257 posts
  • Location: Herts

Posted 04 October 2020 - 11:30 AM

well worth the upgrade - there's nothing like being able to hit the brake pedal without wondering which way it's going to pull  :lol:


personally, i wouldn't bother with the disc shields, and especially not if you travel on unmade roads as they tend to collect gravel rather than keep it out 


#669 timmy850

timmy850

    Up Into Fourth

  • TMF+ Member
  • PipPipPipPipPipPipPipPipPip
  • 2,991 posts
  • Location: NSW, Australia
  • Local Club: MITG

Posted 04 October 2020 - 11:09 PM

well worth the upgrade - there's nothing like being able to hit the brake pedal without wondering which way it's going to pull :lol:

personally, i wouldn't bother with the disc shields, and especially not if you travel on unmade roads as they tend to collect gravel rather than keep it out

Mine isn’t tooo bad at the moment... I fully replaced all the slave cylinders, hoses and shoes back in 2013. If they’re properly adjusted they work really well, but they had been swapped from the original single cylinder ones to the later twin cylinder ones. The pedal also gets pretty hard when going down a long hill

I have been looking forward to getting discs for a long time! These obviously need a bit of work but I’ll get there with a bit of work. I’ll start without a booster/servo and see what it’s like, I’ve driven a couple of cars with them and really like the feel. I haven’t tried discs without a servo, but I’m used to the hard pedal on the drums

I’ve had two experiences with dust shields - my Mazda3 got a rock in it, and a fellow mini owner got one too - it makes a horrendous screeching noise! I’m not sure what I’ll do with these - I might add them and remove the first time I have any issues

#670 Clip

Clip

    Mini Mad

  • Members
  • PipPipPipPip
  • 181 posts
  • Location: Sunshine Coast Queensland

Posted 05 October 2020 - 07:07 AM

You’ll notice the difference with discs Tim, but you still have to smash them pretty hard if you want to stop quickly. Fine for us as we know how to deal with them, but will catch out anyone that’s not used to unassisted brakes. I’ve got a mk3 cooper s style servo sitting on my bench, and I think I’ll probably take the leap and fit it. 


#671 timmy850

timmy850

    Up Into Fourth

  • TMF+ Member
  • PipPipPipPipPipPipPipPipPip
  • 2,991 posts
  • Location: NSW, Australia
  • Local Club: MITG

Posted 19 October 2020 - 04:48 AM

You’ll notice the difference with discs Tim, but you still have to smash them pretty hard if you want to stop quickly. Fine for us as we know how to deal with them, but will catch out anyone that’s not used to unassisted brakes. I’ve got a mk3 cooper s style servo sitting on my bench, and I think I’ll probably take the leap and fit it. 

Thanks Clip! Sorry I thought I’d replied to you before, I’m definitely looking forward to having them fitted! I’m used to the drums so I’m used to giving them a good shove to stop. I’ve driven some friends cars with boosters and I do like them, but getting a booster would be a bit down the track


Over the weekend I managed to finish a few jobs, one of them was fixing the indicator stalk that my grandpa had previously fixed...

Attached File  4993CCBF-3D22-4557-952C-6D15ABA73657.jpeg   36.33K   3 downloads
The wire needed to be unsoldered from the column end, and then the bulb and old end was removed 

Attached File  09B1B3FD-5BF8-4B77-9B5F-59C1B0B468AB.jpeg   77.58K   3 downloads

The new plastic end was pressed on, then the bulb added back in and it all works fine now! It also looks so much better than before 

Attached File  9B07BEB8-0BC7-4A09-A3D9-AAF8409E7A48.jpeg   38.05K   7 downloads


I’ve also stripped down and cleaned up my disc brakes. The calipers have got scrubbed and they’ll need new seals and some stainless pistons. The hubs look great, ball joints are genuine BMC ones and they just need shimming and greasing. The bearings are Timkens and also look really good and just need greasing 

Attached File  52FF8ABA-BB26-4568-A7B5-D557E2E2D752.jpeg   82.97K   11 downloads
The CV joints looked ok & I got a new pair of Rover boots, so just need greasing too. The discs and pads are a bit thin and will need to be replaced 

Attached File  FFB73225-8DFD-41DC-90A4-58ED959A9414.jpeg   76.97K   7 downloads


Once that’s all sorted I’ll need to get the right rear brake cylinders so that the brake bias is correct, and sort out what I’m going to do for wheels...


#672 KTS

KTS

    Up Into Fourth

  • TMF+ Member
  • PipPipPipPipPipPipPipPipPip
  • 2,257 posts
  • Location: Herts

Posted 19 October 2020 - 08:04 AM

nice job on the indicator stalk - looks like new 


i must admit I assumed the brakes were 7.5" discs but your comment about wheels has got me wondering if they're 8.4" - what size are they ? 


#673 timmy850

timmy850

    Up Into Fourth

  • TMF+ Member
  • PipPipPipPipPipPipPipPipPip
  • 2,991 posts
  • Location: NSW, Australia
  • Local Club: MITG

Posted 19 October 2020 - 08:37 AM

They’re 7.5” Cooper S brakes. I’ll always be on 10” wheels!

The dilemma will be finding something I like, that fits A008 tyres and without any arches

#674 Clip

Clip

    Mini Mad

  • Members
  • PipPipPipPip
  • 181 posts
  • Location: Sunshine Coast Queensland

Posted 19 October 2020 - 08:38 AM

Tim, I managed to get my wheels (same as yours I think?) over the calipers (assuming your discs are 7.5”), just had to grind the calipers down a bit. Can probably get a pic showing where and how much if that would help.


#675 timmy850

timmy850

    Up Into Fourth

  • TMF+ Member
  • PipPipPipPipPipPipPipPipPip
  • 2,991 posts
  • Location: NSW, Australia
  • Local Club: MITG

Posted 19 October 2020 - 09:07 AM

Tim, I managed to get my wheels (same as yours I think?) over the calipers (assuming your discs are 7.5”), just had to grind the calipers down a bit. Can probably get a pic showing where and how much if that would help.

Mine are the wider offset ones, so they stick out an extra 25mm or so on each side than your ones. If I use my current wheels I’ll need some flares which I’m not 100% on for my 850

I’ll be interested in seeing how you modified the caliper, but I’m not super keen on grinding it down

Edited by timmy850, 19 October 2020 - 09:08 AM.


1 user(s) are reading this topic

0 members, 1 guests, 0 anonymous users