Jump to content


Photo

Mini Nomad Foers.... Ish... (My Twuck!)


  • Please log in to reply
21 replies to this topic

#1 shnevpayne

shnevpayne

    Mini Mad

  • Members
  • PipPipPipPip
  • 254 posts
  • Local Club: Minisunlimited

Posted 30 October 2014 - 09:32 PM

So ladies and Gentlemen, time for something completely different!

As far as I know from the forum there are an avid few Nomad owners out there with some pretty stunning examples of cars that well, are the most desirable vehicle, but have been kept to a pristine condition. Tally-ho what what and jolly good job. Mine however, is not one of those.

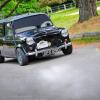
Presenting..... MY TWUCK. (Yes a purposeful spelling mistake there)
IMG_0954_zps08c731ac.jpg


10514451_10204649301658317_3205652316195


It was rebuilt a handful of years ago from the styling of a foers, to, well, the attempted styling of a Landrover "Lightweight 88", a vehicle mainly used in the Dutch army in the days back when.... For those who think they know what I mean, and for those who might want to have a look, here's one from the internet.....

a.jpg


Take note the angled bonnet, squared off wings etc etc etc.....

Anyway, as you can see, its a bit alternative. Having been used as a maintainence vehicle, for minor breakdown recoveries, and previous to that a surf board carrier (the number plate links back to "Surf blue garage?") it has in the last 18 months been equipped with a 2 tonne hydraulic tipper. The previous owner to me (car mechanic) used it about once every blue moon to take scrap to the scrap man, about 2 miles away, then back to the garage. So while old (1977) its engine has clocked no more than 62,000 ish miles. With a good handful of mots to back this up, I have no doubt in that fact. But then, another factor would be the 2 gallon fuel tank. By the time you start getting somewhere you gotta find a petrol station!

Though having said all that, there must be a reason for this project?! Well.... yes. In a nutshell, having driven it for 10 weeks clocking 1000 miles in it (bless) its just brilliant, useful, funny looking and completely flawed.....

The person/persons responsible for the build took into account strength of box section very seriously, but not in the case of water proofing. With all the effort they went into the get it solidly framed with more chequer plate than a green lane 4x4, this was all let down with the use of silicone sealant and expand foam to keep out the rain...... Yep that's correct. Not to mention the shagpile carpets..... Oooooo.....


So, I hear you ask what is the plan?

A very good question indeed. So here's a basic list.
A good engine service.
Rebuild the constantly leaking exhaust system.
Upgrade the box section that needs upgrading.
Remove rust.
Contemplate welding the black panels on or using decent rubber seal/sealant.
Repaint the vehicle using one shade of black, and one shade of yellow only, (50 shades of mini come to mind)

New door seals instead of B&Q DIY draft seals for your front door.
Extending the tipper vertically to build a larger carrying section.
Complete rewire.
Rebuilding the wings
New Interior
New / upgraded dash.
Increase ride height front and rear for larger wheels.
FLICK SWITCHES for lots of lights and flashy stuff! ETC ETC ETC.....

Well that ain't exactly in order, but you get the picture. Its a lot of work. Which starts tomorrow morning! More pictures to follow. But please let me know your thoughts and ask any questions!!!


P.s. To those who would like to know, yes, it's available for prom hire!! 
P.P.S. Yes I have had 3 people ask about that already.

P.P.P.S. Yes, it is roadworthy... ish......


Edited by shnevpayne, 02 November 2014 - 12:01 PM.


#2 SAL 821X

SAL 821X

    Camshaft & Stage Two Head

  • Members
  • PipPipPipPipPipPipPipPip
  • 1,890 posts
  • Location: Hinckley
  • Local Club: Leicester Mini Owners Club

Posted 30 October 2014 - 10:25 PM

I love it... Therefore I want one.

#3 shnevpayne

shnevpayne

    Mini Mad

  • Members
  • PipPipPipPip
  • 254 posts
  • Local Club: Minisunlimited

Posted 01 November 2014 - 12:29 AM

Today was the stat of the project....
Sometimes you just wonder why you started....
The list is gonna be somewhat large of things to do!!!!


IMG_1158_zpsc33d92c8.jpg

IMG_1155_zpse4988391.jpg


IMG_1162_zps956b89f4.jpg

The wings, made up of 3 sections, were held on with 3 screws a piece..... Nice!!!


IMG_1160_zps8a0e0c7b.jpg

Whats worse is to fit the headlights, the box section along the front has been severely cut into.... Whoops!!!!
 

IMG_1167_zps9bf73d6a.jpg

IMG_1166_zps876f6258.jpg


You'll notice the lovely inner section by the passenger footwell, and the bodge job in the drivers side.... Yes that is a gear stick gaitor, yes the brake pedal has been welded. Yes I need to find a floor mounted accelerator..... Oh boy!!!
 

IMG_1165_zpsda7b93d8.jpg


Here's some quality cutting to get the wires through to the front lights.... :(

IMG_1183_zpsa1f37850.jpg


Taking out the seat subframes....

IMG_1194_zpse651987d.jpg

To allow the removal of the floor!!
 

Ofcourse... removing the floor meant only one thing.......
IMG_1189_zpsac7ede6a.jpg


FLINTSTONES MOMENT!

The chaos continues soon :D


#4 Ben_O

Ben_O

    Mill Road Garage

  • Paint Doctor
  • PipPipPipPipPipPipPipPipPipPip
  • 9,781 posts
  • Location: Isle of Wight

Posted 02 November 2014 - 04:11 AM

HA HA love it!


If that's you in the pictures, we are sooooo alike! That's exactly what i would be doing  :teehee: 


Can't wait to see more on this!


Ben


#5 shnevpayne

shnevpayne

    Mini Mad

  • Members
  • PipPipPipPip
  • 254 posts
  • Local Club: Minisunlimited

Posted 02 November 2014 - 10:55 AM

HA HA love it!


If that's you in the pictures, we are sooooo alike! That's exactly what i would be doing  :teehee: 


Can't wait to see more on this!


Ben

Well you gotta have some fun!!! Yep and yer tis, its me! The legs in any other shots belong to a very understanding other half.

And yes, before you ask, she doesn't mind getting her hands dirty!!! Ooo errr Missus!


#6 Gadgets

Gadgets

    Speeding Along Now

  • Members
  • PipPipPipPipPip
  • 471 posts
  • Location: Somerset

Posted 02 November 2014 - 11:28 AM

Bear in mind that you will need to get a Private Hire License if you are carrying out prom work. The only exemption is if you do a wedding (you still need the appropriate insurance cover though)


Vehicles can and are often impounded and points put of driving licences. VOSA have got really hot on this waiting at the school proms for the stretch limo operators that have ruined this for everyone!


Edited by Gadgets, 02 November 2014 - 11:29 AM.


#7 Steve G

Steve G

    Mini Mad

  • Noobies
  • PipPipPipPip
  • 130 posts
  • Location: Hampshire

Posted 02 November 2014 - 11:31 AM

Your drivers side footwell looks just like the one on my Scamp ! The tyre on mine had actually worn through the alloy inner arch and there was very little room for the throttle pedal or your feet. 

So far most of the time I have spent has been making up a decent pedal box mount so the pedals fit around the steering column. I don't know exactly where the inner arch can fit to give the most room until I have the disc brake subframe fitted. 


#8 shnevpayne

shnevpayne

    Mini Mad

  • Members
  • PipPipPipPip
  • 254 posts
  • Local Club: Minisunlimited

Posted 02 November 2014 - 11:38 AM

Your drivers side footwell looks just like the one on my Scamp ! The tyre on mine had actually worn through the alloy inner arch and there was very little room for the throttle pedal or your feet. 

So far most of the time I have spent has been making up a decent pedal box mount so the pedals fit around the steering column. I don't know exactly where the inner arch can fit to give the most room until I have the disc brake subframe fitted. 

Minor Flaw with the design... but, my thoughtis to put in something floor mounted to replace this,. Want to allow as much space inside the inner arch for slightly larger wheels.... 

I may consider doing the French version, so having the brake and clutch the leftside of the steering column, and the accel pedal on the right. I know that this would be tight with the heater matrix, but would provide more space. But then, I gotta see exactly what can be done... Any suggestions always welcomed!!!! :D


Edited by shnevpayne, 02 November 2014 - 11:43 AM.


#9 shnevpayne

shnevpayne

    Mini Mad

  • Members
  • PipPipPipPip
  • 254 posts
  • Local Club: Minisunlimited

Posted 02 November 2014 - 11:43 AM

Bear in mind that you will need to get a Private Hire License if you are carrying out prom work. The only exemption is if you do a wedding (you still need the appropriate insurance cover though)


Vehicles can and are often impounded and points put of driving licences. VOSA have got really hot on this waiting at the school proms for the stretch limo operators that have ruined this for everyone!

I'm guessing that's if you are paid for the job......?? I would merely be taking friends/younger siblings of friends, not for a cash donation, but as a future, you owe me beer money! So would I be able to get around it that way?


#10 Gadgets

Gadgets

    Speeding Along Now

  • Members
  • PipPipPipPipPip
  • 471 posts
  • Location: Somerset

Posted 02 November 2014 - 11:54 AM

If you are carrying "fare paying" passengers all vehicles have to have a private hire license, have the correct insurance cover (its law) but as i say weddings are exempt from private hire law.  Only one person per PH  vehicle, driver medical exam, CRB check,, and the vehicle has to have an additional test  (second MOT) It is very expensive and when I looked into it my local council would only give a Private Hire license on cars up to 7 years old, mine at the time were 82 years old!


I got pulled and warned by the council who were sat waiting outside the School Prom, ruined it for lots of people. Even if you say you are doing it for free they will investigate you, its not nice and personally not worth the agro.


Speaking from experience......Regarding doing it for free, if you are starting to advertise this as a service I would be very very wary. As they will look at this as why would you be advertsing Prom work and "Touting for work" and not charging. 


If you are just doing the prom for a family member or friend totally free you should be ok, but if they see you at other proms you take the risk, you take the fun!


Good luck


Edited by Gadgets, 02 November 2014 - 12:01 PM.


#11 shnevpayne

shnevpayne

    Mini Mad

  • Members
  • PipPipPipPip
  • 254 posts
  • Local Club: Minisunlimited

Posted 02 November 2014 - 12:00 PM

Fair enough, haven't exactly advertised for it, just been asked if i'd consider it. Top of this post is to be taken as good form!  Besides, I can't exactly carry that many people! Well, legally anyway!


Edited by shnevpayne, 02 November 2014 - 12:02 PM.


#12 shnevpayne

shnevpayne

    Mini Mad

  • Members
  • PipPipPipPip
  • 254 posts
  • Local Club: Minisunlimited

Posted 03 November 2014 - 06:24 PM

So as it stood on Sunday evening, I had removed almost every panel from the front, apart from underneath the doors, as one screw on each side was in an impossible location, behind the battery encasement, and the otherside behind the fuel tank.
Not being awkward obviously, but these had to come out.... With some difficulty....

So here's where the screw is located, behind that pillar....IMG_1195_zps99c72251.jpg


And here is also where the screw is... behind that fuel tank....IMG_1197_zpsf3b2e946.jpg


But that fuel tank is underneath that riveted sheet metal, so...... or not....... The death of the first drill bit.IMG_1198_zpsd63a53d5.jpg


Ah but that sheet metal won't come off until the fuel filler cap and rubber hose is removed....... IMG_1205_zpsc0a9aa36.jpg


Aha but that fuel tank won't come out because of that massive plate of metal known as the back of the cab! Oh b*$%>?$@:@....
IMG_1207_zps28752502.jpg

IMG_1208_zps437589a4.jpg


After some brute force, and bending metal....
IMG_1211_zps624ed9dc.jpg


So after that it was time for the original metal plates to come out, as well as the inner rear arches... Riveting stuff......
IMG_1216_zps26994c47.jpg


But I hear you ask, why didn't you take them out before attempting the fuel tank? Ah, well placed rivets between the impossible gaps! Seems the twuck was built from the ground upwards, literally, which is making some of these bits a bit of a pig!

Anyway... quick quiz..... name that substance.........IMG_1214_zpsd90d3400.jpg


If you guessed "Expandy foam" Congratulations!...... Yes more freaking expandy foam........ Oh this is gonna be fun!!!!!

The fun continues tomorrow!


#13 MrBounce

MrBounce

    Up Into Fourth

  • TMF+ Member
  • PipPipPipPipPipPipPipPipPip
  • 2,563 posts
  • Location: The Manroom in Ipswich

Posted 06 November 2014 - 12:49 PM

I love this. And I love your writing style too. This amount of bodgery reminds me of my Midas... :lol:


#14 shnevpayne

shnevpayne

    Mini Mad

  • Members
  • PipPipPipPip
  • 254 posts
  • Local Club: Minisunlimited

Posted 06 November 2014 - 06:55 PM

So after much panel removal, and dirt, filler, foam amongst other things, it was time for a clear up! Included in the mess were the door and back panel seals, better known in the building world as draught excluders, them little rubbery foamy things you put round your door frame? Yeah, another classic bodge job! :D
IMG_1219_zps095d2edb.jpg


So bringing the car to light I gave him a little hose down, and a rad wash out, as it was BROWN, very very BROWN! Seat belts and a few other bits came out, so it was time to remove yet more screws and bolts!IMG_1221_zps91d54232.jpg


So... I wonder what happens when I take this one out........?

IMG_1222_zps964c7816.jpg


Great I have a convertible! Just 2 Bolts, 5 screws, and even more rubber sealant! 

IMG_1224_zpseee54b88.jpg


Yet more rubber sealant, and not laid very well... ooo It used to be red!

IMG_1225_zps16d47b8c.jpg


So whilst waiting for the rubber sealant remover to work....  put in this ere cable...... To the other end of the car. I now have an internal battery cable, the aim is to get the fuel line and the rear brake pipes to do the same, or at least protect them a little better.

IMG_1228_zps1a8fd04c.jpg


And so to the main job.... or at least the start of it, removal of sharp, bulgy objects, rust, and paint..... Let get this bad boy smooth and bald and beautiful!

IMG_1248_zpsbc5a9d65.jpg


IMG_1237_zps228d9242.jpg


To be continued tomorrow!


Edited by shnevpayne, 06 November 2014 - 06:56 PM.


#15 shnevpayne

shnevpayne

    Mini Mad

  • Members
  • PipPipPipPip
  • 254 posts
  • Local Club: Minisunlimited

Posted 11 November 2014 - 06:40 PM

So, at 5pm this evening, I had a package arrive, about 10 foot long, and about 15kg in weight.... My beautiful box section! Or atleast the first lot......
So no hanging around..... I cut away the horrid blue bodges, and laid into putting in the new structure!
Here's the old.....

IMG_1169_zpsca7ad8d2.jpg


IMG_1171_zps389878b2.jpg


And here's the new......
IMG_1253_zpse06675bf.jpg


IMG_1255_zps40286f03.jpg


IMG_1257_zpsfde4f2e7.jpg


IMG_1258_zpsb25fd5dd.jpg


Now I am happy to accept all criticism on my welding..... I HAVE NEVER DONE IT BEFORE!!

I'm not worried about how it looks, most will be hidden under wings and body panels! its a bit of a fun truck and a project! As long as it does the job I don't mind!!


0 user(s) are reading this topic

0 members, 0 guests, 0 anonymous users