Great job so far, I collected my '79 estate last weekend from my parents the resto is to start shortly :)
Cheers, good luck on your project will keep an eye out for it on the forum, hopefully yours will be in better condition than this one!

Mini Mad

Posted 19 August 2015 - 11:07 PM
Great job so far, I collected my '79 estate last weekend from my parents the resto is to start shortly :)
Cheers, good luck on your project will keep an eye out for it on the forum, hopefully yours will be in better condition than this one!
Mini Mad

Posted 20 August 2015 - 07:42 AM
Nice mini
Got my sons 71 Clubman estate a month ago.
Came in boxes with a rolling shell. Finally got it in the air and rolled over on side to sort out the rear end.
found that the previous repairer had not aligned the subframe mountings correctly so need to cut out their replacement heel board and start again.
Great thread keep the photos coming I have used them as point of reference.
Mini Mad
Posted 20 August 2015 - 09:44 PM
Nice mini
Got my sons 71 Clubman estate a month ago.
Came in boxes with a rolling shell. Finally got it in the air and rolled over on side to sort out the rear end.
found that the previous repairer had not aligned the subframe mountings correctly so need to cut out their replacement heel board and start again.
Great thread keep the photos coming I have used them as point of reference.
Will keep the photo's coming, not nice having to repair someones bodged job good luck with that, how are you tackling the heel board whole new one or just new ends? are you getting your sons estate on the forum so we can see it, this is where I should have been more original than just putting 71 clubman estate.
Mini Mad
Posted 21 August 2015 - 08:33 AM
Nice mini
Got my sons 71 Clubman estate a month ago.
Came in boxes with a rolling shell. Finally got it in the air and rolled over on side to sort out the rear end.
found that the previous repairer had not aligned the subframe mountings correctly so need to cut out their replacement heel board and start again.
Great thread keep the photos coming I have used them as point of reference.
Will keep the photo's coming, not nice having to repair someones bodged job good luck with that, how are you tackling the heel board whole new one or just new ends? are you getting your sons estate on the forum so we can see it, this is where I should have been more original than just putting 71 clubman estate.
I will get some photos of the car once i work out how to do photos on this site.
The car has 1275 Gt running gear and my 14 year old son has loads of ideas of how it will look when we finish it.
I just want to get the underside done and back on its wheels then i can rain in his artistic flair.
As for the heel board i think that i will just remove the end that has been put in but need to check all alignments first before cutting out a solid panel.
Mini Mad
Posted 22 August 2015 - 09:54 AM
Nice mini
Got my sons 71 Clubman estate a month ago.
Came in boxes with a rolling shell. Finally got it in the air and rolled over on side to sort out the rear end.
found that the previous repairer had not aligned the subframe mountings correctly so need to cut out their replacement heel board and start again.
Great thread keep the photos coming I have used them as point of reference.
Will keep the photo's coming, not nice having to repair someones bodged job good luck with that, how are you tackling the heel board whole new one or just new ends? are you getting your sons estate on the forum so we can see it, this is where I should have been more original than just putting 71 clubman estate.
I will get some photos of the car once i work out how to do photos on this site.
The car has 1275 Gt running gear and my 14 year old son has loads of ideas of how it will look when we finish it.
I just want to get the underside done and back on its wheels then i can rain in his artistic flair.
As for the heel board i think that i will just remove the end that has been put in but need to check all alignments first before cutting out a solid panel.
Always goood to have a solid base to work from, at least it's just one side so easy to fit subframe to align sub mountings.
To put pics on I use flickr it's free, part of yahoo so if you have yahoo email use same pasword, once uploaded click on share icon and bbcode then copy and paste but delete part of the code, should look like code below but delete the highlighted ends(had to slightly adjust the code so photo didn't pop up). Also good thing with flickr is you can edit/rotate the photo once uploaded. Hope this might help as another option to photobucket and imageshack they mention on this site. Just updated the uploading photo's with easier explanation under forum feedback and questions.
[ url=htt ps://flic.k r/p/xaF 6SY][img ]https : //fa rm 1. staticflickr.cim/2050 1803400_a38f062f01_z.j pg [/img][/url] 20 15- 8-1 8 -29 0 by [url=htps: //ww .fli ck r.cam/photo s/48 314136@ N03/]zebec[/ url], on Flickr
Edited by country clubman, 22 August 2015 - 10:36 AM.
Mini Mad
Posted 03 September 2015 - 02:59 PM
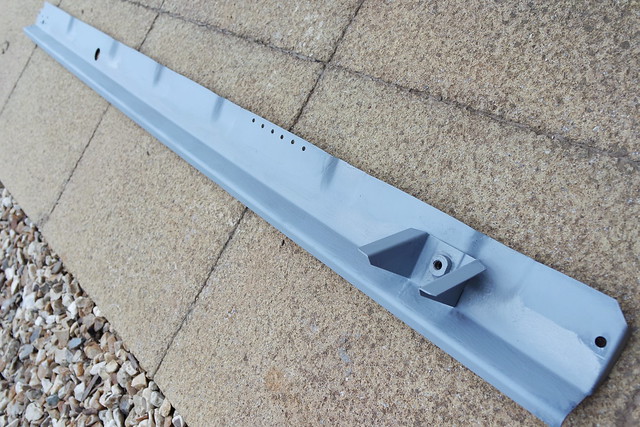
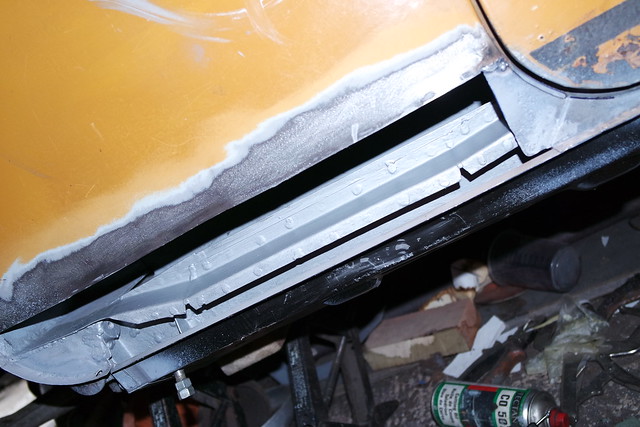
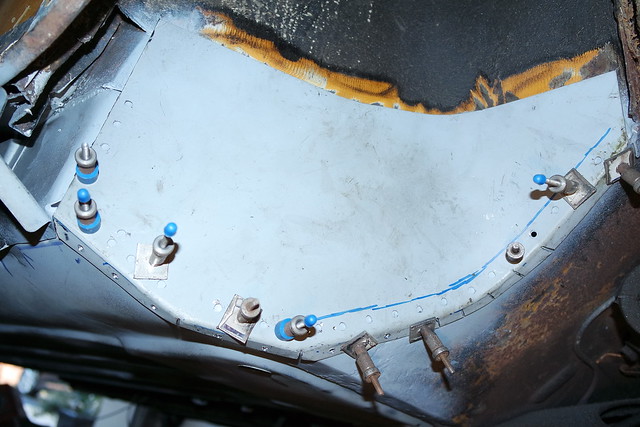
Finally managed to get the sill on today, didn't have enough time to finish the welds though! but good to get it on.
Here is the sill prepared painted, drilled for plug welds where the cross member is and front bracket already welded on, painted centre bit that isn't getting welded with good paint and the edges with weld through paint.
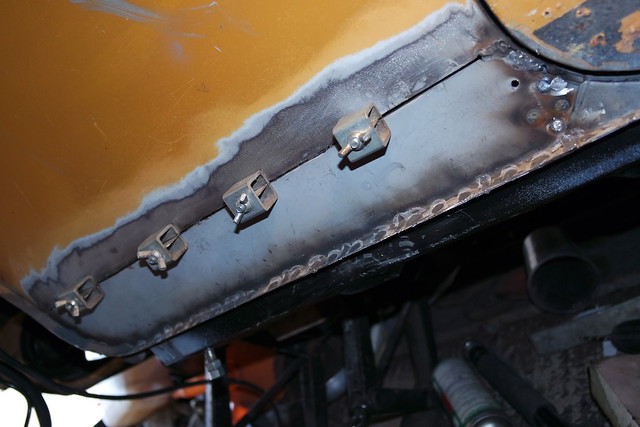
Drilled floor ready for plug welding as always easier to plug weld from above where possible, also the front bracket drilled inside ready for welding.
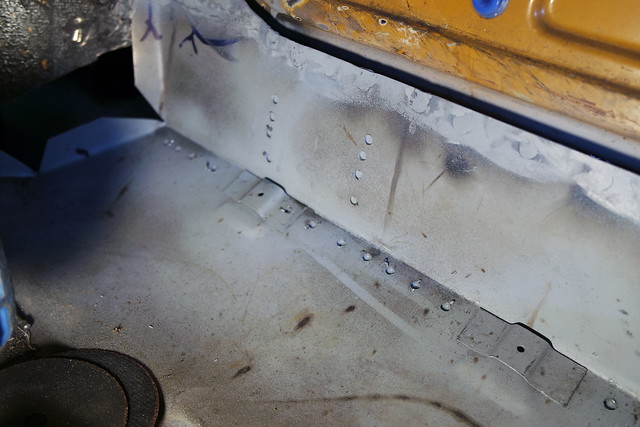
Painted inside the door step, again good paint where not welding and weld through in rest of the places
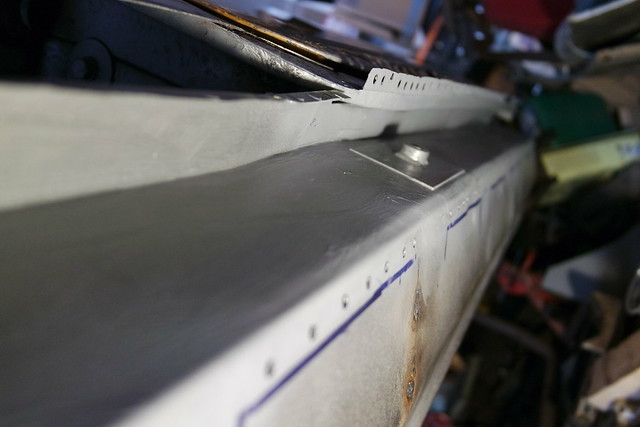
And finally the sill eventually on!
Edited by country clubman, 03 September 2015 - 03:01 PM.
Mini Mad
Posted 17 September 2015 - 08:25 PM
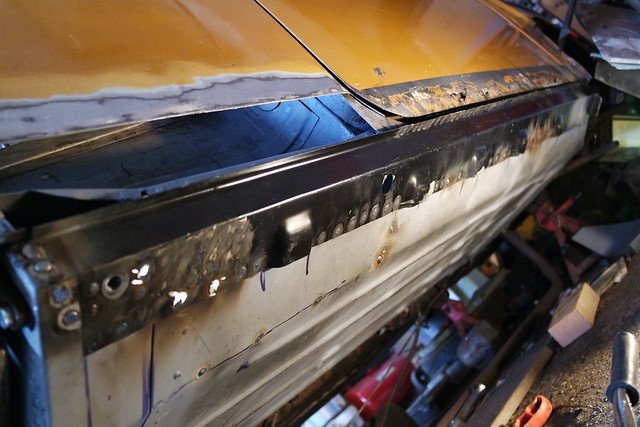
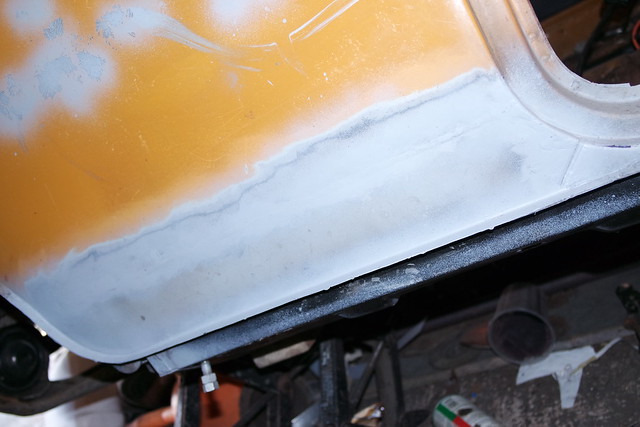
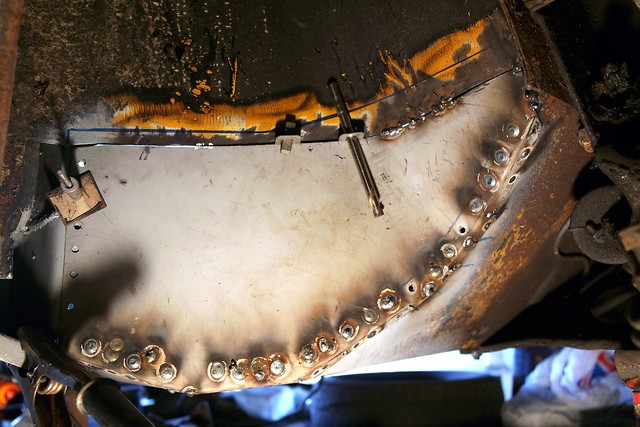
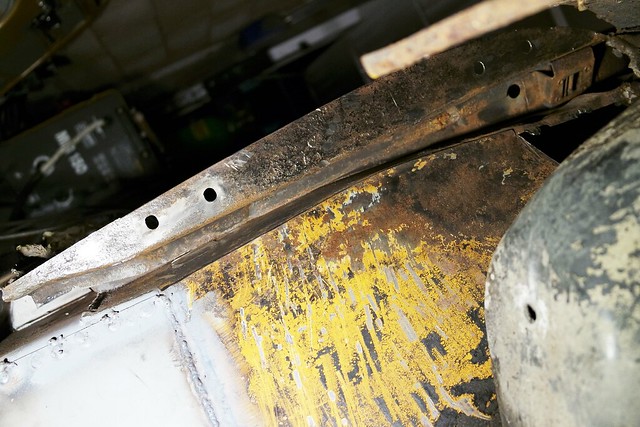
Sorted the side out, needs little bit of work to straighten it up, but nice and solid now. Nice to see the difference from the rusty open side, you can see how the m-machine compangnion box closing panel isn't the same as original one, such a simple panel they should have got the lengths correct at least!

Cleaned up and finished with bit of etch till get around to do the bodywork.
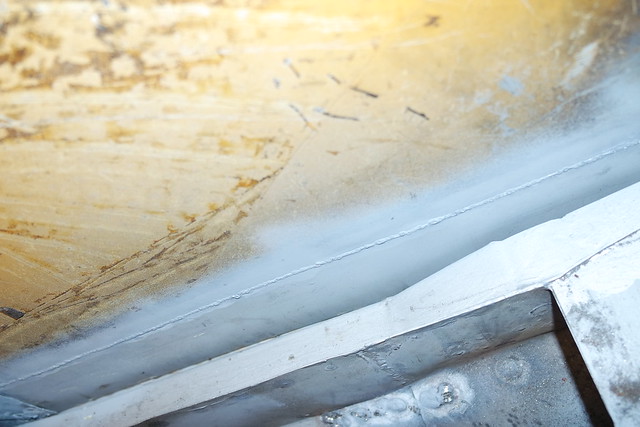
As you can see I butt welded it, try to minimis distortion as can use lowest setting on welder for this, also neater on inside than having a joggled edge, might clean it up a little but the side card will hide it anyway.
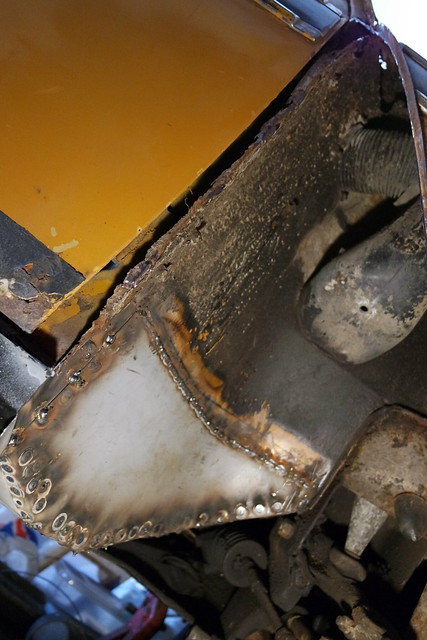
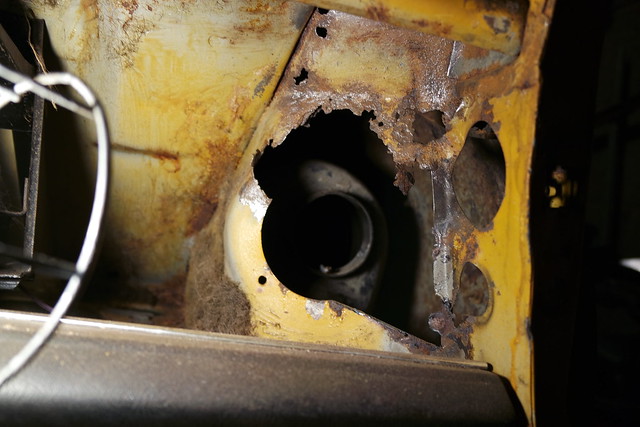
Next job started is the bottom of front wheel arch, below the starting panel from m-machine didn't match up so had to cut it where the line is. I also needed to bend the lip as that wasn't at the correct angle so had to cut slits into the lip.

This is the hole it needs to fill.

Then got this far, with a bit of pressure and some skin pins to hold it in place doesn't fit too badly. Another day to finish this one off.
Edited by country clubman, 17 September 2015 - 08:31 PM.
Mini Mad
Posted 24 September 2015 - 10:58 PM
Continued with the lower arch repair, a 8mm drill bit came in handy to use with the welding clamps to pull the curved part together.
Pic from inside, came together quiet well, just needs tidying up.
Cut out the A panel to see how bad it was under there, as suspected there is no lip for the A panel to fold back on just rust so will need some sorting out, this also makes it easier to finish the repair, but this is as far as got today.
Mini Mad
Posted 25 September 2015 - 07:42 AM
Love the within hands reach engineering with the drill bit.
If you could please hurry up a bit as I am a door skin away from having to fit the A panel's on mine and will be looking for tips for alignment ect. 
Already used your post to identify that I don't have any centre rail extensions/jacking points so need to order those.
What wire size and is it gas or gas-less to do the butt welds?
I notice that there is a little rust on the lower door are you repairing or replacing the door skin?
Mini Mad
Posted 25 September 2015 - 05:22 PM
Love the within hands reach engineering with the drill bit.
If you could please hurry up a bit as I am a door skin away from having to fit the A panel's on mine and will be looking for tips for alignment ect.
Already used your post to identify that I don't have any centre rail extensions/jacking points so need to order those.
What wire size and is it gas or gas-less to do the butt welds?
I notice that there is a little rust on the lower door are you repairing or replacing the door skin?
Hey, I'd love to hurry up with things but few hours here and there, if I'm lucky one full day a month! I'm itching to be getting on with this. There is a post on fitting A panels in the bodywork section, it's the folding the metal lip over I'm not looking forward to, but preparing the door hinge panel will take longer. I've not fitted any of these panels before so just fitting best can and learning from my mistakes.
The sill brackets aren't there for jacking, their just sill reinforcements, the estates doesn't have jacking points, front 14A9550 at minispares & rear 14A9552 but rear are handed.
The welding is done with 0.8mm with gas, again there is a post on here which wire size is best and most people find 0.6mm best, so spose it depends which you prefer, I tried 0.6 just found I ended up turning wire speed up so didn't see the point.
Yep will be sorting the doors out at some point, probably re skin, but getting it back on road then sort doors out as rear doors need doing as well.
Mini Mad
Posted 25 September 2015 - 09:20 PM
Hey, I'd love to hurry up with things but few hours here and there, if I'm lucky one full day a month! I'm itching to be getting on with this. There is a post on fitting A panels in the bodywork section, it's the folding the metal lip over I'm not looking forward to, but preparing the door hinge panel will take longer. I've not fitted any of these panels before so just fitting best can and learning from my mistakes.Love the within hands reach engineering with the drill bit.
If you could please hurry up a bit as I am a door skin away from having to fit the A panel's on mine and will be looking for tips for alignment ect.
Already used your post to identify that I don't have any centre rail extensions/jacking points so need to order those.
What wire size and is it gas or gas-less to do the butt welds?
I notice that there is a little rust on the lower door are you repairing or replacing the door skin?
The sill brackets aren't there for jacking, their just sill reinforcements, the estates doesn't have jacking points, front 14A9550 at minispares & rear 14A9552 but rear are handed.
The welding is done with 0.8mm with gas, again there is a post on here which wire size is best and most people find 0.6mm best, so spose it depends which you prefer, I tried 0.6 just found I ended up turning wire speed up so didn't see the point.
Yep will be sorting the doors out at some point, probably re skin, but getting it back on road then sort doors out as rear doors need doing as well.
Mini Mad
Posted 29 September 2015 - 10:36 PM
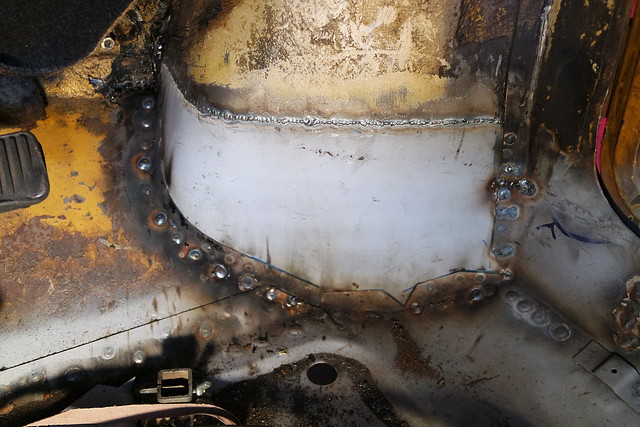
Did a bit of cutting away, the hinge check/strengthener panel seems solid, sort the rust out and all good, just need to sort the side and upper bit of the inner arch/flitch out.
From inside, as most look when take the air vents out! some sorting out here.
Edited by country clubman, 29 September 2015 - 10:37 PM.
On The Road

Posted 06 October 2015 - 04:56 PM
 image.jpeg 45.45K
36 downloads
image.jpeg 50.08K
19 downloads
image.jpeg 48.57K
23 downloads
image.jpeg 59.21K
19 downloads
image.jpeg 53.36K
15 downloads
image.jpeg 43.83K
19 downloads
image.jpeg 44.24K
19 downloads
image.jpeg 35.65K
19 downloads
image.jpeg 45.45K
36 downloads
image.jpeg 50.08K
19 downloads
image.jpeg 48.57K
23 downloads
image.jpeg 59.21K
19 downloads
image.jpeg 53.36K
15 downloads
image.jpeg 43.83K
19 downloads
image.jpeg 44.24K
19 downloads
image.jpeg 35.65K
19 downloads
Mini Mad
Posted 06 October 2015 - 09:52 PM
Mini Mad
Posted 06 October 2015 - 11:44 PM
I've just bout an 1980 Clubman Estate, just wanted to get it through the MOT as the bloke who owned it before me drove it everyday. Had a guy come weld it for me as I had no idea what I was doing or the time to be honest?... And he said I may as well just scrap the whole thing. I shall include some photos of the bad bits that need "Attention" as there's quite a few
Looks good, but looks like a bit of work needs doing is the underneath solid as this is more related to MOT? so depends how far you want to go, from the photo's looks like new scuttle panel, new A panels and lower rear corners sorting, and depends what is found when remove these things(might not be too bad when cleaned up though with any luck), but looks ok for MOT(depending on underside and mechanical), what is it a driving restoration? That's what I planned to do but got carried away!
If your not doing repairs yourself then it could get costly for the garage bills, maybe why he said worth scrapping as in his eyes can't see repairs to the value of the mini, was he an old chap who doesn't know value of mini's and seen so many scrapped in better condition in his days, or was he trying to get it of you cheap! I don't think anyone would ever scrap an old mini now, unless your that old chap who did your welding! lol. So might be worth you getting it through MOT then pricing up the repairs needed and you might find it cheaper, save yourself time and stress to sell it on and buy one in better nick, or get yourself a welder and learn to weld, as it'll be the labour cost more than the parts that'll be the killer.
To get more views on this you'd have probably been better posting this as a new post, maybe start a new thread on this keep us updated on progress.
Edited by country clubman, 07 October 2015 - 07:52 AM.


0 members, 0 guests, 0 anonymous users


