Coming along nicely, second what Craig said about the hose, spoke the boys at SC, at Minifair, and told them about the problems I had with it, it seems the first bend is 15 degrees out, as it should be 90 degrees, this wants to pull the hose towards the fan. I'm thinking of making my one out of stainless for more protection, maybe that's over kill!
Did you fit the engine into the car, or have I read it wrong again, lol. Will you have to do any mods, etc, etc.
Is that water pump pulley 4.2", as it looks quite close, maybe just the picture angle.
I had the same issue with my starter, I ended up buying a hi torque power lite unit.


95 Sprite Rebuild & 16V Conversion
Started by
alchall
, Nov 11 2014 05:27 PM
691 replies to this topic
#406

72hump
-

- Members
-

- 200 posts
Mini Mad
- Location: Nairn
- Local Club: IMOG
Posted 12 February 2018 - 08:59 PM
#407
alchall
-
- Just Joined
-
- 604 posts
Super Mini Mad
- Location: Chorley
Posted 12 February 2018 - 09:13 PM
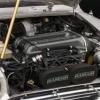
Looks great!
Thing with that large drain pipe is that you wont know how well it fits or rubs on anything until the engine is in the car. As it looks at the moment I am sure it will rub on the fan. Also looks like it will rub on the water pump pulley. Might even be too close the the manifold. I cut a fair bit off the length which goes to the rear drain.
It certainly wasn't a "bolt on part" for me. In fact I have used very little of that hose. I have used an aluminium tube to run parallel to the fan as it gives you an extra 10mm of clearance. It also 'firms' the hose up a bit.
Maybe Im being over optimistic! Having looked again I can see that it could well foul the fan, might dig my old rad and fan out of storage to try it out. It is quite close to the water pulley but I think it looks worse in the photo than in real life, something else to have a good look at!
I might trial fit the manifold at the weekend, partly to see if youre right and partly because I just really want to see it in place :-D
#408
alchall
-
- Just Joined
-
- 604 posts
Super Mini Mad
- Location: Chorley
Posted 12 February 2018 - 09:15 PM
Have you painted the trigger wheel?
Nope, thats how it came, I think its a new design as it definitely looks different to others Ive seen on here, not just the colour but also it is flush across the outer face so less of a clearance problem with the engine mount / rad support (although it will need a small modification I think to allow the fan belt to be changed without resorting to enginen out!
#409
alchall
-
- Just Joined
-
- 604 posts
Super Mini Mad
- Location: Chorley
Posted 12 February 2018 - 09:26 PM
Coming along nicely, second what Craig said about the hose, spoke the boys at SC, at Minifair, and told them about the problems I had with it, it seems the first bend is 15 degrees out, as it should be 90 degrees, this wants to pull the hose towards the fan. I'm thinking of making my one out of stainless for more protection, maybe that's over kill!
Did you fit the engine into the car, or have I read it wrong again, lol. Will you have to do any mods, etc, etc.
Is that water pump pulley 4.2", as it looks quite close, maybe just the picture angle.
I had the same issue with my starter, I ended up buying a hi torque power lite unit.
Guess I may have to alter that hose after all, time will tell I guess.
Not in the car yet, just subframe in for now, probably a couple of weeks and Ill get it in and work out what mods I need to make, really need to make some kind of decision about filtration too!
Water pump is a 4.2, its close but not as bad as the picture looks.
Not sure if Im my mind I can justify the extra cost of a high torque starter, where did you get yours from?
#410
alchall
-
- Just Joined
-
- 604 posts
Super Mini Mad
- Location: Chorley
Posted 12 February 2018 - 09:30 PM
Oh and the water hose definitely needs modifications, it wont fit at all as it is, may just need a couple of inches looping off the pump end.
#411
72hump
-
- Members
-
- 200 posts
Mini Mad
- Location: Nairn
- Local Club: IMOG
Posted 12 February 2018 - 09:31 PM
Bought the starter from Minisport.Guess I may have to alter that hose after all, time will tell I guess.Coming along nicely, second what Craig said about the hose, spoke the boys at SC, at Minifair, and told them about the problems I had with it, it seems the first bend is 15 degrees out, as it should be 90 degrees, this wants to pull the hose towards the fan. I'm thinking of making my one out of stainless for more protection, maybe that's over kill!
Did you fit the engine into the car, or have I read it wrong again, lol. Will you have to do any mods, etc, etc.
Is that water pump pulley 4.2", as it looks quite close, maybe just the picture angle.
I had the same issue with my starter, I ended up buying a hi torque power lite unit.
Not in the car yet, just subframe in for now, probably a couple of weeks and Ill get it in and work out what mods I need to make, really need to make some kind of decision about filtration too!
Water pump is a 4.2, its close but not as bad as the picture looks.
Not sure if Im my mind I can justify the extra cost of a high torque starter, where did you get yours from?
Like the new trigger wheel design, could have done with that on mine as the clearance was non existent.
Edited by 72hump, 12 February 2018 - 09:35 PM.
#412
minisilverbullet
-
- TMF+ Member
-
- 3,799 posts
Up Into Fourth
- Name: Craig
- Location: Sweden
Posted 12 February 2018 - 09:59 PM
Have you painted the trigger wheel?
Nope, thats how it came, I think its a new design as it definitely looks different to others Ive seen on here, not just the colour but also it is flush across the outer face so less of a clearance problem with the engine mount / rad support (although it will need a small modification I think to allow the fan belt to be changed without resorting to enginen out!
Looks like a much better design! Will make setting the TDC much easier. And as you better clearance.
#413
evoderby
-

- Noobies
-
- 89 posts
Stage One Kit Fitted
Posted 13 February 2018 - 07:41 AM
Very clean build!
Two comments:
1) I’d paint the clutch slave cylinder now that you still have good access, they go rusty very quickly and become a sore to the eye.
2) I’d go electric waterpump (on the drydeck connection side of the engine) & electric fan in a heartbeat since it frees up so much space on the other side of the engine that is so crowded with the cam drive and oil returns. In combination with a digital controller you can also do away with the SC remote thermostat housing, which again frees up precious space.
I run the above combination (Meziere pump, Spal fan, Davies Craig digital controller) on my 110Bhp@wheels 5 port with very stable results in addition to freeing up power.
#414
alchall
-
- Just Joined
-
- 604 posts
Super Mini Mad
- Location: Chorley
Posted 13 February 2018 - 05:01 PM
Very clean build!
Two comments:
1) I’d paint the clutch slave cylinder now that you still have good access, they go rusty very quickly and become a sore to the eye.
2) I’d go electric waterpump (on the drydeck connection side of the engine) & electric fan in a heartbeat since it frees up so much space on the other side of the engine that is so crowded with the cam drive and oil returns. In combination with a digital controller you can also do away with the SC remote thermostat housing, which again frees up precious space.
I run the above combination (Meziere pump, Spal fan, Davies Craig digital controller) on my [email protected] 5 port with very stable results in addition to freeing up power.
Hi, thanks!
Good tip on the slave cylinder, I'll get to that!
I see where you're coming from with the electric pump and fan, I'll definitely be getting an electric fan on the outside of the rad but also keeping the mechanical one as everything I've read says this is the optimum setup. I had done a lot of reading about pro's and con's of electric water pumps and had decided against, I may give it a bit more thought before I'm finished though.
#415
alchall
-
- Just Joined
-
- 604 posts
Super Mini Mad
- Location: Chorley
Posted 13 February 2018 - 05:07 PM
Bought the starter from Minisport.
Guess I may have to alter that hose after all, time will tell I guess.Coming along nicely, second what Craig said about the hose, spoke the boys at SC, at Minifair, and told them about the problems I had with it, it seems the first bend is 15 degrees out, as it should be 90 degrees, this wants to pull the hose towards the fan. I'm thinking of making my one out of stainless for more protection, maybe that's over kill!
Did you fit the engine into the car, or have I read it wrong again, lol. Will you have to do any mods, etc, etc.
Is that water pump pulley 4.2", as it looks quite close, maybe just the picture angle.
I had the same issue with my starter, I ended up buying a hi torque power lite unit.
Not in the car yet, just subframe in for now, probably a couple of weeks and Ill get it in and work out what mods I need to make, really need to make some kind of decision about filtration too!
Water pump is a 4.2, its close but not as bad as the picture looks.
Not sure if Im my mind I can justify the extra cost of a high torque starter, where did you get yours from?
Like the new trigger wheel design, could have done with that on mine as the clearance was non existent.
Bitten the bullet and ordered a high torque starter, I made a schoolboy error when fitting the clutch assembly so popped it off yesterday and sent it back to MED for re-balancing, I also asked their advice on the starter and so decided it was the right route to take and ordered one from them, it'll be coming back with the clutch assembly in the next day or two.
I have to say, fantastic service from MED, they are only charging me postage for the re-balance, they received it at lunch time today and by 15.45 they'd done the work and phoned me back to arrange payment and shipping, incredible!
#416
1330RG
-
- Just Joined
-
- 219 posts
Mini Mad
- Location: southampton
Posted 14 February 2018 - 09:43 PM
Cant beat good customer service!
#417
alchall
-
- Just Joined
-
- 604 posts
Super Mini Mad
- Location: Chorley
Posted 18 February 2018 - 06:07 PM
Lots of bits and bobs done over a couple of afternoons this weekend, almost ready to drop it into the car!
I had the clutch re-balanced by MED in the week so I've popped that back in on Friday evening and also installed the exhaust headers, not sure how tight the nuts should be though?
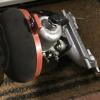
Spent about 4 hours on Saturday doing the timing, when I first started I thought it was going to be straightforward and fairly quick, but I was quite wrong, I found as Craig did with the sliver bullet that the method in the SC guide book just would not work, it started off well enough but there was not enough movement in the pulleys to turn the cam far enough to get the target 1mm of lift. In the end I set the cams on number 1 to 1mm without the belt, locked the engine at TDC, fitted and tensioned the belt then I simply had to make some fine adjustments to put them back to 1mm from where they moved to whilst re-fitting the belt. To do this I had to do things a little bit in reverse by measuring how far the cam bucket moved from TDC to fully closed, I'm confident though that this is now good (hope so as I've since fitted and sealed the cam cover!.
Had to get some 2.5mm threaded bar as well to do this, it's spectacularly tricky to get the end of the DTI needle on the cam bucket, travelling at the same angle as the cam and not touching the cam shaft, the tolerance is very fine!
I also had to bolt a piece of steel onto the head in-between the cams to secure the DTI, here's a photo I took somewhere during the process, nearly back round at zero here so quite close to 1mm here.....

Next up I made a little blanking plate to cover the hole in the bottom of the transfer case where the SPI crank position sensor used to live, I pulled the old sensor apart and used the resulting part as a template to cut a new plate from a sheet of stainless steel I had, it's not perfect but it's good enough for the job, it'll never been seen down here anyway....

So while I'm on the subject I fitted the SC crank position sensor, not sure if I maybe have set this a little close, air gap is 0.6mm?

Alternator install was reasonably straightforward with the kit from SC, I got myself a new cap head bolt so I could fit it with the DSN bracket, although I did need to shave a bit off the head to get it to fit and I also had to shave a bit off one corner of the alternator so I could swing it closer in to the block in order to get the fan belt on, still very tight so I might be better with a slightly longer belt.
Timing belt runs very close to the water pump pulley! I may be able to encourage the belt backwards a couple of mm...

Fitted the large oil drain pipe from the front of the head, I cut the top part slightly shorter and at a slight angle and took a couple of cm off the bottom end as well and this is how it ended up, it's a little close to the belt but may be ok, will consider some further adjustment to get it further away....

At least it's not touching the exhaust!

Unlike the other oil drain from the back of the head which is only mm's away....

I will get a stainless steel tie to pull the two pipes together, may also get some kind of heat shield for them as well and will probably wrap the exhaust headers.
Other tasks completed today included fitting the starter motor, loom and oil feed pipe, I will make a bracket eventually to screw onto the back of the head (there's a threaded hole at the back already) that I'll use to secure the oil feed and fuel lines with P clips. Could find my cable ties so need to get some in so I can fix the loom to the fuel rail.
So here it is in all it's glory now....


#418
alchall
-
- Just Joined
-
- 604 posts
Super Mini Mad
- Location: Chorley
Posted 18 February 2018 - 06:10 PM
Oh and while I had the clutch out I decided to weigh it to compare to the old assembly, it came in at 6.6Kg, vs 10.3Kg for the original so that's quite some weight off the bottom end....
#419
minisilverbullet
-
- TMF+ Member
-
- 3,799 posts
Up Into Fourth
- Name: Craig
- Location: Sweden
Posted 18 February 2018 - 08:09 PM
Well done on the cam timing. It is a real pain, but you get much quicker at it. Fingers crossed though you will not need to do it again. Trouble I had was when I tensioned the belt tensioner, the crank moved ever so slightly. What I learned to do was to set the the crank some degrees before TDC, know that when I tensioned the tensioner it would intern turn the crank to TDC. I marked the tooth on the flywheel with tipex, which was in line with the opening for the starter. I did this when the engine was in the middle of its dwell position any TDC. Made it much easier to find TDC the numerous other times i needed to.
Also bought some 2.5mm threaded bar. you are right on not being trick to set the dial gauge into position. I am happy to say that yours looks exactly like how I did it.
Crank sensor - looks good!
I think the belt is to close to the water pump pulley.
#420
1330RG
-
- Just Joined
-
- 219 posts
Mini Mad
- Location: southampton
Posted 18 February 2018 - 09:38 PM
Damn its tight around the belt end! I also agree that its too close. Iv not yet built a 16v a series but have a massive amount of experience with 16v 4efte starlet engine building. Belts can travel across the cam pullys a few mm when under load. Id try and get some more clearence if its possible, any chance you can put some spacers under it?
Other than that im super envious of the engine, it looks great dude!
Other than that im super envious of the engine, it looks great dude!


2 user(s) are reading this topic
0 members, 1 guests, 0 anonymous users
-
Bing (1)


