Jump to content


Photo
- - - - -

95 Sprite Rebuild & 16V Conversion


  • Please log in to reply
691 replies to this topic

#421 robj2502

robj2502

    Mini Mad

  • Noobies
  • PipPipPipPip
  • 136 posts

Posted 19 February 2018 - 06:22 AM

Engine looks amazing! - very jealous


I have had both an 8v and 16v head sitting around for a little while so have been following your build with interest. Cam tolerances look like a massive pain and having seen the insides of the heads I can see why (although 8v has a little more room for obvious reasons). Is there anything that you have come across that you were surprised by/werent aware of once you started putting the block and head together? I ask as I am likely to go down the same route as you with getting SC to do the machining/prep and I put it together. 


#422 minimissions

minimissions

    Up Into Fourth

  • Members
  • PipPipPipPipPipPipPipPipPip
  • 3,427 posts
  • Location: North West
  • Local Club: M.M.O.C

Posted 19 February 2018 - 06:46 AM

That is literally a work of art! Love it!


Bet you cant wait to hear it run?


#423 alchall

alchall

    Super Mini Mad

  • Just Joined
  • PipPipPipPipPipPip
  • 604 posts
  • Location: Chorley

Posted 19 February 2018 - 11:53 AM

Well done on the cam timing. It is a real pain, but you get much quicker at it. Fingers crossed though you will not need to do it again. Trouble I had was when I tensioned the belt tensioner, the crank moved ever so slightly. What I learned to do was to set the the crank some degrees before TDC, know that when I tensioned the tensioner it would intern turn the crank to TDC. I marked the tooth on the flywheel with tipex, which was in line with the opening for the starter. I did this when the engine was in the middle of its dwell position any TDC. Made it much easier to find TDC the numerous other times i needed to. 


Also bought some 2.5mm threaded bar. you are right on not being trick to set the dial gauge into position. I am happy to say that yours looks exactly like how I did it. 


Crank sensor - looks good!


I think the belt is to close to the water pump pulley. 


I re-read the SC guide and spotted that it said 0.8mm - 1mm for the crank sensor so may tweak it out a bit.


Looking carefully at the belt it's up against the ring on the idler pulley so it certainly isn't likely to crash against it but I may try and encourage the belt backwards, probably need to release the tension to do this, not sure if that will affect timing though :-/


Damn its tight around the belt end! I also agree that its too close. Iv not yet built a 16v a series but have a massive amount of experience with 16v 4efte starlet engine building. Belts can travel across the cam pullys a few mm when under load. Id try and get some more clearence if its possible, any chance you can put some spacers under it?

Other than that im super envious of the engine, it looks great dude!


Thanks! spacers would be a good idea but alternator water and crank pulleys are all perfectly aligned at the moment, anyway, as above I think it's already in worst place position forwards, will have to give this more thought once I've encouraged the belt back a bit.


Engine looks amazing! - very jealous


I have had both an 8v and 16v head sitting around for a little while so have been following your build with interest. Cam tolerances look like a massive pain and having seen the insides of the heads I can see why (although 8v has a little more room for obvious reasons). Is there anything that you have come across that you were surprised by/werent aware of once you started putting the block and head together? I ask as I am likely to go down the same route as you with getting SC to do the machining/prep and I put it together. 


Thanks!


I'm not sure there's been any huge surprises, mainly because I'd spent quite a lot of time researching before hand, some of it is reasonably straightforward, what you will find though if you have the SC guide that it really is just a guide, while there's some very useful and specific info in there there's also quite a bit it doesn't tell you, however, the guys at SC are quick to respond and happy to help when you have questions.


Also note that while the kit that SC sell is very comprehensive it's certainly not complete, there's lots of other bits and bobs you'll have to source yourself and solution's you'll have to work out for your specific build.


The most time consuming and tricky single thing as far as the conversion is concerned has been cam timing, other parts of the build have been tricky but I'd have had them anyway even if I'd gone for a straight forward build.


That is literally a work of art! Love it!


Bet you cant wait to hear it run?


Thanks, it does look good, the mrs has suggested it looks too good to hide away in the engine bay :-)


Gonna be a little while before it runs, got to get it in the shell, do the mods, get the shell painted then build it back up again, it's going to be a long wait!


#424 1330RG

1330RG

    Mini Mad

  • Just Joined
  • PipPipPipPip
  • 219 posts
  • Location: southampton

Posted 19 February 2018 - 08:42 PM

If my mrs said that to me id see that as a reason to build a second one for the new lounge centre piece! (My mrs has little to know interest in the cars i build though haha)

#425 alchall

alchall

    Super Mini Mad

  • Just Joined
  • PipPipPipPipPipPip
  • 604 posts
  • Location: Chorley

Posted 13 March 2018 - 05:20 PM

Bit of an update, I've been on holiday hence the lack of updates (I managed to miss all the snow and enjoy a bit of warmth in Malta!)....


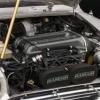
So I have dropped the engine into the car, wasn't too tricky but I've learned a couple of little lessons for when I come to do this for real without damaging the paintwork, for example, have to fit the exhaust headers after installation, it won't go in with them in place (but they're not as difficult to fit afterwards as I had anticipated).


mini-862.jpg


mini-863.jpg


I've reasonable room front to back, I've set it as far back as I think is sensible for the time being (possibly, a touch too far), it's close to the bulkhead here but once the headers are wrapped it shouldn't be too much of I problem I think.....


mini-865.jpg


And that leaves plenty of room up front, I think I've decided to fit the ITG sausage filter such as the one that SC sell and I'll probably have to modify the top of the front panel for it to fit and secure the bonnet with aero catches, but it will all fit!


mini-864.jpg


The bonnet on the other hand does need a lot of work to fit, I started with my old rusty unit to practice, have slowly hacked away a the cross members and still not got to the end, looks like it needs practically the whole centre section removed.....


mini-867.jpg


And it will need a small hump, even with the engine as far forward as I can get it it doesn't quite fit, I've cut a bit of a section and bent it up for now, it needs taking further in to the centre but actually it's sitting higher up than it really needs to be, engine only really pokes out bay 5 or 10 mm.


mini-868.jpg


So now I'm torn, do I carry on with the experiment then transfer to the new bonnet and fabricate a bulge or go for something else, Carbon Weazel's products seem to be top notch but not cheap, the 16v bonnet looks neat. I'm now starting to think again about the final look of this car!


#426 Steve220

Steve220

    Up Into Fourth

  • Members
  • PipPipPipPipPipPipPipPipPip
  • 4,885 posts
  • Location: Shropshire
  • Local Club: RAF Mini Club

Posted 13 March 2018 - 05:43 PM

Did you fit the engine stabiliser to position the engine correctly? I found mine moved forward a lot with the standard one fitted from where the engine mounts naturally sat it.


#427 minisilverbullet

minisilverbullet

    Up Into Fourth

  • TMF+ Member
  • PipPipPipPipPipPipPipPipPip
  • 3,799 posts
  • Name: Craig
  • Location: Sweden

Posted 13 March 2018 - 07:26 PM

Your test bonnet looks a lot like mine did. I basically cut all the cross sections off and it still would not fit, even with a set of lift brackets at the rear. 


SC say you can shave the mounts. In the end as you know I went for a 16v bonnet from arc angels. Doesn't fit the best, but I do like how it gives a nod to something different under the bonnet. 


#428 72hump

72hump

    Mini Mad

  • Members
  • PipPipPipPip
  • 200 posts
  • Location: Nairn
  • Local Club: IMOG

Posted 13 March 2018 - 08:19 PM

Your getting there with it, I think everyone I spoken to or seen has had fitting problems with the engine or bonnet. If you want to go down the road of fitting the original bonnet, you'll have to remove all the centre webbing, then the bonnet is very flimsy, if your thinking of aero catches, the front webbing will have to go. You will have to come up with something to stop the bonnet twisting. I think I cut around 30mm of the front cross member to get the ITG to fit.

Edited by 72hump, 14 March 2018 - 08:01 PM.


#429 alchall

alchall

    Super Mini Mad

  • Just Joined
  • PipPipPipPipPipPip
  • 604 posts
  • Location: Chorley

Posted 14 March 2018 - 12:06 AM

Did you fit the engine stabiliser to position the engine correctly? I found mine moved forward a lot with the standard one fitted from where the engine mounts naturally sat it.


I fitted the upper stabiliser, a DSN adjustable one so can alter the position to suit but not yet fitted the bottom ones, also purchased adjustable ones for the bottom.

#430 alchall

alchall

    Super Mini Mad

  • Just Joined
  • PipPipPipPipPipPip
  • 604 posts
  • Location: Chorley

Posted 14 March 2018 - 12:07 AM

Your test bonnet looks a lot like mine did. I basically cut all the cross sections off and it still would not fit, even with a set of lift brackets at the rear. 
 
SC say you can shave the mounts. In the end as you know I went for a 16v bonnet from arc angels. Doesn't fit the best, but I do like how it gives a nod to something different under the bonnet. 


Yeah I saw the deliberation you went through and am in the same position now, as you say though it is a nice hint that theres something interesting under the bonnet!

#431 alchall

alchall

    Super Mini Mad

  • Just Joined
  • PipPipPipPipPipPip
  • 604 posts
  • Location: Chorley

Posted 14 March 2018 - 12:10 AM

Your getting there with it, I think everyone I spoken to or seen has had fitting problems with the engine or bonnet. If you want to go down the road of fitting the original bonnet, you'll have to remove all the centre webbing, then the bonnet is very flimsy, if your thinking of aero catches, the front webbing will have to go. You will have to come with something to stop the bonnet twisting. I think I cut around 30mm of the front cross member to get the ITG to fit. image.jpeg image.jpeg


I do like the look of what youve achieved there, really nice work! Ive ready lost rigidity with what Ive done. I am a bit torn between replicating your solution or going for a ready made option, its decision time...

#432 72hump

72hump

    Mini Mad

  • Members
  • PipPipPipPip
  • 200 posts
  • Location: Nairn
  • Local Club: IMOG

Posted 14 March 2018 - 08:10 PM

Your getting there with it, I think everyone I spoken to or seen has had fitting problems with the engine or bonnet. If you want to go down the road of fitting the original bonnet, you'll have to remove all the centre webbing, then the bonnet is very flimsy, if your thinking of aero catches, the front webbing will have to go. You will have to come with something to stop the bonnet twisting. I think I cut around 30mm of the front cross member to get the ITG to fit. image.jpeg image.jpeg


I do like the look of what youve achieved there, really nice work! Ive ready lost rigidity with what Ive done. I am a bit torn between replicating your solution or going for a ready made option, its decision time...

If your thinking of getting a bonnet from The Carbon Weezel, you won't be disappointed, as Nick and Ben do awesome work. I was thinking of that option, but decided to go down the route of the original bonnet, as I didn't like the look of all the composite bonnets.

#433 KTS

KTS

    Up Into Fourth

  • TMF+ Member
  • PipPipPipPipPipPipPipPipPip
  • 2,257 posts
  • Location: Herts

Posted 14 March 2018 - 09:39 PM

those motors do look very nice - lovely colour scheme too


exhaust headers look awfully close to the lip on the subframe cross-member - maybe it's just the angle the photo's taken from.  is it worth relieving the lip to give a little more clearance (..assuming it's not going to compromise the subframe strength..)


also, on a slight tangent - what flooring have you used in the garage ? looks good 


#434 alchall

alchall

    Super Mini Mad

  • Just Joined
  • PipPipPipPipPipPip
  • 604 posts
  • Location: Chorley

Posted 15 March 2018 - 09:53 AM

those motors do look very nice - lovely colour scheme too


exhaust headers look awfully close to the lip on the subframe cross-member - maybe it's just the angle the photo's taken from.  is it worth relieving the lip to give a little more clearance (..assuming it's not going to compromise the subframe strength..)


also, on a slight tangent - what flooring have you used in the garage ? looks good 


You're right they are very close and adjusting the engine back and forth with the upper engine steady doesn't make much difference, it's possible the lower steadies when I fit them will help but otherwise I'll probably take little out of that lip on the subframe.


The flooring was from Mototile - http://mototile.com/...AiAAEgJH-vD_BwE it's the recycled PVC tile that I got, it was more expensive than paint but it's very good, very hard wearing and pretty easy to fit.


#435 minimissions

minimissions

    Up Into Fourth

  • Members
  • PipPipPipPipPipPipPipPipPip
  • 3,427 posts
  • Location: North West
  • Local Club: M.M.O.C

Posted 15 March 2018 - 12:58 PM

Love how this looks with that engine in there! Cant wait to see the car in paint... its going to be a monster


0 user(s) are reading this topic

0 members, 0 guests, 0 anonymous users