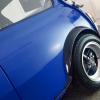
Love how this looks with that engine in there! Cant wait to see the car in paint... its going to be a monster
Thanks, It is a nice looking thing, part of why I decided to go this route was the aesthetics....


Super Mini Mad

Posted 15 March 2018 - 01:42 PM
Love how this looks with that engine in there! Cant wait to see the car in paint... its going to be a monster
Thanks, It is a nice looking thing, part of why I decided to go this route was the aesthetics....
Super Mini Mad
Posted 02 April 2018 - 07:57 PM
Slow progress at the moment, other stuff taking priority but also just doing fiddly jobs to get everything to fit.
So first up the bonnet, I've decided to go with a hump, order in with Carbonweezel, getting hinge fittings, safety catch and prop, will have to secure with bonnet pins though. Also ordered some other tickets from them and they're doing me a fibreglass mockup of their airbox so I can try that for size for a filtration option.
I made up a top radiator bracket to fit to the SC top plate, it's a little rough and ready but fits nicely so have asked Carbonweezel to make me one up in carbon fibre so that's part of my order.

I've decided to mount the ECU in the car under the dash, so had a fiddle with routing for the loom, I will either drop it through one of the holes in the top of the crossmember as I've done for now or will cut a hole in the bulkhead in the bottom corner.
Also done some plumbing, top hose made up from a 180 and 2x 90 samco bends and a joiner, had to find a 50mm long joiner to make this compact but it fits nicely enough...


Next up a made up a little bracket to mount onto the back of the head to secure fuel and oil pipes, there's already a little threaded hole here made to measure!
Knocked this up from a 20mm square section tube, a little fiddly and needs a tidy and a coat of paint but does the job nicely...

Then onto some fuel line routing and also hose for the crank case breather....


I'll use P clips on the fuel rail mounts to secure the fuel feed hose but I need some either with larger screw holes or ones that I can drill wider holes in (can't do that with the ones I have due to the way they're made).
Works nicely with my new mount at the rear (breather hose not yet clipped as I didn't have a P clip large enough)....

And I will probably make up a bracket to secure the fuel pressure regulator, I can do something using the threaded hole on the front of the head that you can see on the right here...

I ordered an oil catch can thinking nice and slim so will fit nicely under the wing where the charcoal canister used to be (I'm ditching it so it's a useful space for it).

Unfortunately it's not that good a fit, so ordered a smaller cylinder shaped one that also came with a filter, this will work much better....

And finally, ordered some grommets to mount back plate for air filter to the ram pipes, not perfect but I think with a rubber washer between it and the back of the ram pipes and it'll be fixed nice and solid, mounting to a back plate a job for another day!

Mini Mad

Posted 03 April 2018 - 07:13 PM
One Carb Or Two?
Posted 03 April 2018 - 08:07 PM
Ive also got the adjustable one. With it at the minimum i found it rested too close to the frame/bulkhead and the reverberations were tremendous. Ive just wound mine on and will let you know how it works out on the road.I fitted the upper stabiliser, a DSN adjustable one so can alter the position to suit but not yet fitted the bottom ones, also purchased adjustable ones for the bottom.Did you fit the engine stabiliser to position the engine correctly? I found mine moved forward a lot with the standard one fitted from where the engine mounts naturally sat it.
Mini Mad
Posted 03 April 2018 - 08:31 PM
Edited by 1330RG, 03 April 2018 - 08:32 PM.
Super Mini Mad
Posted 04 April 2018 - 08:21 AM
Beginning to take shape, looking very smart mate, some nice work and attention to detail in this build. Looking at your photos, I've noticed your fitting the rubber grommets behind the trumpets for your filter back plate, just to point out, encase you haven't noticed, but the standard throttle cable layout might be a problem. At this rate you'll be finished long before me, so l'll be nicking ideas of you, lol.
Thanks very much!!!
And yeah I'm trying to work out how I can alter the throttle cable holder to pull the cable downward to avoid fouling the back plate, no idea if I'll be successful, if not I'll need some kind of plan B, maybe switching to K1200 throttle bodies which route the cable differently could be the answer, watch this space 
Super Mini Mad
Posted 04 April 2018 - 08:23 AM
Ive also got the adjustable one. With it at the minimum i found it rested too close to the frame/bulkhead and the reverberations were tremendous. Ive just wound mine on and will let you know how it works out on the road.
I fitted the upper stabiliser, a DSN adjustable one so can alter the position to suit but not yet fitted the bottom ones, also purchased adjustable ones for the bottom.Did you fit the engine stabiliser to position the engine correctly? I found mine moved forward a lot with the standard one fitted from where the engine mounts naturally sat it.
Thanks, that's useful information, I think I'll be able to set the engine further forward anyway, I just need to make sufficient adjustment to the top of the front panel to allow for this, once I've got the mock up air box I'll have a better idea of how it'll all fit.
Super Mini Mad
Posted 04 April 2018 - 08:24 AM
One of my favourite builds so far. Nice work mate.
Cheers!
Mini Mad
Posted 04 April 2018 - 06:52 PM
Beginning to take shape, looking very smart mate, some nice work and attention to detail in this build. Looking at your photos, I've noticed your fitting the rubber grommets behind the trumpets for your filter back plate, just to point out, encase you haven't noticed, but the standard throttle cable layout might be a problem. At this rate you'll be finished long before me, so l'll be nicking ideas of you, lol.
Thanks very much!!!
And yeah I'm trying to work out how I can alter the throttle cable holder to pull the cable downward to avoid fouling the back plate, no idea if I'll be successful, if not I'll need some kind of plan B, maybe switching to K1200 throttle bodies which route the cable differently could be the answer, watch this space
Super Mini Mad
Posted 05 April 2018 - 09:23 AM
Beginning to take shape, looking very smart mate, some nice work and attention to detail in this build. Looking at your photos, I've noticed your fitting the rubber grommets behind the trumpets for your filter back plate, just to point out, encase you haven't noticed, but the standard throttle cable layout might be a problem. At this rate you'll be finished long before me, so l'll be nicking ideas of you, lol.
Thanks very much!!!
And yeah I'm trying to work out how I can alter the throttle cable holder to pull the cable downward to avoid fouling the back plate, no idea if I'll be successful, if not I'll need some kind of plan B, maybe switching to K1200 throttle bodies which route the cable differently could be the answer, watch this space
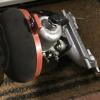
This is how I got round my problem, hope this helps!image.jpeg
Thanks that's useful yes, looks like you've put a little pulley in there next to the cam, is that to prevent the cable from becoming worn due to the tighter angle that it now runs at?
Mini Mad
Posted 05 April 2018 - 05:54 PM
Thanks that's useful yes, looks like you've put a little pulley in there next to the cam, is that to prevent the cable from becoming worn due to the tighter angle that it now runs at?
This is how I got round my problem, hope this helps!
Beginning to take shape, looking very smart mate, some nice work and attention to detail in this build. Looking at your photos, I've noticed your fitting the rubber grommets behind the trumpets for your filter back plate, just to point out, encase you haven't noticed, but the standard throttle cable layout might be a problem. At this rate you'll be finished long before me, so l'll be nicking ideas of you, lol.
Thanks very much!!!
And yeah I'm trying to work out how I can alter the throttle cable holder to pull the cable downward to avoid fouling the back plate, no idea if I'll be successful, if not I'll need some kind of plan B, maybe switching to K1200 throttle bodies which route the cable differently could be the answer, watch this space
Super Mini Mad
Posted 09 April 2018 - 04:43 PM
Thanks that's useful yes, looks like you've put a little pulley in there next to the cam, is that to prevent the cable from becoming worn due to the tighter angle that it now runs at?
This is how I got round my problem, hope this helps!
Beginning to take shape, looking very smart mate, some nice work and attention to detail in this build. Looking at your photos, I've noticed your fitting the rubber grommets behind the trumpets for your filter back plate, just to point out, encase you haven't noticed, but the standard throttle cable layout might be a problem. At this rate you'll be finished long before me, so l'll be nicking ideas of you, lol.
Thanks very much!!!
And yeah I'm trying to work out how I can alter the throttle cable holder to pull the cable downward to avoid fouling the back plate, no idea if I'll be successful, if not I'll need some kind of plan B, maybe switching to K1200 throttle bodies which route the cable differently could be the answer, watch this space
Yes that's the plan, took a few prototypes to get it to work, bought the small pulley from eBay for a couple a quid.
Food for thought, thanks!
Super Mini Mad
Posted 09 April 2018 - 04:48 PM
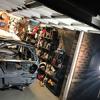
Didn't get much time in the garage this weekend, but new p clips turned up so I did a bit of a tidy up of the fuel and breather hoses and made a little bracket to secure the fuel pressure regulator. It's fairly simple but looks neat enough and should be good enough to just stop things flapping around too much, you can just see it in the first of these photo's....


Hopefully will get a bit more time in the garage this weekend, maybe sort out the gearbox steadies and I should also have a few bits arriving in the next couple of days from my new friends at Carbonweazel including fibreglass mockup of their air box so some further experimentation with air filtration and throttle cables could also be on the cards.
Super Mini Mad
Posted 10 April 2018 - 08:54 AM
Super Mini Mad
Posted 10 April 2018 - 04:59 PM
Love it! Cant wait to see it with some weezel bits in there
How about this then


0 members, 0 guests, 0 anonymous users


