Jump to content


Photo
- - - - -

95 Sprite Rebuild & 16V Conversion


  • Please log in to reply
691 replies to this topic

#466 72hump

72hump

    Mini Mad

  • Members
  • PipPipPipPip
  • 200 posts
  • Location: Nairn
  • Local Club: IMOG

Posted 11 June 2018 - 06:11 PM

Any updates mate, I'm having withdraw sypmtoms, since I don't have the time to do mine.

 
Haha sorry, I've been away on holiday for 3 of the last 5 weeks so no progress to report at the moment!
 
I've bought some parts to build the brake vacuum system and my loom is with David Wilson to be modified and improved so may be a little progress this weekend, time for the engine to be popped back out to modify the engine bay, hopefully will get this right first time and will only have to go back in once more before it goes in for real (chances I suspect are slim!)

Fantastic, good luck with the engine bay mods, are you going to cut the slam plate of?

#467 alchall

alchall

    Super Mini Mad

  • Just Joined
  • PipPipPipPipPipPip
  • 604 posts
  • Location: Chorley

Posted 13 June 2018 - 12:32 PM


Any updates mate, I'm having withdraw sypmtoms, since I don't have the time to do mine.

 
Haha sorry, I've been away on holiday for 3 of the last 5 weeks so no progress to report at the moment!
 
I've bought some parts to build the brake vacuum system and my loom is with David Wilson to be modified and improved so may be a little progress this weekend, time for the engine to be popped back out to modify the engine bay, hopefully will get this right first time and will only have to go back in once more before it goes in for real (chances I suspect are slim!)

Fantastic, good luck with the engine bay mods, are you going to cut the slam plate of?


Yup - it has to be cut away for the filter to fit, I'll be using bonnet pins to secure the bonnet, need to to get my hands on the new bonnet to determine what type to use, shouldn't be far away now!


#468 alchall

alchall

    Super Mini Mad

  • Just Joined
  • PipPipPipPipPipPip
  • 604 posts
  • Location: Chorley

Posted 17 June 2018 - 07:36 PM

Have had a few weeks off due to some holidays but made a start again this weekend.....


First a little update on some new bits and pieces, penultimate carbon fibre parts arrived, mirrors and radiator top bracket, the latter is a custom part and fits perfectly....


mini-899.jpg


mini-896.jpg


mini-897.jpg


Having taken inspiration from minisilverbullet and northernpowers respective builds I sourced the parts to build an electronic vacuum system to drive the brake servo as the throttle bodies won't produce enough vacuum. I toyed with 2nd hand options on eBay from different cars but found that many seem to use the same Hella UP28 pump, I sourced a new generic one for £65 and a new reservoir for £15, there's also a pressure switch which I've not photographed which is the same as the one northernpower used. My loom is in the process of being customised by Wired by Wilson and this will incorporate the necessary wiring and fuse etc. to connect this all up so it should be nice and neat, not totally decided how to mount it yet but I'll work that out over the next couple of weeks.


mini-898.jpg


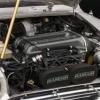
So now to some actual progress, popped the engine back out to start on the mods, two main ones being the slam panel to fit the air filter and a piece out of the subframe to avoid fouling the exhaust.


mini-900.jpg


mini-901.jpg


And engine back in to see if these work or need some fettling....


mini-902.jpg


mini-903.jpg


mini-905.jpg


mini-908.jpg


mini-906.jpg


I'm happy with this, I may make a small modification to the cross member as one of the down pipes is a little close, need to give this a bit of thought.


So the engine is now out, back on it's trolley and covered up ready for me to move on to completing the shell. 1 A panel to fit, doors to finish fettling, rear seat strengthener to fit, slam panel and subframe mods above will need fettling and strengthening, a hole is needed in the bulkhead for the ECU loom to enter the cabin, mounting for the ECU under the dash to be made, and mountings for both the oil catch tank and the vacuum pump being the main items left to complete.


mini-909.jpg


#469 72hump

72hump

    Mini Mad

  • Members
  • PipPipPipPip
  • 200 posts
  • Location: Nairn
  • Local Club: IMOG

Posted 17 June 2018 - 09:01 PM

Looking very smart, love all your carbon parts. I had to do the same with my subby, and also cut my cross member for extra exhaust clearance, and I will be putting a heat shield on to protect the paint work.

#470 alchall

alchall

    Super Mini Mad

  • Just Joined
  • PipPipPipPipPipPip
  • 604 posts
  • Location: Chorley

Posted 17 June 2018 - 09:13 PM

Looking very smart, love all your carbon parts. I had to do the same with my subby, and also cut my cross member for extra exhaust clearance, and I will be putting a heat shield on to protect the paint work. image.jpeg


The carbon parts are really nice, not cheap though and some are just an extravagance :-)

I’m also thinking some kind of heat shielding on the cross member and lower bulkhead might make sense.

Did you add in some strengthening to the subframe where you adjusted it?

#471 72hump

72hump

    Mini Mad

  • Members
  • PipPipPipPip
  • 200 posts
  • Location: Nairn
  • Local Club: IMOG

Posted 17 June 2018 - 09:29 PM

Looking very smart, love all your carbon parts. I had to do the same with my subby, and also cut my cross member for extra exhaust clearance, and I will be putting a heat shield on to protect the paint work. image.jpeg


The carbon parts are really nice, not cheap though and some are just an extravagance :-)

I’m also thinking some kind of heat shielding on the cross member and lower bulkhead might make sense.

Did you add in some strengthening to the subframe where you adjusted it?

No I didn't add anything, but I didn't remove as much material as you did, as long as you still have a fold on the steel it should be strong enough for road use, but if you feel it isn't strong enough you could just double the thickness of the steel. Your garage looks great, can't wait until I do my one.

#472 minimissions

minimissions

    Up Into Fourth

  • Members
  • PipPipPipPipPipPipPipPipPip
  • 3,427 posts
  • Location: North West
  • Local Club: M.M.O.C

Posted 18 June 2018 - 05:55 AM

That engine is something else :gimme:


So what colour is the shell going? Flame red the colour you painted inside the sills?


#473 minisilverbullet

minisilverbullet

    Up Into Fourth

  • TMF+ Member
  • PipPipPipPipPipPipPipPipPip
  • 3,799 posts
  • Name: Craig
  • Location: Sweden

Posted 18 June 2018 - 11:31 AM

Regarding the vacuum pump:


Have you though as far as where to connect the reservoir, I am guessing after the switch using a T connector? I am looking into this also and can't figure it out. I think I will add after the switch and before the servo and use a oneway valve. I am hopping that the reservoir will also "store" the negative pressure created from the TBs so the pump won't need to work as hard. 


​I guess you will still use the vacuum from the TBs? Or will you use the pump for your only source of vacuum. 


#474 alchall

alchall

    Super Mini Mad

  • Just Joined
  • PipPipPipPipPipPip
  • 604 posts
  • Location: Chorley

Posted 18 June 2018 - 12:51 PM


Looking very smart, love all your carbon parts. I had to do the same with my subby, and also cut my cross member for extra exhaust clearance, and I will be putting a heat shield on to protect the paint work. image.jpeg


The carbon parts are really nice, not cheap though and some are just an extravagance :-)

I’m also thinking some kind of heat shielding on the cross member and lower bulkhead might make sense.

Did you add in some strengthening to the subframe where you adjusted it?

No I didn't add anything, but I didn't remove as much material as you did, as long as you still have a fold on the steel it should be strong enough for road use, but if you feel it isn't strong enough you could just double the thickness of the steel. Your garage looks great, can't wait until I do my one.


Thanks that's useful, I'll probably weld in a plate in that area to add a bit of thickness and strength. 


Best thing about the garage is it's double, I started in a single and it's so much easier now!


#475 alchall

alchall

    Super Mini Mad

  • Just Joined
  • PipPipPipPipPipPip
  • 604 posts
  • Location: Chorley

Posted 18 June 2018 - 12:52 PM

That engine is something else :gimme:


So what colour is the shell going? Flame red the colour you painted inside the sills?


My original plan was flame red with a black roof, but now things have moved on I'm giving consideration to leaving the carbon on show on the bonnet and having the rest of the car a single colour, I'm also considering something like a candy apple red metallic.


#476 alchall

alchall

    Super Mini Mad

  • Just Joined
  • PipPipPipPipPipPip
  • 604 posts
  • Location: Chorley

Posted 18 June 2018 - 03:54 PM

Regarding the vacuum pump:


Have you though as far as where to connect the reservoir, I am guessing after the switch using a T connector? I am looking into this also and can't figure it out. I think I will add after the switch and before the servo and use a oneway valve. I am hopping that the reservoir will also "store" the negative pressure created from the TBs so the pump won't need to work as hard. 


​I guess you will still use the vacuum from the TBs? Or will you use the pump for your only source of vacuum. 


I've not yet decided if I'll use the vacuum from the TBs or not, I guess with the reservoir in place it would mean the pump running less often and it's an inexpensive addition. 


I'm not 100% sure on the plumbing yet as I've not quite got to that level of detail, first job was to get the parts and work out what I need to do to the car to mount it and wire it into the loom before I commit to paint and while I'm getting the loom modified, I think however that the reservoir is as you're guessing after the switch, I think the switch will simply measure the negative pressure in the system so being next to the reservoir seems to make logical sense but I may be wrong....


#477 minimissions

minimissions

    Up Into Fourth

  • Members
  • PipPipPipPipPipPipPipPipPip
  • 3,427 posts
  • Location: North West
  • Local Club: M.M.O.C

Posted 18 June 2018 - 03:58 PM

That engine is something else :gimme:
 
So what colour is the shell going? Flame red the colour you painted inside the sills?

 
My original plan was flame red with a black roof, but now things have moved on I'm giving consideration to leaving the carbon on show on the bonnet and having the rest of the car a single colour, I'm also considering something like a candy apple red metallic.

Awesome I like the sound of those plans.

#478 cp2708

cp2708

    Mini Mad

  • Just Joined
  • PipPipPipPip
  • 171 posts
  • Location: London
  • Local Club: LSMOC

Posted 20 June 2018 - 12:27 AM

Just read from start to finish. Great project, top quality work. 


#479 alchall

alchall

    Super Mini Mad

  • Just Joined
  • PipPipPipPipPipPip
  • 604 posts
  • Location: Chorley

Posted 20 June 2018 - 09:58 AM

Just read from start to finish. Great project, top quality work. 

Thanks for your kind words!


#480 Jgguinness

Jgguinness

    Mini Mad

  • Noobies
  • PipPipPipPip
  • 120 posts
  • Location: UK

Posted 22 June 2018 - 12:39 PM

Ive just read this from start to finish too whilst at work over the last few days.  Looking amazing, so much hard work gone into this.  Looking forward to seeing it in paint soon!


0 user(s) are reading this topic

0 members, 0 guests, 0 anonymous users