Looks great!
I like the forward planning. I could have learned from that, as I ended up squeezing ancillaries in afterwards.
Do you know where you will fit the ECU?


Up Into Fourth

Posted 10 September 2018 - 09:18 AM
Looks great!
I like the forward planning. I could have learned from that, as I ended up squeezing ancillaries in afterwards.
Do you know where you will fit the ECU?
Super Mini Mad
Posted 10 September 2018 - 11:32 AM
good to see the detailing coming together
Very nice work mate, the car is going to be something else once she's finished.
This is looking good, the use of those rivnuts will make life so much easier.
Thanks Guys, and yes rivnuts are perfect or these types of fittings, I will probably use them for the arches as well as I have some countersunk M4's that should be good for that....
Super Mini Mad
Posted 10 September 2018 - 11:35 AM
Looks great!
I like the forward planning. I could have learned from that, as I ended up squeezing ancillaries in afterwards.
Do you know where you will fit the ECU?
To be fair it's much easier for me to do this level of forward planning as I've stripped the car right back, you didn't really have that luxury.
ECU is going to go under the dash below the glove box on the passenger side, the carb type ECU loom as a fairly long cable so it will route perfectly through my new bulkhead hole to that area under the dash.
Mini Mad
Posted 11 September 2018 - 06:38 PM
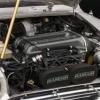
I just read all 34 pages. You really did an awesome job on the body.
And that engine.... looks absolutely superb. Would love to have one in my engine bay... haha
Super Mini Mad
Posted 12 September 2018 - 03:21 PM
I just read all 34 pages. You really did an awesome job on the body.
And that engine.... looks absolutely superb. Would love to have one in my engine bay... haha
Thanks! you have some patience to read this whole thread  but it's nice to see people taking an interest!
Mini Mad

Posted 14 September 2018 - 04:08 PM
Super Mini Mad
Posted 15 September 2018 - 01:04 PM
I've also just read the whole thread (not quite in one go!).
The car is looking fantastic, I'm particularly envious of the bodywork considering your lack of experience with the welder at the beginning.
That engine looks pretty nice too
Thanks! 
Super Mini Mad
Posted 16 September 2018 - 10:03 PM
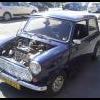
Bit more meaningful update this week, spend some good time in the garage this weekend and the shell is very nearly done!
Small modification to the cross member to give the exhaust header a little more space, just one of the down pipes needed a bit of clearance so I marked it up last time I had the engine in. I cut this section out, modified it so it sits further back and added side sections, pretty pleased with how this turned out, just hope it's right when the engine goes back in! one more test fit to follow before I call it all complete.
I also added some welds to the sides of the engine steady mount to give it some additional strength.
You can also see evidence of some of my very first welding inside the cut out, that bulkhead has had a lot of work done now!


Fitted a lip to the front panel and plug welded the upright to it so it's got its strength back, also pleased with this!

Front panel drilled for mounting the grille and riv nuts added, also drilled holes to accommodate 4 spot lights, I may only go with two but at least I have the options...

Passenger side A panel fixed and door test fitted again...

Also you may notice the arch here, I fitted rivnuts so the can be fitted with screws rather than pop rivets, this has worked quite nicely but can't get the rivet tool in the space for the hole at the bottom next to the door for the rear arches, need to give this some thought!
They work well though.....

More bits and bobs coming through now so I can do some final test fitting, ordered a custom dash and centre console from Optimise Automotive so I can work out what space I have behind it for ECU etc.
I have bought some Smiths auxiliary gauges and as my old binnacle was only a 2 clock I got myself a 3 clock from eBay of the same vintage. I used the best bits from both and cleaned it all up, also kept the original speedo so the milage isn't altered. Gave the plastic a good polish and they're looking pretty good....

And made a start on the heater, dismantled it and cleaned it all out, the matrix isn't good, and the foam from the flap inside was basically dust so I've ordered some foam sheet to replace it with....

Up Into Fourth

Posted 17 September 2018 - 05:35 AM
Awesome nice clean work there...
Mini Mad

Posted 17 September 2018 - 05:07 PM
Mill Road Garage

Posted 17 September 2018 - 07:11 PM
I love the crossmember mod. Very tidy
One Carb Or Two?

Posted 18 September 2018 - 10:33 AM
Edited by MacGyver, 18 September 2018 - 10:34 AM.
Speeding Along Now

Posted 18 September 2018 - 12:28 PM
Super Mini Mad
Posted 18 September 2018 - 03:22 PM
Awesome nice clean work there...
I love the crossmember mod. Very tidy
Nice bit of fabrication on that cross member indeed! Looks original.
What's the problem with the rivnut insert? If the head of the tool too wide, just slacken the adjuster off and put several (6-7) washers between the rivnut and the tool, then you should have a good sleek access to tight spaces.
Ben
THANKS GUYS!!
I am pleased with the cross member modification, it's what I had in my mind and it worked, took a while but wasn't actually that hard in the end!
And yes the head of the riv nut tool just won't fit in the space, and it's too far from the edge of the seam to use washers, however, I found a £12 rivnut tool on Amazon which has smaller mandrels and that just fits, and actually may be a better device than the one I paid 3x the price for ages ago!
Super Mini Mad
Posted 18 September 2018 - 03:25 PM
When you hoping to get her to the body shop for paint? Nice clean work as always by the way.
Fantastic work as ever on this. Any thoughts on colour yet for the body?
I'm looking around now for body shops as it's practically ready now and no doubt there will be a bit of a lead time, especially for somewhere that has a good reputation.
I think I'm back around at the original flame red, but undecided on what to do with the bonnet, keep it showing the carbon fibre, paint it red, or see if maybe the raised middle section could be painted red leaving the two lower edges in carbon fibre as they are pretty much the same width as stripes so that might work and make the hump less obvious at first glance....


0 members, 0 guests, 0 anonymous users


