Jump to content


Photo
- - - - -

95 Sprite Rebuild & 16V Conversion


  • Please log in to reply
691 replies to this topic

#526 72hump

72hump

    Mini Mad

  • Members
  • PipPipPipPip
  • 200 posts
  • Location: Nairn
  • Local Club: IMOG

Posted 18 December 2018 - 04:09 PM

A quick question mate, where did you get your injectors from?


Funnily enough you're the second person to ask me this in the past day!

I deliberated for some time about what to get and where from and decided it was a bit of a minefield so in the end I got them from SC, they were expensive but at least I can be sure that they're a good match, somebody with some better knowledge may be able to give you some good advice about what alternatives would work for less outlay.
Had a look at SC, their a bit pricey. Anyway, did a bit of trawling this afternoon, and managed to get a set of genuine Bosch EV1 440cc ones from a fuel injector specialist, and not Flea bay

Edited by 72hump, 18 December 2018 - 04:11 PM.


#527 1330RG

1330RG

    Mini Mad

  • Just Joined
  • PipPipPipPip
  • 219 posts
  • Location: southampton

Posted 18 December 2018 - 09:55 PM

Build is comming along nicely. Love the care going into making the fit of the engine/clearences so tidy. Something that seems a littl overlooked on k head builds some times

#528 alchall

alchall

    Super Mini Mad

  • Just Joined
  • PipPipPipPipPipPip
  • 604 posts
  • Location: Chorley

Posted 19 December 2018 - 12:13 PM


A quick question mate, where did you get your injectors from?


Funnily enough you're the second person to ask me this in the past day!

I deliberated for some time about what to get and where from and decided it was a bit of a minefield so in the end I got them from SC, they were expensive but at least I can be sure that they're a good match, somebody with some better knowledge may be able to give you some good advice about what alternatives would work for less outlay.
Had a look at SC, their a bit pricey. Anyway, did a bit of trawling this afternoon, and managed to get a set of genuine Bosch EV1 440cc ones from a fuel injector specialist, and not Flea bay


I found eBay to be full of knock offs, was nervous about what I might end up with if I went down that road!


#529 alchall

alchall

    Super Mini Mad

  • Just Joined
  • PipPipPipPipPipPip
  • 604 posts
  • Location: Chorley

Posted 19 December 2018 - 12:15 PM

Build is comming along nicely. Love the care going into making the fit of the engine/clearences so tidy. Something that seems a littl overlooked on k head builds some times


Thanks!


I guess I have the luxury of a bare shell that is yet to be painted so have a lot of freedom that you wouldn't have if you were doing it as an independent modification, trying to do my best to find the right compromises as I go....


#530 alchall

alchall

    Super Mini Mad

  • Just Joined
  • PipPipPipPipPipPip
  • 604 posts
  • Location: Chorley

Posted 23 December 2018 - 05:22 PM

A few more bits and bobs done this weekend. 


Decided on the location for the ECU, it fits snugly under the glove box in the corner with just enough space for the cable to route to it, it avoids the windscreen air tube and I only have to drill one new hole in the tray as one lines up nicely. It looks like it's drooping in this picture but it's not in reality.


mini-959.jpg


While I was at it I had another fiddle with the dash, having inspected many photo's on the internet for examples to see how it really should look. I've determined that the problem is self inflicted, I've fitted the bottom dash rail a few millimetres too high up on the drivers side, it fits about right at the passenger side but I can't get it in at the bottom on the drivers....


mini-954.jpg


Passenger side looks right, I thought it wasn't at the top but looking at others this seems typical...


mini-952.jpg


Driver side you can see just doesn't sit back far enough at the bottom.....


mini-953.jpg


So I'm going to have to fix that mistake now!


Next up the vacuum system, after much deliberation I've decided to mount the reservoir on the servo bracket, so I made a bracket for this to attach to using 2mm steel, it's pretty solid....


mini-955.jpg


And fits around the clutch master cylinder nicely with room for the hoses to run....


mini-956.jpg


mini-957.jpg


I've two options for the pressure switch, either atop the servo bracket....


mini-964.jpg


or mounted to the pump using this little bracket I made....


mini-958.jpg


Option 1 I think is better for pipe routing but will require me to extend the power cables, more thought required.


And then I decided to re-do the bracket I made for the fuel pressure regulator as 2mm steel has proven so much stronger than 1.2mm for the vacuum reservoir; I also made it slightly longer and included an extra hole to pop a p-clip on it to hold the hose for the crank case breather hose.


mini-965.jpg


mini-966.jpg


It's now rock solid!


Finally I made a bracket for the little external amp for my stereo, I used part of the now redundant bracket for the clocks so it will fix to the bulkhead and hold the amp behind the dash and under the clocks; more 2mm steel to make the base plate and one half of the clocks bracket removed and ready....


mini-960.jpg


Welded the two together and cleaned up....


mini-962.jpg


mini-963.jpg


And it fits....


mini-963.jpg


I'll pop couple of captive nuts on this for the bolts to hold the amp on as they'll be tricky to get to once it's all in place, I can actually fit it either way up so it can live underneath the clocks in an upside down position or behind them in a sideways position.


#531 1330RG

1330RG

    Mini Mad

  • Just Joined
  • PipPipPipPip
  • 219 posts
  • Location: southampton

Posted 27 December 2018 - 01:01 PM

That amps really tidy, bracket is spot on ?

#532 almarsh132

almarsh132

    Speeding Along Now

  • Members
  • PipPipPipPipPip
  • 389 posts
  • Local Club: Medway Mini's

Posted 06 January 2019 - 08:22 PM

Great work glad to see you are still cracking on. Plan to be on the road for the summer?

#533 alchall

alchall

    Super Mini Mad

  • Just Joined
  • PipPipPipPipPipPip
  • 604 posts
  • Location: Chorley

Posted 04 February 2019 - 09:51 AM

Great work glad to see you are still cracking on. Plan to be on the road for the summer?


Thanks, but I would say next summer is a more likely target, it's a matter of finding the time really to get it finished now


#534 alchall

alchall

    Super Mini Mad

  • Just Joined
  • PipPipPipPipPipPip
  • 604 posts
  • Location: Chorley

Posted 10 February 2019 - 05:25 PM

Just a little update today.....


Bracket made to mount the vacuum switch on top of the brake servo mount.


mini-976.jpg


In place and pipes routed (after some experimentation I think this should be fine...


mini-972.jpg


mini-974.jpg


I purchased a couple of small door catches to fasten the bonnet, I was going with pins but have decided to give this a go instead, I think it's going to need one on each side as I don't think one side will hold the bonnet down evenly so it'll mean some work to make up a bit of a complicated internal release mechanism. I'll try this all out when I get the bonnet back.


mini-971.jpg


mini-975.jpg


http://www.alchall.c...ni/mini-976.jpg

mini-968.jpg


I've also started to dig out more mechanical parts to start cleaning up and refurbishing, rear hubs cleaned and old bearings removed, but I managed to damage one of the internal faces getting the old bearing race out :-/ 


mini-967.jpg


mini-973.jpg


In two minds about the rear brake back plates, clean up blast and powder coat or ditch them and get new ones (they're very crusty!)


mini-970.jpg


mini-969.jpg


#535 alchall

alchall

    Super Mini Mad

  • Just Joined
  • PipPipPipPipPipPip
  • 604 posts
  • Location: Chorley

Posted 24 February 2019 - 05:12 PM

More suspension and brake parts cleaned up....


Lower arms pins and brake pedal pin cleaned up and de-rusted, gave them a bit of wet and dry treatment to get a more polished finish after plating.


Cleaned up...


mini-981.jpg


Plated...


mini-977.jpg


Pins have a bit of a dull finish so may re-do them.


Started clean up of rear brake back plates and they are actually in much better shape than I thought and definitely salvageable, still in the process of de-rusting these but here's how they looked part way through.....


mini-982.jpg

mini-985.jpg


Rear arms cleaned up a bit, these will go off for a refurb.


mini-986.jpg


Steering arms cleaned up and de-rusted, now ready for painting....


mini-983.jpg


Top arms were a pest, lots of heat and a lump hammer to release this bolt, then clearly had to cut the end off to get it out....


mini-980.jpg


And getting the bearings out wasn't straight forward, tricky to get at with a drift, so ordered this device from amazon and the 19mm part was perfect for the job, would have been perfect for getting the old bearings out of the transfer case too and may have saved me damaging it and having to replace it!


mini-979.jpg


And in the end these now fully cleaned up and ready for painting.


mini-984.jpg


Looking for a rear hub on eBay so I can also finish those of then will be able to get all of these parts painted and built up. Back plates I'll probably have powder coated along with the subframes and some other bits and bobs.


#536 mattmiglia

mattmiglia

    Super Mini Mad

  • Members
  • PipPipPipPipPipPip
  • 515 posts
  • Location: West Midlands

Posted 24 February 2019 - 11:42 PM

Looking good mate, parts are coming up nicely.

#537 alchall

alchall

    Super Mini Mad

  • Just Joined
  • PipPipPipPipPipPip
  • 604 posts
  • Location: Chorley

Posted 01 April 2019 - 10:56 AM

Some more slow progress....


I've finished off the drivetrain and suspension components that I started, rear drum back plates are now rust free, given them a coat of POR15 to keep them that way until they go off to be powder coated.


mini-987.jpg


Other parts painted with Frosts extreme chassis black, seems to be very hard wearing and gives a nice satin black finish....


mini-988.jpg


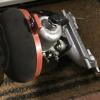
Top arm re-build kit from mini spares came with some less than perfect looking roller bearings so I purchased some more expensive items from Rimmer Brothers, I think you can see from the photo's why I did this, on the left MS and the right RB....


mini-989.jpg


Rest of the kit seems good though and now fully built up and set to one side....


mini-990.jpg


Also new bearings and studs fitted to the rear hubs, caps only lightly fitted into place as they'll need to come off but they'll keep the bearing in place for the time being which I packed with good quality grease...


mini-991.jpg


mini-992.jpg


Then onto fabricating a bonnet catch, I'm going to start with one side for now and hope that it holds the bonnet in place on it's own, but if not then I'll have to revert to my original thinking of a dual sided arrangement, the other side will be more tricky if I have to do it. 


The guys at Carbon Weezel have had to start from scratch with a new bonnet which is clearly costly for them but fair play, they've just got on with it which is all you can really ask for, mistakes happen, how they are dealt with is what's most important and I cannot fault these guys for that!


Anyway, after a bit of experimentation I came up with this....


mini-993.jpg


mini-994.jpg


I've cut the lug of a normal bonnet catch and fabricated the rest, which it is welded to, from a small section of 20mm tube and some 2mm plate steel, I have had to compromise a little on the angle the cable runs in at 90 degrees means the cable runs into the bonnet space in a way that wouldn't work well around the other components so I angled it towards the inner wing, that's as far as I could take it before it became too bent as the cable exits it's covering.


mini-996.jpg


mini-997.jpg


Anyway it opens and closes nicely and doesn't look too shabby, lets hope this is sufficient!


Now onto some bad news!


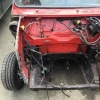
I've been struggling to get the drivers side door to fit well, to the point that I decided I'd rebuilt the door badly and it was the problem, so I made use of the sell off of stock at DSN classics to buy a bunch of stuff I was going to need plus a new door (not cheap), sadly, all this did was confirm that I'd really not done such a bad job of remanufacturing the door after all, it's pretty well close to the same as the new one and the problem is just the same, here you can see what the problem is...


mini-998.jpg


mini-1001.jpg


Compared with the other side which fits really nicely....


mini-999.jpg


mini-1000.jpg


So while it fits reasonably square inside the frame the top rear pushes too far in by approximately 10mm, I've spent a lot of time scratching my head on this but I think I know where the route cause lives, and it goes way back to me fitting the new floor, I now recall having to adjust one of the closing plates between rear arch and seat pan which at the time I wasn't sure was the right thing to do to make the whole thing fit properly across the width of the car, I now think that. what this is doing is causing the car to be misshaped slightly at the B post on the passenger side so I'm going to have to do some major surgery to correct it; off with the rear wings, unpick the welds along the seat pan / heal board, and re-fit with a new closing panel on the side that I adjusted :-(


All in all a costly mistake but hopefully I can remedy it myself...


#538 rich_959

rich_959

    Super Mini Mad

  • Just Joined
  • PipPipPipPipPipPip
  • 568 posts
  • Location: East Yorks

Posted 01 April 2019 - 11:50 AM

Ouch. I'm going through similar problems myself, albeit the body shop are handling it for me. Door fit was always terrible on the car before stripping down. Lots of tinkering with door fit after new inner wings and door posts, all jig and laser aligned with new front end etc. Then after borrowing other sets of doors have confirmed that the rear quarters (which were replaced about ten years ago as part of a previous rebuild) are in very much the wrong place. New rear quarters now required to get everything aligned. At this point I think only the floor/sills, bulkhead, roof and rear panel will end up being left of the old shell. Bloody Mini!!


#539 Steve220

Steve220

    Up Into Fourth

  • Members
  • PipPipPipPipPipPipPipPipPip
  • 4,894 posts
  • Location: Shropshire
  • Local Club: BMC

Posted 02 April 2019 - 03:36 PM

It's only at the top it's out by 10mm by the looks, just bend it. They did it in the factory, and I did it to mine to get the door seals to work.

#540 Steve220

Steve220

    Up Into Fourth

  • Members
  • PipPipPipPipPipPipPipPipPip
  • 4,894 posts
  • Location: Shropshire
  • Local Club: BMC

Posted 02 April 2019 - 03:39 PM

Here's a guide

Attached Files


0 user(s) are reading this topic

0 members, 0 guests, 0 anonymous users