Jump to content


Photo
- - - - -

95 Sprite Rebuild & 16V Conversion


  • Please log in to reply
691 replies to this topic

#46 alchall

alchall

    Super Mini Mad

  • Just Joined
  • PipPipPipPipPipPip
  • 604 posts
  • Location: Chorley

Posted 08 March 2015 - 05:26 PM

This weekend I finally got round to a bit of welding on the car, it was certainly not perfect but as it's my first time I'm pretty pleased with the outcome.


Started like this.....


Mini-88.jpg
 
First job was take off some of the primer to finish off the derusting, so I left the cross member ends (inside and out) and the hinge brackets soaking over night then cleaned it up this morning before moving on to the metal work. 
 
First job was to cut some metal to size to fill in the two area's of rot that had to be cut out at each end of the top of the bulkhead and clamp them into place, I then tacked them into place....
 
 
Attached File  Mini-90.JPG   60.06K   45 downloadsAttached File  Mini-92 copy.jpg   66.45K   49 downloads
 
Then off came the clamps and pulse welded along the joins, I did blow a couple of holes and some of it wasn't particularly tidy but it ended like this....
 
Attached File  Mini-91.JPG   53.33K   46 downloadsAttached File  Mini-93.JPG   62.79K   41 downloads
 
When I ground them down I did find a couple of pin holes that needed to be welded up so I set about that then ground them back down again, I've actually found I do still have a couple of tiny pin holes to fix but that's for another day, but tidied up it looks OK to me.....
 
Attached File  Mini-99 copy.jpg   69.49K   56 downloads
 
I also welded up a couple of holes and a crack next to the bulkhead hole....
 
Attached File  Mini-105.JPG   48.28K   21 downloadsAttached File  Mini-103 copy.jpg   52.63K   23 downloads
 
Last job was to trim the top of the new metal as I'd made the longer piece too large, but here's how it looks now having been cleaned up and re-primed....
 
Attached File  Mini-107.JPG   60.23K   41 downloads
 
So that's it, first welding done, still learning but at least I can actually do it and I'm happy with the outcome, next job top dash rail to be replaced, need to put in some bracing first though!


#47 alchall

alchall

    Super Mini Mad

  • Just Joined
  • PipPipPipPipPipPip
  • 604 posts
  • Location: Chorley

Posted 09 March 2015 - 09:59 AM

Well I've been giving some thought to the engine department and purchased a copy of this as it seems like a tempting upgrade and an extra little challenge for the project....


Attached File  Twin Kam Instructions.jpg   36.23K   65 downloads


#48 BusheyTrader

BusheyTrader

    Speeding Along Now

  • TMF+ Member
  • PipPipPipPipPip
  • 481 posts
  • Location: Bushey
  • Local Club: Nope

Posted 11 March 2015 - 11:24 PM

Interesting........

How many extra horses will that give you?

Adam

Edited by BusheyTrader, 11 March 2015 - 11:28 PM.


#49 Hendred

Hendred

    Speeding Along Now

  • Members
  • PipPipPipPipPip
  • 484 posts
  • Location: Cleobury Mortimer Nr Ludlow, Shropshire Name: John

Posted 12 March 2015 - 07:18 AM

This weekend I finally got round to a bit of welding on the car, it was certainly not perfect but as it's my first time I'm pretty pleased with the outcome.


Started like this.....


First job was take off some of the primer to finish off the derusting, so I left the cross member ends (inside and out) and the hinge brackets soaking over night then cleaned it up this morning before moving on to the metal work. 
 
First job was to cut some metal to size to fill in the two area's of rot that had to be cut out at each end of the top of the bulkhead and clamp them into place, I then tacked them into place....


Then off came the clamps and pulse welded along the joins, I did blow a couple of holes and some of it wasn't particularly tidy but it ended like this....
 
 
When I ground them down I did find a couple of pin holes that needed to be welded up so I set about that then ground them back down again, I've actually found I do still have a couple of tiny pin holes to fix but that's for another day, but tidied up it looks OK to me.....
 
 
I also welded up a couple of holes and a crack next to the bulkhead hole....
 
 
Last job was to trim the top of the new metal as I'd made the longer piece too large, but here's how it looks now having been cleaned up and re-primed....
 
 
So that's it, first welding done, still learning but at least I can actually do it and I'm happy with the outcome, next job top dash rail to be replaced, need to put in some bracing first though!


Glad your pleased with your welding, you picked it up quicker than I did.  What do you think of the Clarke 135TE?


Edited by Hendred, 12 March 2015 - 07:20 AM.


#50 alchall

alchall

    Super Mini Mad

  • Just Joined
  • PipPipPipPipPipPip
  • 604 posts
  • Location: Chorley

Posted 12 March 2015 - 11:44 AM

Interesting........

How many extra horses will that give you?

Adam

They provide some examples in the document and on their website, they suggest 120bhp and 100lbft torque are achievable with the RS cams and no modifications, such as porting, to the head. It looks like the torque curve is reasonably flat and comes in reasonably low in the rev range that suggests that it would also be very drivable which certainly would be difficult, if not impossible to achieve approaching anywhere near even 100bhp with modifications to the A series head and racier cam profiles.


I'm not sure how this would compare in terms of performance and cost to going down the 7 port head route though.


#51 alchall

alchall

    Super Mini Mad

  • Just Joined
  • PipPipPipPipPipPip
  • 604 posts
  • Location: Chorley

Posted 12 March 2015 - 11:49 AM

Glad your pleased with your welding, you picked it up quicker than I did.  What do you think of the Clarke 135TE?


I picked it up quicker than I anticipated, I do find I am blowing holes occasionally though and I think it's more to do with technique than settings as I can manage to do it without blowing holes without changing settings. I think as I get more practice I'll be fine though which is a great relief as it would be painfully expensive to pay somebody else to do the work for me!


I like the welder, it's easy to setup and use, it's not too bulky and it works on a 13A power supply, I am using hobbyweld gas which I am also pleased with, I hadn't realised when I got the gas bottle and welder that I needed an adapter to connect it to the welder so had to go back for that but that was just my poor research up front before I started and was easily solved.


#52 Hendred

Hendred

    Speeding Along Now

  • Members
  • PipPipPipPipPip
  • 484 posts
  • Location: Cleobury Mortimer Nr Ludlow, Shropshire Name: John

Posted 13 March 2015 - 08:24 AM

I do exactly the same, use hobbyweld gas with a regulator.  Keep up the practise.


#53 alchall

alchall

    Super Mini Mad

  • Just Joined
  • PipPipPipPipPipPip
  • 604 posts
  • Location: Chorley

Posted 15 March 2015 - 10:07 PM

Well I decided to put off doing the top dash rail for another day (although I have decided how I'm going to go about bracing the windscreen opening and the bulkhead when I do) and spent a few hours finishing off the top part of the bulkhead and the crossmember.


First off fixing the missing corner on the edge of the bulkhead, I decided to do this using some 10x10x1 corner that I had as it seemed to be the easiest way of going about things and ensured a nice straight line, not perfect as the original is more than 10mm high but it should be enough to plug weld the inner wing to and it looks reasonably neat but not perfect....


Attached File  Mini-114.jpg   43.67K   29 downloads


I then measured the position of the engine steady mount, cut out the bent and rusty metal that it was welded to, made up a new piece, welded it in, ground it down and applied a layer of Electrox....


Attached File  Mini-113.jpg   42.53K   29 downloadsAttached File  Mini-116.jpg   51.49K   44 downloadsAttached File  Mini-117.jpg   44.49K   47 downloadsAttached File  Mini-118.jpg   28.71K   38 downloads


Final job was to attach the new bracket, I sanded off the black paint off the back as it looked like there might be a bit of rust lurking below it, primed it, drilled a couple of 6mm holes and lined it up to fit in the same position as the old one according to the measurements I took above. I temporarily clamped it in place and marked where the holes met the crossmember so I could sand off the primer, spray on a little weld through primer, let that dry, clamped it back on, welded it up, ground down the welds, cleaned it all up and then a final coat of primer to finish the job.....


I also stripped the old paint and rust as well as I could from the support brackets and popped them in a bath of Deox C to get rid of all the rust, I've had them out and wire brushed a couple of times but they weren't quite finished this morning so I'll take them out and clean them up tomorrow evening. I won't be doing anything other than priming them for the time being as I want to leave them off until it comes time to fit the inner wings as it's just one more thing to get in the way.....


Attached File  Mini-112.jpg   50.49K   22 downloads


The one thing you can't see from the photo's is that I took the opportunity while I had a hole in the crossmember to give the whole of the inside from left to right a good clean out, de-rust where accessible and applied some Electrox where I could, hopefully this will be sufficient to keep it in good condition for some years to come, I certainly put some time into it!


I feel like I'm now making some progress (albeit I'm not 100% sure I've done the right thing with the corner edge at the top of this post) but it's nice to see a section done, I seem to be slowly getting better at the welding too so I should start to speed up soon I hope!


#54 Hendred

Hendred

    Speeding Along Now

  • Members
  • PipPipPipPipPip
  • 484 posts
  • Location: Cleobury Mortimer Nr Ludlow, Shropshire Name: John

Posted 16 March 2015 - 05:47 PM

Awesome mate


#55 Ben_O

Ben_O

    Mill Road Garage

  • Paint Doctor
  • PipPipPipPipPipPipPipPipPipPip
  • 9,781 posts
  • Location: Isle of Wight

Posted 16 March 2015 - 06:07 PM

Looking good! Nice to see you picking up the new skills quickly.


One thing i thought i would mention, That engine steady bracket, Is there only those two small plug welds holding it on? I only ask because you might find that it won't stay put for long once the car is on the road. I would either add a few more plug welds or some short runs of seam weld around the edges. Just to be safe.


Nice work though. Keep it up


Ben


#56 alchall

alchall

    Super Mini Mad

  • Just Joined
  • PipPipPipPipPipPip
  • 604 posts
  • Location: Chorley

Posted 16 March 2015 - 06:32 PM

Thanks guys, I'm feeling good about it again now I'm getting used to the welding!


One thing i thought i would mention, That engine steady bracket, Is there only those two small plug welds holding it on? I only ask because you might find that it won't stay put for long once the car is on the road. I would either add a few more plug welds or some short runs of seam weld around the edges. Just to be safe.


I was thinking about this myself, as far as I could tell it did originally have only the two but it did had been seam welded round the edges by a previous owner, I think I may take your advice and add a couple more plug welds for good measure!


#57 Hendred

Hendred

    Speeding Along Now

  • Members
  • PipPipPipPipPip
  • 484 posts
  • Location: Cleobury Mortimer Nr Ludlow, Shropshire Name: John

Posted 16 March 2015 - 09:48 PM

Thanks guys, I'm feeling good about it again now I'm getting used to the welding!


There is always highs and lows!


#58 alchall

alchall

    Super Mini Mad

  • Just Joined
  • PipPipPipPipPipPip
  • 604 posts
  • Location: Chorley

Posted 23 March 2015 - 02:14 PM

Right then, big weekend this weekend, I welded in my first new panel; the top dash rail!


This took me all day but actually was easier than I anticipated, most of my time was taken up with prep, de-rusting and tidying up the welds at the end....


So first job was to install a brace bar just underneath the dash rail, I'm not convinced this was 100% necessary but it meant I had some peace of mind and also served a second purpose as it meant I could fashion a sort of Jig at each end to enable me to align the new panel correctly and at the same angle as the old one.


Attached File  Mini-119.jpg   65.04K   25 downloadsAttached File  Mini-120.jpg   72.03K   39 downloads


I also did some measuring (and more measuring, multiple times just to be sure), the main things I measured up were distance from rail to top of windscreen opening at three locations and marked where I measured on some masking tape, I also measured along the centre line from the centre of the rear bulkhead to the very front of the dash rail to make sure it wasn't sitting too far forward or backward at the end.


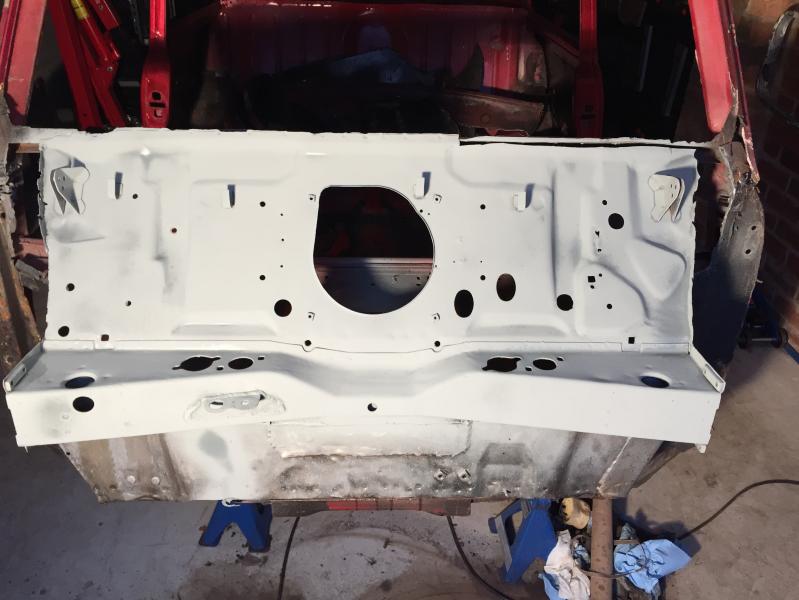
Drilling out the welds that remained along the top of the bulkhead (there were only half of them due to the previous repairs I had made to the top edge), was straightforward, cutting the rail off at each end was slightly more involved, I had to cut it out about 5mm or so in from the A post using both the grinder and the snips and then ground it down using the power file (this has become my favourite tool and was invaluable for this job!).


With the old panel out I then set to cleaning up and de-rusting with Deox Gel the inside of the top edge of the bulkhead, oh and I had to weld a couple of small pinholes that I found in my previous repairs so I fixed them while I was at it so I did this first. I also sanded the e-coat off the edge of the new panel where it was going to be welded plus a couple of small patches on it where the coating had been damaged and a little rust had set in. Onto all of these edges I then applied a coat of weld through zinc primer.


Attached File  Mini-123.jpg   74.57K   31 downloadsAttached File  Mini-124.jpg   71.73K   28 downloadsAttached File  Mini-125.jpg   74.05K   21 downloads


Next up, clamping it into place, measuring, adjusting etc. so it matched my measurements, which was much more straightforward than I anticipated, assuming of course I've not cocked up somewhere along the line!  O_O


Attached File  Mini-126.jpg   68K   23 downloads


I then set about some welding, first just a couple of tacks, re-measured to check all was well (which it was), a couple more tacks, removed the clamps holding the rail to my jig and worked my way along the length of the rail applying plug welds, clamping as I went to keep it all tight and solid. I finished by applying a plug weld to the tabs at the underside of each end of the dash rail (I drilled these holes earlier) and then seam welded the corners inside to finish the job off, to be honest the seam welds (especially on the drivers side where there was also a small hole that needed to be filled in the A post where it had rusted through) aren't the tidiest so I may grind them back and if necessary re-do them at some point later down the line when I've had some more welding practice.


Attached File  Mini-127.jpg   70.04K   24 downloadsAttached File  Mini-128.jpg   60.05K   17 downloads


So there it is in place, the last jobs were to grind down the welds so they are perfectly flush with the front of the bulkhead so as not to foul the scuttle when the time comes to install it, cleaned it all up and finally applied a coat of Electrox. Done!


Attached File  Mini-129.jpg   73.65K   9 downloadsAttached File  Mini-130.jpg   56.01K   18 downloads


You may notice some red paint at the ends of the cross member, I decided to paint these parts and the corresponding insides of the support brackets to offer some future protection against the elements, or ingress of water as has clearly been a problem to date! I first sanded the small spots where they will be welded on, applied a coat of weld through, masked them and around the edges, a couple of coats of etch primer followed by a couple of coats of top coat and repeated on the brackets.


Attached File  Mini-122.jpg   62.67K   13 downloads


So that's a successful Sunday in the garage I think, I've got a week off coming up where I hope to get the repairs to the lower bulkhead complete, the dash shelf replaced (this is in a real mess, bent at the ends and bits missing where the previous repairs were made to the inner wings) and the toe board replaced. Toe board replacement is a bit daunting but necessary as the subframe mounting points are shot and it's been badly patched in the bottom corners previously too; some careful bracing and jig fashioning and much measuring will be required before I start on that!


#59 Hendred

Hendred

    Speeding Along Now

  • Members
  • PipPipPipPipPip
  • 484 posts
  • Location: Cleobury Mortimer Nr Ludlow, Shropshire Name: John

Posted 25 March 2015 - 07:22 AM

Looking forward to seeing what you get done in your week off


#60 alchall

alchall

    Super Mini Mad

  • Just Joined
  • PipPipPipPipPipPip
  • 604 posts
  • Location: Chorley

Posted 26 March 2015 - 09:17 AM


Looking forward to seeing what you get done in your week off


Not as much as I am :-)


I've made a bit of a head start, cut out the dodgy repair to the lower bulkhead and left the exposed top edge to de rust in some Deox Gel....


Attached File  Mini-131.jpg   51.73K   17 downloadsAttached File  Mini-132.jpg   57.35K   14 downloads


Next all I have to do is move the brackets to a fresh piece of steel and get them in the right position, how hard can that possibly be?


Attached File  Mini-133.jpg   55.41K   18 downloads


0 user(s) are reading this topic

0 members, 0 guests, 0 anonymous users