Nice, powder coating looks spot on. Any word when your shell is been returned?
It'll be a while yet, they said it would take around 3 months but couldn't be sure as it would depend on how much repair work comes their way.


Super Mini Mad

Posted 04 July 2020 - 06:11 PM
Nice, powder coating looks spot on. Any word when your shell is been returned?
It'll be a while yet, they said it would take around 3 months but couldn't be sure as it would depend on how much repair work comes their way.
Super Mini Mad
Posted 29 July 2020 - 09:42 PM
It's about time for an update, it's all happening now :-D
Started building up the subframes, a bit of trial and error here and there as this is new to me despite the Haynes manual, this forum, YouTube etc. I still had to do one or two things twice to get it right, actually the trickiest job in reality was getting the trunnion pins torqued up, even finding advice on what to torque too was tricky, seems between 25 and 35 lb ft is popular, I could get them to 30 so satisfied with that.
Anyway, a few pics of progress not a lot of detail but you get the gist, only think left before it goes on the car now is the handbrake cable, couldn't finish this as I'm missing the clevis pins!


I had the radius arms refurbed as I don't have the means to ream the bush but I stripped and painted them, lots of new parts in here, backplates are original (powder coated) but all the rest of the brake components are new including goodridge braided hoses and DSN classics greasable handbrake quadrants. I'm using mini spares (Ripspeed) hi-lo's with the long pin on the rears painted black, standard rubber springs, and KAD adjustable camber and toe brackets (I splashed out on KAD here as they seem to be by far the best).
I've started the front, a couple of evenings and I'll be done as far as I want to before it's on the car, springs and top arms are both in....

Here again all new brake components, standard springs, hi-lo's, and fully adjustable lower arms (mini spares) and tie bars (KAD again as these also seem to really be the best and the strongest), top arms are original but that's about it up front, I also have a mixture of DSN classics and Specialist Components solid mounts (SC rear, DSN top, both came with fronts, undecided which to use), and SC tower bolts.
I also collected my fuel tank from the body shop last time I was there, this looks nice, but won't be seen!

Waiting for a new sender seal before I put it all back together, and I think I have a suitable pump but not 100% sure, when I bought the car he said it had a new pump and it was an MPI unit (can't get the SPI one anyway now) and I think it's correct but not sure, the SPI pump won't work with this build.
And this morning I headed over to the body shop for the penultimate time partly to have a peak at the almost complete job and partly to drop off some arches for painting.
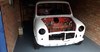
And it really is nearly done, should be ready next week, paint wise it's just the arches and the screws for the boot hinges that they've yet to do, the roof and mirrors were painted black yesterday so it was a good time to go look.
I have to say that it is stunning, the quality of the finish out of the gun is incredible, it's not yet been flatted and polished but you would barely know, I cannot wait to see what it's like when it's completed, should be getting it back next week some time.
Here's a couple of photo's I took while I was there, it's fair to say I'm very happy :-D


I've seen the inside and underside, nothing too exciting there, they've taken great care to make sure any parts on show are well finished, I'll be back with an update in a couple of weeks once it's back home!
Up Into Fourth

Posted 29 July 2020 - 09:49 PM
Mini Mad

Posted 30 July 2020 - 05:23 PM
One Carb Or Two?

Posted 30 July 2020 - 05:38 PM
Great colour red very vibrant
Speeding Along Now

Posted 30 July 2020 - 09:17 PM
Absolutely stunning!
Super Mini Mad
Posted 11 August 2020 - 09:15 AM
And she's back home....


The paint job is first class, I just have to keep it that way while I build it all back up!
I only popped the arches and mirrors on to see how it all looked, they're back off again for safe keeping, I had a last minute change to Group 2 arches as I wanted painted and I found these that have the holes in the same places as the standard ones, except it turns out they don't quite, the hole at the bottom next to the door on both the front and rear arches isn't quite in the same place, but I think it should be fine as the trim should hold it in place and if not a small dot of sealant should do the trick.
So I've made a bit of a start, rear loom and washer bottle in, steering rack fitted, front top shock mounts fitted (I also applied a little tiger seal under these to keep the water out), front to rear brake line fitted, new fuel lines fettled and fitted (that was one hard job, took ages to get them close to the shape of the originals then needed a lot of tweaking to really fit properly), some anti drum stuck on the inside and some clear underbody wax under the boot floor and on top of the rear subframe which is now curing.


I think my next job is getting it on the subframes and perched on some axel stands.
Up Into Fourth

Posted 11 August 2020 - 11:34 AM
That shell looks lovely - there's nothing better than bolting on all the new or re-furbished parts, enjoy!
One Carb Or Two?

Posted 11 August 2020 - 09:33 PM
One Carb Or Two?
Posted 12 August 2020 - 01:19 PM
Fantastic what's your rebuild time frame ??
Super Mini Mad
Posted 12 August 2020 - 03:09 PM
Fantastic what's your rebuild time frame ??
Thanks! I aim to get it on the road for next spring / summer, I think that should be achievable and no need to have it ready for middle of winter when I don't want to be using it anyway....
Mini Mad
Posted 12 August 2020 - 03:55 PM
looks brilliant,! enjoy the rebuild
Mini Mad
Posted 12 August 2020 - 09:34 PM
Mini Mad

Posted 13 August 2020 - 06:41 AM
Very nice. What did you use inder the car? Raptor bedliner?
Super Mini Mad
Posted 20 August 2020 - 05:05 PM
Your shell looks absolutely stunning, just a quick question, I see your not running with the tank vent line under the car, where are you venting the tank too?
Good isn't it  I'm just going to drop a short pipe out through the grommet in the boot floor and vent it out there, I've cut off that first part of the vent pipe to use for this purpose.
Very nice. What did you use inder the car? Raptor bedliner?
I did ask what they used, and I can't remember but it wasn't Raptor, it's an underbody coating along the lines of Gravitex.


0 members, 1 guests, 0 anonymous users


