Jump to content


Photo

Workshop Hints, Tips And Tricks


  • Please log in to reply
20 replies to this topic

#1 Ben_O

Ben_O

    Mill Road Garage

  • Paint Doctor
  • PipPipPipPipPipPipPipPipPipPip
  • 9,781 posts
  • Location: Isle of Wight

Posted 02 December 2014 - 04:56 PM

I thought it might be a good idea to start this thread so we can share any tips and tricks we have found whilst working on the Mini's


So if you have a home made tool that does a particularly good job of something otherwise difficult or perhaps you have discovered a short cut to doing any particular job then post it up in here. Feel free to add pictures to illustrate your ideas.


Please keep your entries safe though. Make sure that anything you suggest is tried and tested and may not pose a threat to other people trying it.

Any such entries may be removed.


Thanks


Ben


#2 Ben_O

Ben_O

    Mill Road Garage

  • Paint Doctor
  • PipPipPipPipPipPipPipPipPipPip
  • 9,781 posts
  • Location: Isle of Wight

Posted 02 December 2014 - 05:00 PM

When using grinder accessories like cutting discs, Grinding stones and flap discs, Don't use them until they are worn to nothing before starting a new one.


I use cutting discs until they are just over half worn and then change for a new one, I do the same with grinding stones. That way, you can use a full size disc for general work and you have part worn discs for getting into those tight areas.


I buy the coarsest flap discs i can and when one is about half worn, i save it as this is ideal for going over fully linished welds to fully smooth them off and are ideal for removing paint/e-coat from edges prior to welding as they remove the paint fine without thinning the metal.


Ben


#3 Bubblebobble

Bubblebobble

    Super Mini Mad

  • Members
  • PipPipPipPipPipPip
  • 661 posts
  • Location: oxford

Posted 02 December 2014 - 05:52 PM

I would add on the subject of angle grinders , do not wear loose clothing , especially t-shirts . I have been leaving over using one and it caught my shirt, wrapping itself and my hand into it so could not turn it of as it cut into my chest . It took all my strength to hole it away so it was only just touching  , until someone came by and pulled the plug from the wall .


 Safety first with everything , gloves googles/face screen , overalls , ear defenders / ear plugs .


#4 Ben_O

Ben_O

    Mill Road Garage

  • Paint Doctor
  • PipPipPipPipPipPipPipPipPipPip
  • 9,781 posts
  • Location: Isle of Wight

Posted 02 December 2014 - 06:07 PM

I am not a hoarder by any stretch of the imagination but if i see something made of metal that is going in the bin, i always ask myself, could i make something useful with that?


Here are a few examples.


Our old Vegetable rack kept falling apart so we bought a better one so rather than throw it away,i removed the middle rack and welded the top and bottom the the end rails making it solid and now use it for my grinder and accessories.

My mother in law had a few basic household tools in one of those plastic tool trays but she bought a tool bag instead as the side got cracked on the plastic one. rather than bin it, i plastic welded the crack up and it fits perfectly in the top rack of the veg trolley and holds all the accessories perfectly.


P1060195_zpsbc60c52d.jpg


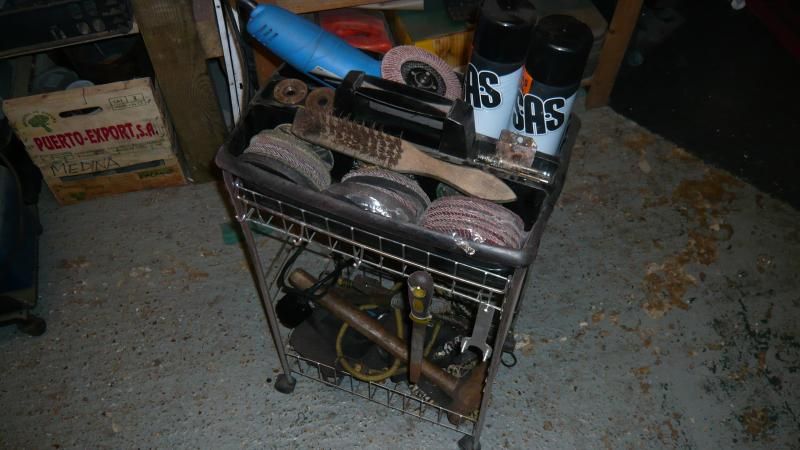
i can roll it to where i am working and everything is organised and to hand. No more of that 'where did i put that new packet of cutting discs' anymore


i also made a trolley for my Mig welder as i kept knocking the bottle over when moving it around.


This is made out of 2 television wall brackets, 2 washing line props and a kiddies toy buggy all of which my mum was chucking out after clearing out her loft.


1_zps37f32ea0.jpg


5_zps7d583c24.jpg


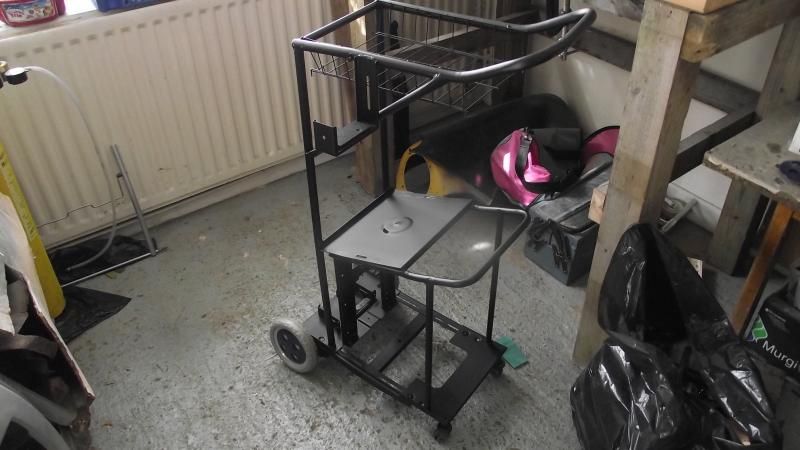
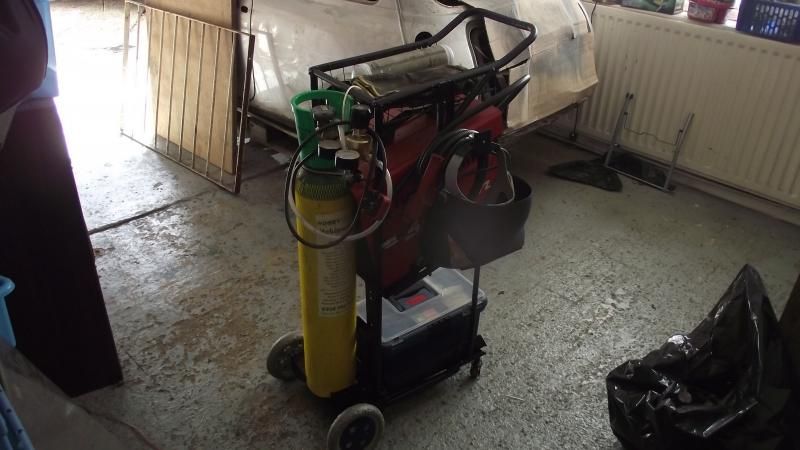
As you can see, i have storage for my gloves in the top and an arm on the side to hold the cables and my shield.


storage in the bottom for a small plastic toolbox containing spare parts for the welder and a place to stand the gas bottle.

It cost nothing to make and has saved me so much time and aggro.

The basket in the top is the middle one i removed from the veg trolley above.


Ben


#5 Bubblebobble

Bubblebobble

    Super Mini Mad

  • Members
  • PipPipPipPipPipPip
  • 661 posts
  • Location: oxford

Posted 02 December 2014 - 06:15 PM

+1 on storage , it so much more convenient to have a small trolley or table on wheels so that your tools are not on the floor and within easy reach .


#6 Tamworthbay

Tamworthbay

    Crazy About Mini's

  • Members
  • PipPipPipPipPipPipPipPipPipPip
  • 7,025 posts
  • Name: Clive
  • Location: Tamworth
  • Local Club: A5 minis

Posted 02 December 2014 - 09:39 PM

Getting a decent earth can be tricky on small bits of welding, so I spot weld an old bolt in the repair piece. It also makes it easy to hold in place while you tack it on. At the end just cut it off and grind flat.

#7 Ben_O

Ben_O

    Mill Road Garage

  • Paint Doctor
  • PipPipPipPipPipPipPipPipPipPip
  • 9,781 posts
  • Location: Isle of Wight

Posted 02 December 2014 - 10:14 PM

If you want to dry fit panels to your restoration project to check alignment before welding, then you can pre-drill some small holes and then pop a screw in to hold things nicely.


I don't like doing that as it is boring, takes time and if you want to keep removing the panel to adjust and refit, it soon becomes tedious.


so i use these - http://www.ebay.co.u...0-/231094760437


All you need to do is put a 1/4 screwdriver-socket adaptor into your drill with a 7mm socket, pop one of these in the end and buzz it in with the drill.No need to pre-drill holes and pulls the panels up tight to one another.

With a reversible drill, they go in and come out on seconds too and just chuck them in a pot and use them again and again.


make sure you use a clutched drill though as they can easily over tighten and loose their grip


marvellous 


Edited by Ben_O, 02 December 2014 - 10:16 PM.


#8 cookie4343

cookie4343

    **Caution: Do Not Feed Alcohol**

  • Traders
  • PipPipPipPipPipPipPipPipPip
  • 2,257 posts
  • Local Club: CV1 Mini's

Posted 03 December 2014 - 12:14 AM

My sheet metal bender, cost me about £20 to build and about 3 hours work.
Still needs a few tweaks but it works and will save me a lot of time just wish I made one years ago.
1ed001a22128d8b766bd27e3081c16df_zps0bc4
c3d936c11b84a76b2fffea7b17b0f8e0_zps770e

#9 rally515

rally515

    Up Into Fourth

  • Members
  • PipPipPipPipPipPipPipPipPip
  • 3,848 posts
  • Location: ask!

Posted 07 December 2014 - 06:04 PM

 Hi Ben, great idea for a thread firstly :thumbsup: .


And secondly here's something I've just realised works tonight, I while ago I thought to myself "that dusty reel of MIG wire can't be doing the liner of the lance any good",#

so I wrapped a piece of insulation tape (the red one pictured below) around the spool just were it is about to feed into the liner.

As you can see hopefully from the picture of the red one there is quite a build up of crud from the spool, the copper coating only protects the wire so much from corrosion).


The yellow tape picture is a cleaner version I've just re-done tonight after finding it helps. It should help protect and increase the life of the liner somewhat.

IMG_20141207_175736_zpsd0dc84f0.jpg

IMG_20141207_175750_zpsf8f536b7.jpg


Cheers,

Cliff


#10 stefan5417

stefan5417

    On The Road

  • Noobies
  • PipPip
  • 42 posts
  • Location: Yeovil

Posted 07 December 2014 - 06:13 PM

Not a tool but cheap glass tint spray paint works very well on vinyl dashboard covers haha. Been on for a couple months and not a mark

#11 Ben_O

Ben_O

    Mill Road Garage

  • Paint Doctor
  • PipPipPipPipPipPipPipPipPipPip
  • 9,781 posts
  • Location: Isle of Wight

Posted 08 December 2014 - 12:44 AM

Good ideas guys.


Keep them coming :-)


Ben


#12 olly33

olly33

    One Carb Or Two?

  • Members
  • PipPipPipPipPipPipPip
  • 758 posts
  • Location: Midlands
  • Local Club: 42nd Street (back in day)

Posted 08 December 2014 - 11:41 PM

I did not know until the other day that you can use the top door hinges(internal type) also on the bottom,and if you want a neat look,just cut off the third screw hole,straight so it looks like a bottom hinge.

#13 Ben_O

Ben_O

    Mill Road Garage

  • Paint Doctor
  • PipPipPipPipPipPipPipPipPipPip
  • 9,781 posts
  • Location: Isle of Wight

Posted 16 December 2014 - 07:31 PM

A common rust spot on Mini's which usually becomes apparent when removing the scuttle is the bonnet hinge mounts.


If these are left, the rust will spread and cause more problems.


Now the most obvious thing to do is drill the spot welds holding them to the bulkhead and clean everything up and weld them back but then you are left with the painstaking job of trying to get something in there to grind the heads of the plug welds back.


So instead, why not drill the spot welds from inside the bulkhead? There is plenty of access and once removed, cleaned and back in place, they can be plug welded from inside where it is MUCH easier to get in there with the grinder to linish off the heads of the plug welds.


#14 One step at a time

One step at a time

    Mini Mad

  • Members
  • PipPipPipPip
  • 282 posts
  • Location: Staffordshire

Posted 29 December 2014 - 12:19 AM

Not mini related as such but defiantly garage related, the first thing I remember my Dad teaching me.
Always place your warm cup of brew on a piece of wood and NOT metal. It'll stop warmer a lot longer.

#15 cal844

cal844

    Crazy About Mini's

  • Members
  • PipPipPipPipPipPipPipPipPipPip
  • 9,486 posts
  • Location: Ballingry, Fife
  • Local Club: TFMOC

Posted 13 January 2015 - 01:41 PM

Not mini related as such but defiantly garage related, the first thing I remember my Dad teaching me.
Always place your warm cup of brew on a piece of wood and NOT metal. It'll stop warmer a lot longer.

or a rubber mat or maintenence free battery :)


3 user(s) are reading this topic

0 members, 3 guests, 0 anonymous users