Hi Luke,
Will provide fotos if needed.
Gear change selector I mean is underneath the clutch, it's your lowest point of the R1 on the right side of the car (left if standing upfront).
Assume my final solution will also be to cut out the frontmember and replace it with a straight profile, also easier to mount flip front I planned.

Cooper Mpi Restoration - My Second Mini Project
Started by
LukeH
, Dec 18 2014 12:13 PM
196 replies to this topic
#62

LukeH
-
- TMF+ Member
-

- 1,004 posts
One Carb Or Two?
- Location: Norwich, Norfolk
Posted 30 March 2015 - 07:30 PM
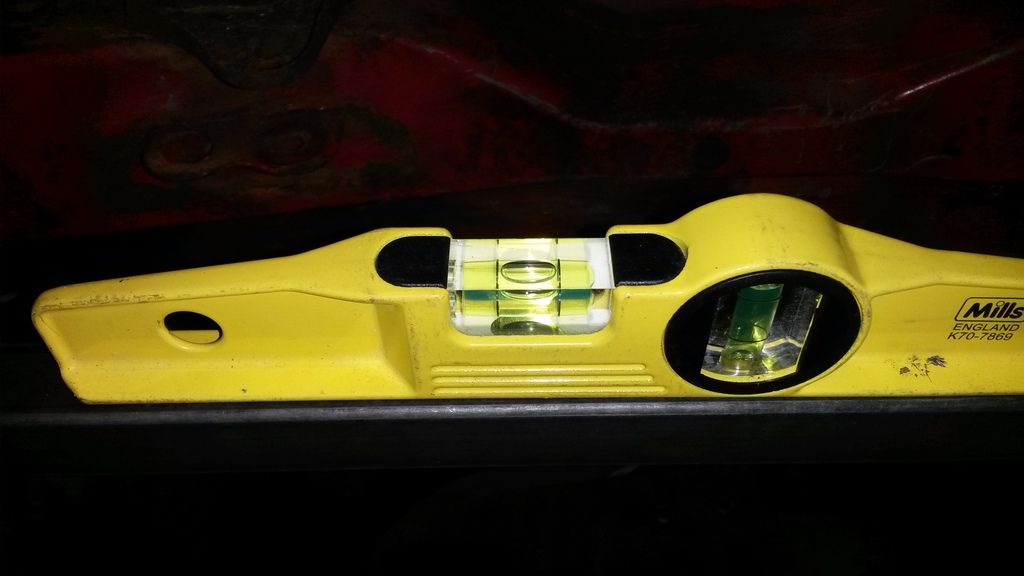
Just a small update because I forgot to take pics at the weekend apart from this one of my mitre skills!
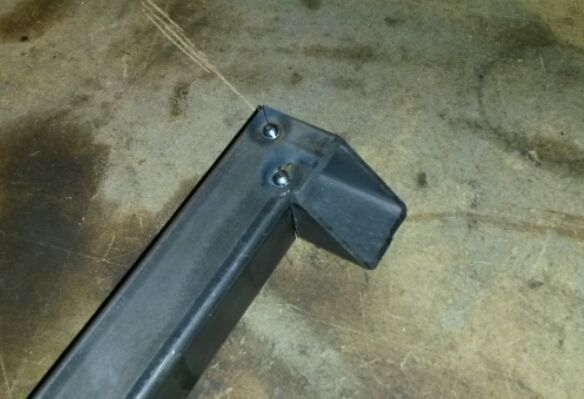
I've got the left upright and main cross bar done on the cradle and now I've started fabricating the left hand side mount that will pickup the engine bolt. I'll add pics to explain when I get a chance.

I've got the left upright and main cross bar done on the cradle and now I've started fabricating the left hand side mount that will pickup the engine bolt. I'll add pics to explain when I get a chance.
#63
LukeH
-
- TMF+ Member
-
- 1,004 posts
One Carb Or Two?
- Location: Norwich, Norfolk
Posted 03 April 2015 - 09:01 PM
Good progress being made. I've got the offside mount fabricated and tacked into place. I also made up the nearside mount and also tacked into place.

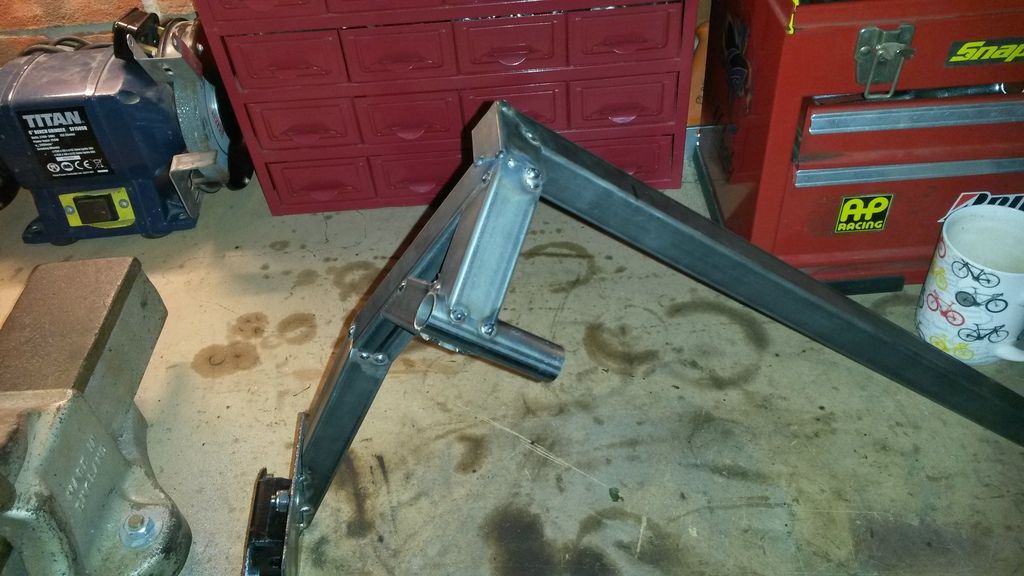
Next up will need the engine lifting out so I can level and square the cradle relative to the subframe so I can make the strut that goes down to the nearside engine mount.


Next up will need the engine lifting out so I can level and square the cradle relative to the subframe so I can make the strut that goes down to the nearside engine mount.
#64
R1mini
-

- Members
-
- 1,385 posts
One Carb Or Two?
Posted 04 April 2015 - 03:53 PM
You'll never get a 56 tooth sprocket in and your top speed will be far to low around 80 ish at max revs
I would suggest a 14 tooth front sprocket and a 44/45 diff sprocket which will give a max speed of about 120mph. You don't really want to go any lower on the front sprocket as it will wear horribly
David
#65
roadhouse
-

- Noobies
-
- 106 posts
Mini Mad
- Location: Oklahoma
Posted 06 April 2015 - 05:46 PM
Nice work so far!
#66
LukeH
-
- TMF+ Member
-
- 1,004 posts
One Carb Or Two?
- Location: Norwich, Norfolk
Posted 06 May 2015 - 06:32 AM
Sorry its been a little while since the last update. I've had lits of other things going on and haven't had much spare time. I've got this week off work to spend on the mini so hopefully I should achieve quite a lot.
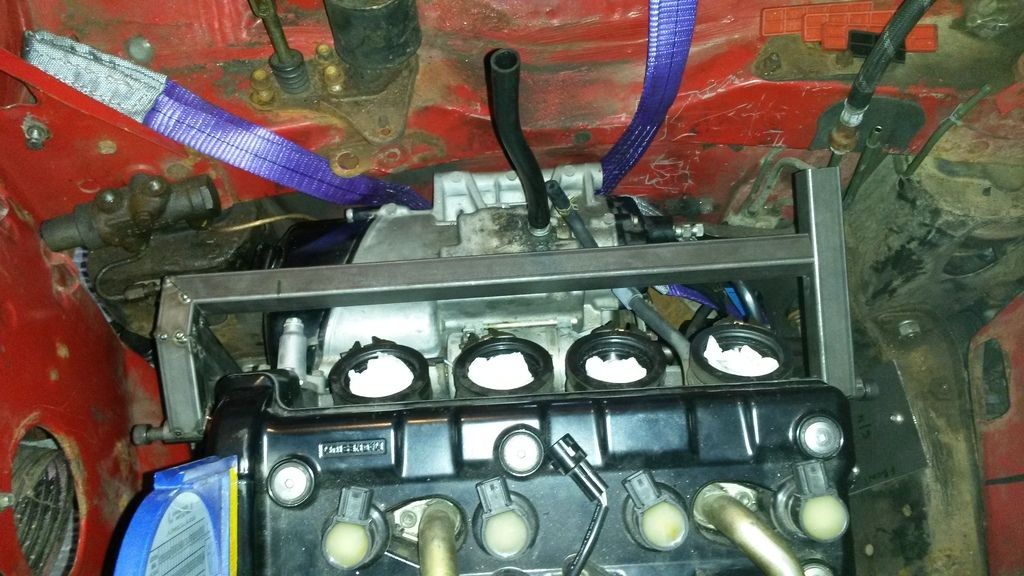
Tuesday was spent working on completing the main cradle backbone with the intention of being able to mount the engine without the need for support.
I'll let the pictures do the talking.
That's the engine mounted in the car without an engine crane holding it up. It lined up perfectly as I lowered it in. The engine sprocket is square to the subframe so chain alignment is looking good.
I've checked ground clearance and it seems ok. I've got 6" from sump to floor and should have about 3.5 - 4" to the exhaust once fitted.
The next job is to fabricate the rest of the cradle. I will keep the pictures coming
Tuesday was spent working on completing the main cradle backbone with the intention of being able to mount the engine without the need for support.
I'll let the pictures do the talking.


That's the engine mounted in the car without an engine crane holding it up. It lined up perfectly as I lowered it in. The engine sprocket is square to the subframe so chain alignment is looking good.
I've checked ground clearance and it seems ok. I've got 6" from sump to floor and should have about 3.5 - 4" to the exhaust once fitted.
The next job is to fabricate the rest of the cradle. I will keep the pictures coming
#67
LukeH
-
- TMF+ Member
-
- 1,004 posts
One Carb Or Two?
- Location: Norwich, Norfolk
Posted 06 May 2015 - 06:56 PM
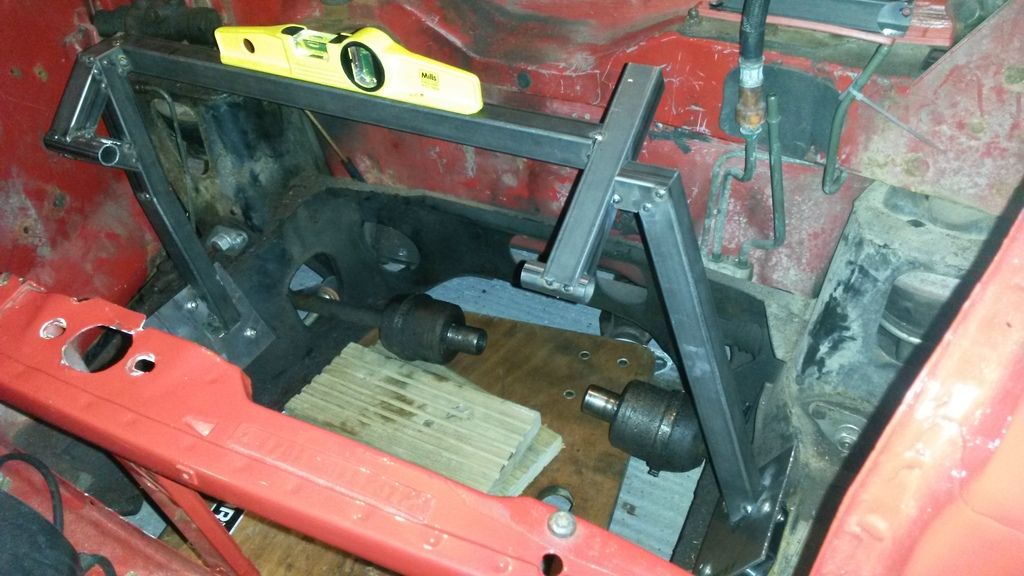
Another busy day today. It doesn't look like I got a huge amount done but what I did manage was very tricky to get right and took a lot of head scratching. I also had to cut 3mm plate steel by hand which was hard work but better than a messy angle grinder cut.
I started the day by making some brackets that will form part of the back mounting point on the engine. The washer was the exact size I needed for the outer radius and the hole in the centre is the same size as the engine mount hole so made sense to use it as a guide and draw around it.


Next up was making the struts, backbones or whatever you want to call them to link the main cradle backbone to the rear engine mount. This area needs to be strong due to me mounting the diff hanger from the rear upper piece of the cradle. They needed to clear both the engine and also allow enough room to accommodate the reverse motor when that gets fitted.
I measured everything carefully and used a combination of set squares, angle finders and my straight eye  to line everything up. The numbers in blue are the angles I cut each piece according to the gauge on my chop saw. I made one up, tacked it and offered up to check alignment. I then repeated it twice to produce three matching pieces.


That's it for now. Hopefully more to follow tomorrow.
Luke.
#68
Helldriver
-

- Noobies
-
- 101 posts
Mini Mad
- Location: Wädenswil
Posted 08 May 2015 - 03:25 PM
wow, looking good.
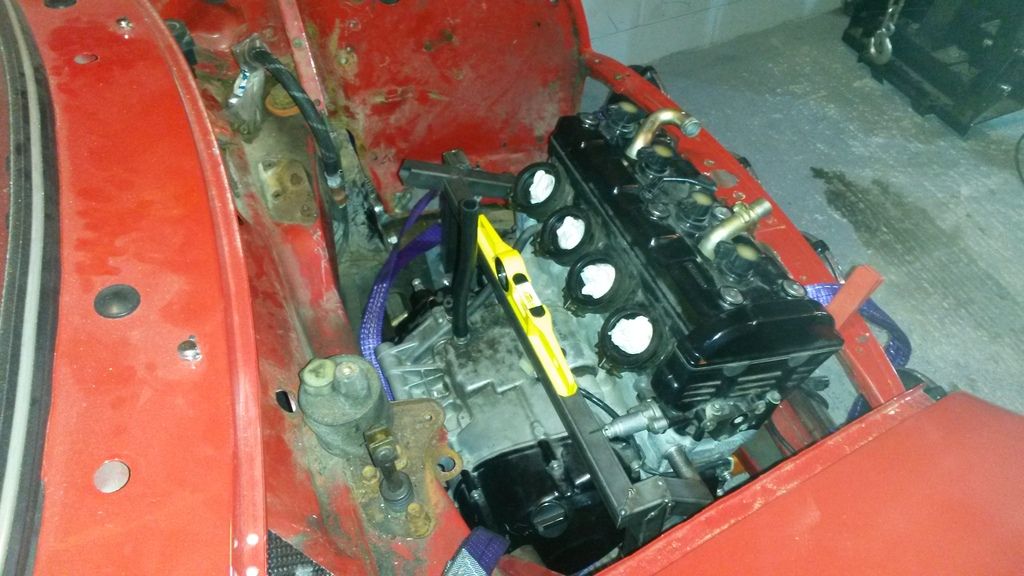
Did you try to fit the injection of the 5PW to check if it clears the frame?
There is not much space and lot of pipes and fuel supply which needs to clear the frame too.
#69
LukeH
-
- TMF+ Member
-
- 1,004 posts
One Carb Or Two?
- Location: Norwich, Norfolk
Posted 08 May 2015 - 07:40 PM
Yeah I did check it. I had a slight panicky moment when I realised I hadn't checked it but all good. The fuel supply pipe fouls a little so I will have to cut it a bit shorter.
#70
LukeH
-
- TMF+ Member
-
- 1,004 posts
One Carb Or Two?
- Location: Norwich, Norfolk
Posted 08 May 2015 - 08:05 PM
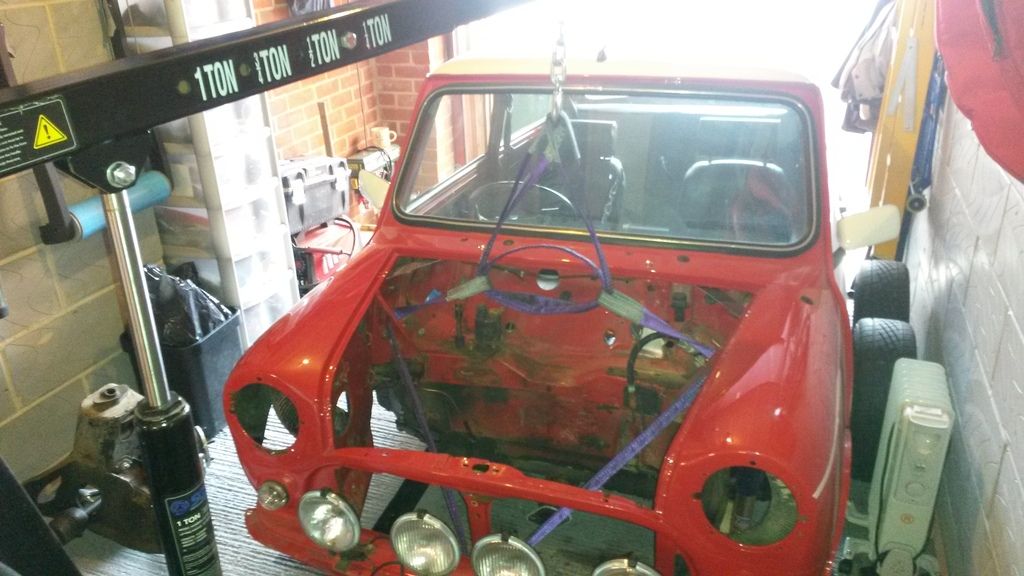
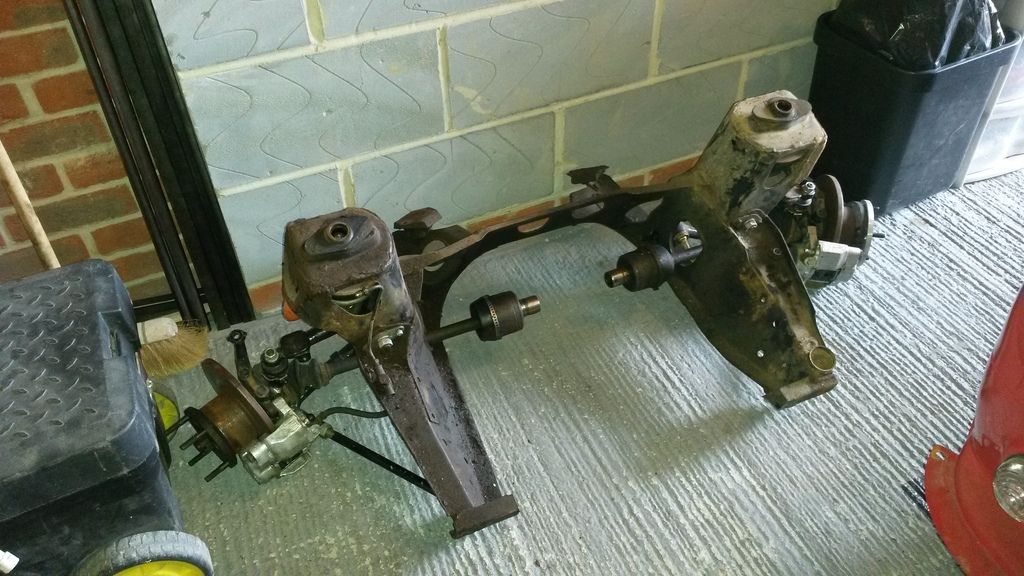
Today was spent removing the engine and subframe so I can gain better access to complete the cradle fab. I also want to strip the subframe down and paint it up before I refit. The engine bay needs some work to get it perfect so made sense to get everything removed.
Luckily my engine crane was able to lift the shell high enough so I could get the subframe out fairly easily.
I spent a bit of time adding some more welds to the cradle now that I'm happy it fits and is straight/square. I think I'll get a pro to fully seam weld it up though to be sure its strong.
Luckily my engine crane was able to lift the shell high enough so I could get the subframe out fairly easily.


I spent a bit of time adding some more welds to the cradle now that I'm happy it fits and is straight/square. I think I'll get a pro to fully seam weld it up though to be sure its strong.
Edited by LukeH, 08 May 2015 - 08:07 PM.
#71
LukeH
-
- TMF+ Member
-
- 1,004 posts
One Carb Or Two?
- Location: Norwich, Norfolk
Posted 08 May 2015 - 08:15 PM
You might notice the big bit of metal missing from the front subframe! I cut it out when I was trial fitting the engine to give me more clearance. I plan to add some hollow section back in once I'm happy everything fits.
#72
Helldriver
-
- Noobies
-
- 101 posts
Mini Mad
- Location: Wädenswil
Posted 09 May 2015 - 10:53 AM
Yeah I did check it. I had a slight panicky moment when I realised I hadn't checked it but all good. The fuel supply pipe fouls a little so I will have to cut it a bit shorter.
You need to rotate the fuel pressure regulator by 180 degrees anyhow and bend the pipe 15 degrees away from the engine after mounted it 180 degrees otherwise it fools you. That should solve the clearance issue with it. Done it on mine.
if it is the fuel supply between carb 1 and 2 then rotate this by 180 degrees, needed to be done on Lynx cradle too.
#73
LukeH
-
- TMF+ Member
-
- 1,004 posts
One Carb Or Two?
- Location: Norwich, Norfolk
Posted 10 May 2015 - 08:28 AM
Yeah I did check it. I had a slight panicky moment when I realised I hadn't checked it but all good. The fuel supply pipe fouls a little so I will have to cut it a bit shorter.
You need to rotate the fuel pressure regulator by 180 degrees anyhow and bend the pipe 15 degrees away from the engine after mounted it 180 degrees otherwise it fools you. That should solve the clearance issue with it. Done it on mine.
if it is the fuel supply between carb 1 and 2 then rotate this by 180 degrees, needed to be done on Lynx cradle too.
Thanks for the tips. I will check that out when I next venture into garage.
I've just PM'd you about your lynx stuff.
Luke
#74
LukeH
-
- TMF+ Member
-
- 1,004 posts
One Carb Or Two?
- Location: Norwich, Norfolk
Posted 12 May 2015 - 01:13 PM
I am planning on ordering my differential assembly this week from Douglas at Westgarage the only problem is what sprocket size to go for? Taking R1mini's advice above I was thinking of a 44 tooth but I am now wondering whether that will still be a little too big for clearance both on subframe and ground.
I'm currently running on 12's but plan to fit 10's inline with the overall style I am going for. I want a bit of top end but not too fussed as I won't be going on track and I'm getting older now and rarely feel the need to brake the speed limit 
decisions, decisions.
Luke.
#75
LukeH
-
- TMF+ Member
-
- 1,004 posts
One Carb Or Two?
- Location: Norwich, Norfolk
Posted 14 May 2015 - 06:40 PM
Order placed for differential kit. I decided to go for a 41 tooth which when combined with a 14 front which will equate to 123 mph on 10's and 70 mph at 6500rpm in 6th.
The westgarage kit is very reasonably priced and uses standard mini output cover so servicing should be easy. I can't wait to get my hands on it and crack on with the remaining cradle fabrication.
The westgarage kit is very reasonably priced and uses standard mini output cover so servicing should be easy. I can't wait to get my hands on it and crack on with the remaining cradle fabrication.


1 user(s) are reading this topic
0 members, 1 guests, 0 anonymous users


