Jump to content


Photo
- - - - -

2000 Cooper Sportspack Turbo


  • Please log in to reply
835 replies to this topic

#436 Steve220

Steve220

    Up Into Fourth

  • Members
  • PipPipPipPipPipPipPipPipPip
  • 4,893 posts
  • Location: Shropshire
  • Local Club: BMC

Posted 08 April 2018 - 12:28 PM

A corner turning update!


ScnIVyN.jpg


The rear subframe is finally roadworthy, I attached the wheels to make it easier to move into location under the car. The frame had one more blast from the S50 and UC under the rear boot floor, rear scuttle and heel board. The open sections at the front of the frame were covered in speed tape - If any of you don't know about this stuff, its used in the aviation industry, made by 3M and often is a temporary solution to cracking or raised paneling on aircraft. It also sticks like poop to a blanket! Ideal for a subframe lol.


kOm0KTZ.jpg


k9oxCJi.jpg


All bolted in! And the rear end lowered down to the ground. The hi-los had a bit of adjustment so the car sat higher to air bedding in adjustment later.


U05lIjC.jpg


ZOn5dqY.jpg


I didn't get any pictures getting it in, as just wanted to crack on with fitting. I annoyingly scratched the back of the frame on one of the steering rack bolts :( But touched it up after, you won't be able to see it, but just annoyed that rather than think it through, i rushed a little bit.


ZmLppKt.jpg


Wheels on!


ijcsxea.jpg


I8JPFQ0.jpg


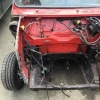
One of the key engine bay pieces that I wanted to arrive was this bulkhead insulation matting. I had it custom made from closed cell foam, as it was fire retardant and better than the open cell foam design you get from other distributors that can hold water and cause rust. I sprayed Dynax UC (using a cut down lance from the old cans of S50) under the scuttle panel and on the bulkhead before fitting to keep things rust free in the future!


pZsMArd.jpg


J5xcdpN.jpg


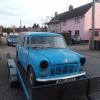
And how she sits now


gLCGrWz.jpg


#437 Steve8274

Steve8274

    Super Mini Mad

  • Members
  • PipPipPipPipPipPip
  • 580 posts
  • Location: Wigan (north west)

Posted 08 April 2018 - 12:45 PM

Looking very smart. Soon be on the road.

#438 jamesmpi

jamesmpi

    Camshaft & Stage Two Head

  • Members
  • PipPipPipPipPipPipPipPip
  • 1,940 posts
  • Location: Chichester
  • Local Club: Abingdon Mini Owners Club

Posted 08 April 2018 - 01:30 PM

Cracking progress! Soon be done 🙂

#439 wingnut

wingnut

    Speeding Along Now

  • Members
  • PipPipPipPipPip
  • 463 posts
  • Location: bury st edmunds

Posted 08 April 2018 - 01:32 PM

Exciting times Steve.Looks great


#440 Jared Mk3

Jared Mk3

    Has a small thing but it does make a difference

  • Members
  • PipPipPipPipPipPipPipPip
  • 1,974 posts
  • Location: Kokstad, South Africa
  • Local Club: MOCKZN

Posted 08 April 2018 - 04:25 PM

I like the effort and foresight that's gone into this. Looking good  =]


#441 Cooper1980

Cooper1980

    Learner Driver

  • Noobies
  • PipPip
  • 22 posts
  • Location: Cheshire

Posted 08 April 2018 - 06:14 PM

Looks absolutely mint, great work

#442 DeanP

DeanP

    Speeding Along Now

  • Members
  • PipPipPipPipPip
  • 499 posts
  • Location: Sutton Coldfield

Posted 08 April 2018 - 07:41 PM

As a matter of interest, what did you use to clean up the outside of fuel lines?


#443 Steve220

Steve220

    Up Into Fourth

  • Members
  • PipPipPipPipPipPipPipPipPip
  • 4,893 posts
  • Location: Shropshire
  • Local Club: BMC

Posted 08 April 2018 - 11:08 PM

As a matter of interest, what did you use to clean up the outside of fuel lines?


A combination of wire wheel, 200 grit sandpaper and deox gel.

#444 phil hill

phil hill

    Super Mini Mad

  • TMF+ Member
  • PipPipPipPipPipPip
  • 616 posts
  • Location: Lincoln, UK

Posted 09 April 2018 - 08:55 AM

Well done Steve, coming along nicely now.

Phil.

#445 rich_959

rich_959

    Super Mini Mad

  • Just Joined
  • PipPipPipPipPipPip
  • 568 posts
  • Location: East Yorks

Posted 09 April 2018 - 09:15 AM

Looking brill Steve!


When spraying the dynax into the sills, where you just doing it through the standard vents underneath?


#446 Steve220

Steve220

    Up Into Fourth

  • Members
  • PipPipPipPipPipPipPipPipPip
  • 4,893 posts
  • Location: Shropshire
  • Local Club: BMC

Posted 09 April 2018 - 10:05 AM

Looking brill Steve!


When spraying the dynax into the sills, where you just doing it through the standard vents underneath?


Hi Rich, thank you! And good question.


I should have done a Pete (Petrol) with this and done a bit more to take photos and describe it!


So firstly I sprayed it with the lance into the bottom of the bins, this gets it at the back of the sills, the rear face of the heel board and the sill to quarter panel seam. I bent it under the closing panel and gave it a good dose too. By now, it should be dripping from the vents underneath (i wore plastic bin liners over my shoes as it goes EVERYWHERE!). I then moved to the inner sill holes and pushed it as far left and right as possible, spraying at all times whilst removing the lance and turning it to maximise coverage. I went in via the square hole on the inside of the A panel/pillar and sprayed all the way down (it drips out the hoist point underneath after). I then went in at each vent point on the outer sill, going left and right whilst turning and spraying. 

After the sills, i moved onto the doors, i pretty much got behind everything i could. I cut down a lance (i had 2) down to about a foot long and crimped the end with the pliers and sprayed it into the seams of where the door skin meets the door body. I also used this modified lance to get it into the rear valance closing panels and the front flitch closing panels as it sprays forward rather than sideways. This was also used for the panel reinforcer at the top of the door skin and the steering rack bracket.

I used UC under the scuttle (getting it right into the join), behind the front and rear valences, the entire underneath boot floor, inside the battery box and where the rear arches meet the rear quarters on the inside.


edited side note - I left it for 24hrs to set then went round again. I used 2 cans of S50 and I've probably used half a can of UC. It goes a long way! And also drips for hours so make sure you've got card or a poly sheet underneath.


I've got an endoscope, so i will try and get pics for you later today of it all.


Edited by Steve220, 09 April 2018 - 10:10 AM.


#447 mini_surfari

mini_surfari

    Speeding Along Now

  • Members
  • PipPipPipPipPip
  • 326 posts
  • Location: Wiltshire

Posted 09 April 2018 - 11:22 AM

i think this is a brilliant build, 


cant help but think it deserves genuine sportspack wheels though  :shifty:


#448 Steve220

Steve220

    Up Into Fourth

  • Members
  • PipPipPipPipPipPipPipPipPip
  • 4,893 posts
  • Location: Shropshire
  • Local Club: BMC

Posted 09 April 2018 - 11:30 AM

i think this is a brilliant build, 


cant help but think it deserves genuine sportspack wheels though  :shifty:


Thank you!


I know what you mean. However i'm really happy with my choice of wheels at the moment! I think they really suit it!


#449 rich_959

rich_959

    Super Mini Mad

  • Just Joined
  • PipPipPipPipPipPip
  • 568 posts
  • Location: East Yorks

Posted 09 April 2018 - 11:57 AM


Looking brill Steve!


When spraying the dynax into the sills, where you just doing it through the standard vents underneath?


Hi Rich, thank you! And good question.


I should have done a Pete (Petrol) with this and done a bit more to take photos and describe it!


So firstly I sprayed it with the lance into the bottom of the bins, this gets it at the back of the sills, the rear face of the heel board and the sill to quarter panel seam. I bent it under the closing panel and gave it a good dose too. By now, it should be dripping from the vents underneath (i wore plastic bin liners over my shoes as it goes EVERYWHERE!). I then moved to the inner sill holes and pushed it as far left and right as possible, spraying at all times whilst removing the lance and turning it to maximise coverage. I went in via the square hole on the inside of the A panel/pillar and sprayed all the way down (it drips out the hoist point underneath after). I then went in at each vent point on the outer sill, going left and right whilst turning and spraying. 

After the sills, i moved onto the doors, i pretty much got behind everything i could. I cut down a lance (i had 2) down to about a foot long and crimped the end with the pliers and sprayed it into the seams of where the door skin meets the door body. I also used this modified lance to get it into the rear valance closing panels and the front flitch closing panels as it sprays forward rather than sideways. This was also used for the panel reinforcer at the top of the door skin and the steering rack bracket.

I used UC under the scuttle (getting it right into the join), behind the front and rear valences, the entire underneath boot floor, inside the battery box and where the rear arches meet the rear quarters on the inside.


edited side note - I left it for 24hrs to set then went round again. I used 2 cans of S50 and I've probably used half a can of UC. It goes a long way! And also drips for hours so make sure you've got card or a poly sheet underneath.


I've got an endoscope, so i will try and get pics for you later today of it all.


Really helpful, thanks Steve. I'll be doing similar when mine comes back from the bodyshop so it's good to have some pointers.


I was looking at the condition of the brown car that Ben-O has been working on and wondered if you considered drilling the door steps, but I imagine the long lance gets to all the same nooks and crannies.


#450 Steve220

Steve220

    Up Into Fourth

  • Members
  • PipPipPipPipPipPipPipPipPip
  • 4,893 posts
  • Location: Shropshire
  • Local Club: BMC

Posted 09 April 2018 - 01:05 PM

No point drilling the door steps if you have the holes in the later inner sills. The lance makes sure the fluid gets everywhere. I would consider doing it twice in all areas but leaving a day or 2 in between applications. If you just keep applying it, the solvent will melt the previous applied fluid and cause it to run. Leaving it for long enough will allow it 'set' and only really needs a quick spray on top after. Its the first time using this stuff on my own car, and i'm really impressed with application, the longevity of a full can and ease of use!


0 user(s) are reading this topic

0 members, 0 guests, 0 anonymous users