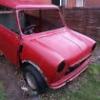
Ouch! Thats a lot worse than mine so panel replacement would be on my list I think! but the good thing is no matter what you do it will be an improvement! Just dont liquid metal the seams, heard about someone doing that and on the first drive the car peeled itself apart!

Triggers Mk3 Shell - New Head Or New Handle
Started by
emale75
, Mar 22 2015 11:02 PM
46 replies to this topic
#16

Alex_B
-

- TMF+ Member
-

- 4,573 posts
Doesn't put foot in mouth enough!
- Location: Eastbourne
Posted 23 March 2015 - 11:00 PM
#17
Ben_O
-

- Paint Doctor
-
- 9,781 posts
Mill Road Garage
- Location: Isle of Wight
Posted 24 March 2015 - 12:12 AM
It is all do-able either by replacing the panels or by using the seam sections from a scrap shell. Thing is, if for instance the quarter panels and the rear panel have significant rust elsewhere, then it's not going to be worth fitting the seam sections from a scrap shell.
Depending on budget, you can get a full height rear panel, a full bodyside and the windscreen frame panel new from heritage. These together with new wings and Apex panels would reinstate your seams and replace the rust panels in one go but then if you need floors too, you will most likely end up with a 90% new shell at the end.
It will be alot of work and cost a fair few bob but in my mind, would be the best solution to the problem.
Good luck with it and remember, we are on hand if you need any help.
Cheers
Ben
Edited by Ben_O, 24 March 2015 - 12:14 AM.
#18
emale75
-
- Just Joined
-
- 24 posts
Learner Driver
- Location: hampshire
Posted 01 April 2015 - 10:06 PM
Really appreciate the offers!
After closer inspection, the other seams aren't much better :-o. The bulkhead seems solid enough which is a tad handy as that seems like its the only panel that I wouldn't have been able to get my mitts on if I were to start from scratch. I was looking for details on jigs/measurements that'll help me. I've written off to BMH for any info, but I can see they might think I should be getting a replacement shell and haven't responded as yet! To be honest if I pull this off and do the jig work and get something that works it could turn into a nice sideline! lol (what am I saying, madness already setting in). If anyone has visited them in WItney and taken picks of the jigs, I'd be interested - the only one I can see is on their site offering tours to groups.
Found this vid - about 2 mins in it basically shows what I think I'm going to be left with.
I've already costed about £2000 in heritage panels, for the front scuttle/windscreen, the two full sides and the rear panel, roof, floor (if needed), rear seat bulkhead (if needed) and rear parcel shelf and some odds and sods. The previous owner has already replaced the rear boot floor, arches etc although its basically tacked in place at the moment as no rear seam to attach it to  (But that needs to be measured to make sure I have a good solid base to work from)
The idea is, weld in some box sections to the wheel arches to the bulkhead and across the tops of the rear wheel arches/companion boxes for front to back and side to side rigidity... Then just get shot of the roof and the other panels leaving me with a big skateboard Drill the new seams and use clecos to hold the new panels together (gaps to be able to plug weld when all in line and then dress it all back nice and neat), and use the garage roof to suspend by ( a winch) it all whist offering it up to the skateboard till its all ready to cleco/tack weld to start with. (In a ford model T stylie) This is where I saw the new roof panel as being critical to help line it up. But only taking the MIG to it when I'm 100% happy with it, at least with the side panels in one bit, door fit gaps should be decent. The front end will help with the gaps - which I'll probably replace after all this.
Honestly, I was kinda starting to panic a bit... but after seeing that video (and another like it) of the mini production line they kinda threw them together I was expecting to see a ruler or some type of measurement tool when it came to putting on the sides etc, I can't see how taking my time to line it all up I could honestly do any worse Its not that clear if they used any jigs at that point just the "that'll do" formula...
Then when I have integrity back in the shell, stick it on a spit and do any other under body work that I've not uncovered yet! I would love to put in the bolt in panel in the rear seat/bulk head to help with this instead of just sticking a hole in it.
I've been loving the youtube Bad Obsession Motorsport vids on project Binky, that's one serious Jig, although I was looking at just using 2" box section with bolting in uprights at any particular stations where it needed something to square it up. I like the idea of also putting in 50mm CDS tube in the Sill void to give it some more strength and attaching the seat belt mounting points to that via plate and captive nut.
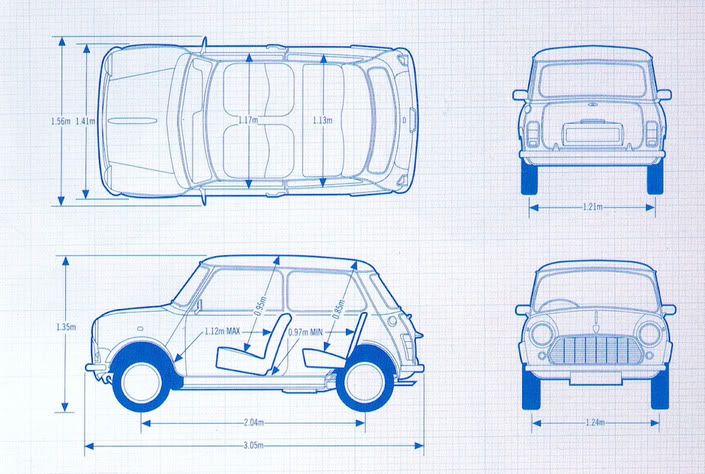
I would have thought somewhere even body repairers would have a bunch of measurements to test if a shell is warped against specific points, datums or stations - closest I can find is down to 1/2".... 13mm is quite a long way, even in old money. I do have a few images to go from though, the subframe mounts should help, its the distance between front screen and rear screen bottom and top, the top and bottom of the windows for the back rear would also help.
I did find the following
http://img.photobuck.../dimensions.jpg
I am also thinking of if its in that state, what else could I do to the shell to help it last... Thinking to put soundproofing on all the panels before fitting just to help with road noise, I'm not saying that I've got 30k to throw at it, but I'm probably looking at comfortable £3-400 a month budget until its done.
I was asked if the actual current body/engine was bone fide - I've worked out if defo a mk 3 shell - the subframe mounting holes in the front tell me that, but the V5 said its a 998, but the VIN suggests it started it life as an 850. I'll have to grab the engine number and trace that back to see where I am. to be honest, its going to be a 1380 with webers by the time I finish with it but one step at a time.
Would love to go for the original orange for that year, but I also like the volcanic orange of the final rovers. Just ideas I'm kicking around.
If its not too cheeky, I would really appreciate if anyone has the lateral measurements from the rear windows top and bottom and same for the front and rear screen or if I get several different measurements that'll really help. Happy to send a 'drink' via paypal for them.
I've got a great face for radio, so I don't think I'll be videoing it, but the other half finally has something to use her snazzy SLR on and I'm not talking the 7.62mm variety! (although.....)
#19
emale75
-
- Just Joined
-
- 24 posts
Learner Driver
- Location: hampshire
Posted 04 April 2015 - 05:58 PM
lol, insult to injury.... sure enough checked the engine number and if the http://www.guess-wor...ech/engine.htm? site it correct, I have a 998 Metro HLE engine.
#20
emale75
-
- Just Joined
-
- 24 posts
Learner Driver
- Location: hampshire
Posted 11 August 2015 - 10:12 PM
So its been a little while Bad Obsession Motorsport have managed to make much better progress with their build!
I've not been idle though, I've built a "tent" on the driveway out of scaffold tube and handrail connectors, I got the footings cut with a diamond drill and got a company in to do that so when its all done, I can take it all down and store the tubes elsewhere. Its covered in fire retardant scaffold sheeting so I'm less likely to torch myself when I start welding.
 DSC_0032.JPG 65.6K
12 downloads
DSC_0032.JPG 65.6K
12 downloads
DSC_0053.JPG 49.27K
23 downloads
I've completed a welding course at the local college, and bought myself a Sealey SuperMig 180 as the hobby welder I got off ebay was a bit... crap
I've also just finished the A Frame Spit - I spent ages looking at others and seeing which would be best for me, I opted for a frame that I saw here, but scaffold sleeves with the centre bit chopped out to hold the tube in whatever orientation I wanted.
DSC_0099.JPG 65.49K
20 downloads
DSC_0100.JPG 48.16K
15 downloads
The front panels have been cut off to expose the subframe which to be honest is in good condition, I was planning to replace everything but it may be a case of sodablasting it and then a powdercoat finish (orange of course)!
DSC_0112.JPG 73.99K
16 downloads
Seeing as I have a structure above the car, I opted for a 250kg electric hoist rather than a normal engine hoist, and you can see the dolly I made to stick the lump on to move it around once its out,
Sunday was spent taking the front panels off and stripping the engine for removal, but I got stuck on the hub nuts, n/s came off fine with a 28mm spanner, but I'm waiting for the 1 1/8 socket to arrive now to remove the o/s one then the drive shafts can come out and get the lump out and clear out the shell in prep to bolt on some plate and build that up to the spit.
Bad Obsession made a jig from the rear view mirror mount, top dash vents and lower dash rail to get the heights right - as I'm replacing both as well, that's my next job.(and in reverse when replacing the full front and skuttle, it seems the right way to go to ensure its in the right place Whilst I'm at it, I also saw jig measurements for full body alignment, so its 2 bits of angle iron for the centre datum and then box section out from that with bracing and then build up to the mounting points to ensure all is true.
One thing, I did see youtube and I LOVE this idea.
I'm a firm believer of the 6 P's (prior preperation prevents piss poor performance) and I don't mind doing all this up front if the final result works and gives me the tools to help others in the future, currently self employed in IT but you never know the future!
Oh and engine wise, I've settled on the idea of a 1293 turbo (t2 not 3), just thinking of reusing the gearbox from my "metro" engine after a rebuild/referb and maybe some s/c cogs. I know I need to start with a 1275 (this site is a great big minipedia!!!!) but if I got an MPI lump as they are newer, can I just swap the head to use a NA one?
Any comments appreciated as usual - just the apologies for it being so long - everyone must have thought I'd given up.
The fun is just about to start!
Damn - just noticed the orientation of the pictures... I'll sort that out later, I consult in IT 
#21
emale75
-
- Just Joined
-
- 24 posts
Learner Driver
- Location: hampshire
Posted 25 September 2016 - 06:52 PM
Been a while
I suffered a break in to my garage having lost my welder (Sealey SuperMig 180) and a bunch of other tools, so have upgraded the security in there whilst replacing all the odds and sods the thieving gits took.
Then after a battle with the local council I had to take down my carport, it was failing by being in front of the front door, I know I argued the toss, but they were adamant at the end of the day, but I am allowed it up for 28 days per year... So the old shell is now under tarpaulin... Plus I've been working on my other pet project, my Honda Pan Euro!
I did however manage to bag a pair of full side panels on eBay

Pleased with them, but they have been dragged around a little, so a dab of kurust to stop that in its tracks.
And the best thing - the panel has SEAMS! And been collecting parts for the restore. Also taken the engine apart and meticulously stored everything in labelled sandwich bags, with pics gal;our! The block and crank are ready for its appointment with the engineers.
The good thing is I saved over 430 on the pair of panels, so was thinking of also investing in a spot welder...
Has anyone used clecos to hold panels together in prep for welding? (intend to also use clamps) this is more to see everything together.
As far as other mods, was looking at a way of somehow putting in Air Con, There are matrix's from Corsa's, A Class or Smart Cars that may fit, I'm planning to put in the Power Steering from a corsa B.
Glad I went to castle coombe last week, its resparked my interest great to see so many, but gutted the auto jumble was so thin on the ground.
Anyway, that's it for the min, just gotta start making jigs,
Edited by emale75, 25 September 2016 - 06:54 PM.
#22
NuFab
-

- Just Joined
-
- 87 posts
Stage One Kit Fitted
- Location: Birmingham
Posted 08 October 2016 - 07:25 AM
Clecos work well for holding panels together... mainly in the sense of getting things aligned though, as once you've drilled that 3mm hole through both panels, you can easily realign them later if you have to pull them apart to add zinc primer etc. I'd add the clecos once you're happy the panels line up, to avoid lots of extra little holes in those nice new seams!
I wouldn't add power steering. The lack of power steering in a Mini contributes to the huge amount of feel you get through the wheel and I wouldn't want to lose any of that.
I wouldn't add power steering. The lack of power steering in a Mini contributes to the huge amount of feel you get through the wheel and I wouldn't want to lose any of that.
#23
tiger99
-

- Members
-
- 8,584 posts
Crazy About Mini's
- Location: Hemel Hempstead
Posted 08 October 2016 - 02:40 PM
It may be that I have misunderstood, but it seems that you may be doing a shell change. I strongly suggest that you check the legal position very carefully. It would not be good for the product of your hard work to be crushed, in addition to the possible fine and criminal record.
In the UK it does seem to be impossible to change to a used shell, only a new replacement would be allowed. There may be an alternative route via an IVA test, but passing that will involve a lot of serious, and in my opinion, disfiguring modifications.
I wish that we could swap shells, but we can't. It is supposedly to prevent "ringing" although I believe it fails miserably. Nor can we use portions of two shells. Again that would be useful, because there is nothing technically wrong with using the remains of a frontal impact and a rear impact to make one good car.
There is an obvious way of cheating the system by transferring the piece of scuttle with the stamped-in number from one shell to the other but I would not advocate doing it as it is probably illegal, even if it is not being done in connection with a real crime such as ringing. It might be classed as misrepresentation.
But as for restoring seams to a deseamed car, that is a very challenging but rewarding task. I wish you success.
#24
emale75
-
- Just Joined
-
- 24 posts
Learner Driver
- Location: hampshire
Posted 10 April 2017 - 06:20 PM
It may be that I have misunderstood, but it seems that you may be doing a shell change. I strongly suggest that you check the legal position very carefully. It would not be good for the product of your hard work to be crushed, in addition to the possible fine and criminal record.
In the UK it does seem to be impossible to change to a used shell, only a new replacement would be allowed. There may be an alternative route via an IVA test, but passing that will involve a lot of serious, and in my opinion, disfiguring modifications.
I wish that we could swap shells, but we can't. It is supposedly to prevent "ringing" although I believe it fails miserably. Nor can we use portions of two shells. Again that would be useful, because there is nothing technically wrong with using the remains of a frontal impact and a rear impact to make one good car.
There is an obvious way of cheating the system by transferring the piece of scuttle with the stamped-in number from one shell to the other but I would not advocate doing it as it is probably illegal, even if it is not being done in connection with a real crime such as ringing. It might be classed as misrepresentation.
But as for restoring seams to a deseamed car, that is a very challenging but rewarding task. I wish you success.
Appreciate the response, this one is a grey area there is the v627 amongst others to consider and there is enough points to retain its current reg. However I'm definitely not ringing it, that is illegal and would definitely be frowned upon in my line of work . Only the panels that need replacing are being done so with Heritage panels with all the relevant paperwork that the v627 requires as and when the need arises.
#25
mattmiglia
-
- Members
-
- 515 posts
Super Mini Mad
- Location: West Midlands
Posted 15 April 2017 - 07:57 AM
Big project, and on a driveway. Respect to you!
#26
Steve220
-

- Members
-
- 4,883 posts
Up Into Fourth
- Location: Shropshire
- Local Club: RAF Mini Club
Posted 15 April 2017 - 08:52 AM
Why are people filling out a v627 form for a rebuild of the same car with new panels? They were brought in for kit cars. If you're significantly rebuilding it, you'll need an IVA test, but even that is a grey area as the DVLA (typically) don't give any depth on that description.
Edited by Steve220, 15 April 2017 - 08:57 AM.
#27
Cooperman
-

- TMF+ Member
-
- 23,031 posts
Uncle Cooperman, Voted Mr TMF 2011
- Location: Cambs.
- Local Club: MCR, HAMOC, Chelmsford M.C.
Posted 17 April 2017 - 01:32 PM
The problem for restorers of classic cars, or absence of a problem, is that the rules for shell changing were drafted with modern cars in mind.
With the vast majority of classic and historic cars there is no way of identifying whether a body-shell is the original which has been restored or not.
Now this may or may not be a god thing, but it is the true case.
It was only later in its manufacturing life that the shell number (VIN) was stamped into the scuttle rail and the scuttle rail is one of the worst items for rusting out.
There also seems to be no official guidance as to what constitutes a re-built shell. It seems that so long as one small part (but how small?) of the original means that a shell has been repaired or restored (choice of words here). I recently saw a pick-up shell being restored and the builder basically had just the front bulkhead and roof plus a bit of the exhaust pipe tunnel. Everything else was new Heritage or other after-market panels. He was making a superb job of it and it certainly has saved another Pick-Up.I guess that is legal.
We see many examples of very comprehensive body re-builds on here as well.
There is also no official guidance on the re-stamping of the VIN number into replacement scuttle rails. My MoT guy says he never checks for the number on old classics as he wouldn't know which old cars have them stamped in. He only checks the rivetted-on plate for details. If a new scuttle is fitted, as so often is necessary, what are you meant to do? There seems to be no answer to this and a police officer friend suggested that as the metal stamps originally used are a standard size, it would be easiest to buy a set of correct type stamps and re-stamp the number. This, in his opinion, would be the easiest and most straightforward thing to do and he could see no reason why it is not completely legal. Someone suggested keeping the old rusty section of scuttle with the number stamped in, but what would that prove in respect of the shell being legal?
A few years ago I sold a Mk.1 project. It comprised a fully restored Mk.1 shell, a front sub-frame (2-bolt hydro type), some suspension parts and the V5. I later discovered that the shell had been used to re-build a very rusty Mk.1 'S' of similar age, but that is nothing to do with me as the guy owned the 850 and the 'S' quite legally. The shells are identical anyway.
It is not re-shelling which is a problem, it is using earlier V5's to re-register late cars as early ones, then pass them off as something they are not, which we keep on seeing on ebay (e.g. a Mk.1 998 Cooper which looks suspiciously like a 1997 MPI!).
#28
Van13
-

- Members
-
- 314 posts
Speeding Along Now
- Location: England
- Local Club: Unknown
Posted 17 April 2017 - 04:42 PM
Good luck with it matey you must have a big pair to take that on,I do love it when people go to the trouble of saving cars in this state will be watching
#29
emale75
-
- Just Joined
-
- 24 posts
Learner Driver
- Location: hampshire
Posted 10 May 2017 - 09:55 PM
So, finally got it up on the spit. That was fun! Ended up buying a farm jack for the last 10 inches of lift - what a brilliant bit of kit!
If there's a next time, I'm going to get someone to help me! So glad I put castors on the A frames, it moved for the first time so I could sweep up all the rust and rubbish collecting under it. I nearly made a broom broom noise...
Gutted the toeboard has rotten through too at the lower subframe mount and seeing as its a '75, that's going to be fun... I'm trying to understand if its hard subframe mount now, and I go ahead and get soft one (76 onwards) are these interchangable on the subframe, or am I then looking at having to get a 76 subframe too?
The new complete floor arrived last week (Amazing customer service from Bull Motif) and added to the collection of 2 full side panels, the rear bulkhead, top/bottom dash rail etc... They are surprisingly big! and I'm loosing my garage!
mini - on spit.jpg 98.21K
14 downloads
What I plan to do is start taking measurements between panels or holes (the ones that were designed to be there) in panels left - I'd really appreciate it if when I post them they can be verified if I can't verify them myself elsewhere, I'm using the seat belt anchor points to bolt a small steel plate to and then weld bars in to join them all up. So the ones towards the top of the B posts then drop bars to meet the ones in the inner sill, and then back to the top of the rear bulkhead/front scuttle jig I've already done - I'll post some pics as soon as I can, it'll probably make more sense... I'm trying to figure out the best way to do the same with the companion boxes, but they are bloody big holes! So ordered steel collar material as don't fancy having to buy a lathe too.
Then turn the jig 120 degrees, and then bolt box section to each of the subframes (after doing that diagonal check) and then join them up so I have a full floor jig so when I take the floor out, nothing moves. Its at that point I'm gonna get medieval with the blowtorch, oops I mean angle grinder.
Thanks for everyone's comments, I know I'm slow at this, but I spend most of my time plotting fixes and thinking things through 1000 times and then do it once (and then properly the next time)...
Cheers.
#30
Jgguinness
-

- Noobies
-
- 120 posts
Mini Mad
- Location: UK
Posted 11 May 2017 - 10:41 AM
Great progress. I am watching this with a lot of interest...I have to carry out something very similar.


0 user(s) are reading this topic
0 members, 0 guests, 0 anonymous users


