Jump to content


Photo
- - - - -

Triggers Mk3 Shell - New Head Or New Handle


  • Please log in to reply
46 replies to this topic

#31 emale75

emale75

    Learner Driver

  • Just Joined
  • PipPip
  • 24 posts
  • Location: hampshire

Posted 15 May 2017 - 09:20 AM

So,


Finished off the internal jigs and spun it, was hoping the clamps on the spit would hold it, alas not, so drilled through the clamp and left the drill bit in there :-) Wow, how heavy are the radius arms!!! The radius arms were only held in with 3 bolts, and only one bolt each side holds it to the floor (slaps forehead)...


Next job measure all the diagonals and then start building a frame down from the subframes (bolted to subframe) and then can flip it back over so its then as the new floor goes in I know its all pointing in the same direction.


Attached File  mini_1.jpg   94.71K   18 downloads


Attached File  mini_2.jpg   65.13K   11 downloads


Attached File  mini_3.jpg   71.41K   13 downloads


#32 emale75

emale75

    Learner Driver

  • Just Joined
  • PipPip
  • 24 posts
  • Location: hampshire

Posted 23 May 2017 - 09:30 PM

So...


Attached File  IMG_20170523_204818-SMALLER.jpg   113.11K   17 downloads


Above is a re-enactment of the Mini Bible subframe alignment pic with green string... Thankfully they intersect at the like the pic... (if you open the pic and look closely - I ended up using threaded bar to replace the rear bolts to give me something to go from, and angle bar on the front so they stand off the panels...


Attached File  IMG_20170523_204758-smaller.jpg   99.17K   18 downloads


This one is the intersection in more detail... 


Attached File  mini measurements.png   289.71K   35 downloads


And this one... is a tweaked version with fairly quick measurements from the back side of the rear subframe to the front edge on the front subframe (orange line)... and where the lines intersect... Number below arrow :-) Also, a tweaked D points to A points and those measurements..... ish...


Has anyone else ever done the same measurements? I'd love to be able to compare it to something... I'd spent ages trying to look for it but drew a blank...


Edited by emale75, 23 May 2017 - 09:33 PM.


#33 emale75

emale75

    Learner Driver

  • Just Joined
  • PipPip
  • 24 posts
  • Location: hampshire

Posted 04 June 2019 - 09:21 PM

Wow, its been a few sleeps!!!


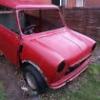
Managed to complete the welding on the subframe/body jig (That I redesigned about 25 times). I basically bolted square tube to both the front and back of the front and rear subframes, reused the front shock mounting plate to weld in uprights(will replace with new), bolt in an upright at the rear through the rear shock mounts and tied/welded it all together. I also put in a tube to pick up the toe board (steering rack location). The two horizontal 50x25 sections stick out so I can attach jockey wheels (the ones that are used to help move caravans around) to them to move it around as the spit is a real pain in the arrsse!!! Then just need to put in two ground anchors so I can chain the thing down (also covered by CCTV). To deter/stop any thieving...... So basically, I can now cut away the.. was going to say body but that's an exaggeration! What's left!! and then get the subframes blasted (Too big for my homemade cabinet) so I can paint them. I was thinking POR15, but I've also seen some other epoxy paints that could be suitable mentioned so if anyone has used an epoxy paint, would love to hear how long its been since it was done and what its looking like now.


Attached File  20190603-mini-jig-done.jpg   52.75K   1 downloads


The new replacement panels (Heritage/Rover) that I now have collected:


Full Floor with trimmings

Toe Board

Rear Section (was really lucky to pick up the rover pre-made entire rear : Rear bulkhead, Boot Floor/Battery Box, wheel arches etc.)

Companion Boxes

Both full side panels

Mk1 Full Rear (I like the lights and didn't want to have extra welding with the small adaptor plates)

Full windscreen/Scuttle

Both innerwings with A panels already attached

Wings and Front panel 

Oh and the roof...


Not decided if to fix and reskin the current doors, or just go new, so still have the originals, but as the two full sides are new I "hope" it should be good.


Those now calculating, yup the bulkhead is staying!! Everything is being replaced like for like as per the regs.


I know its been ages, I know there is a lot to do. I've been meticulous to ensure everything will line up and will be put together better than it was the first time around. I have also made a load of internal jigs to make sure its all in the right place.


I've also invested in a spotwelder, and a gazillion cleco's. 


Hopefully soon it'll be wheels on, flipped over and the dead metal cut away. That will be a massive milestone.


I've learned a new mantra "How do you eat an elephant? One bite at a time" (I don't advocate eating elephants though!! before I get slammed). :-D


Happy days eh!


#34 stumpy75

stumpy75

    Mini Mad

  • Members
  • PipPipPipPip
  • 291 posts
  • Location: wales

Posted 04 June 2019 - 09:43 PM

If you got a full scuttle windscreen surround (comes with the header rail and the boxing panels that mount it to the door paerature panel ) and two door frame/aperature repair panels that would be the front sorted with all new steel and then a used or new rear panel with 1/4 panelp thats the majority of the rear done

Edited by stumpy75, 04 June 2019 - 09:50 PM.


#35 emale75

emale75

    Learner Driver

  • Just Joined
  • PipPip
  • 24 posts
  • Location: hampshire

Posted 04 June 2019 - 09:50 PM

Cheers for the reply, I have 2 of these.


Attached File  20190603-mini-side.jpg   8.26K   1 downloads


#36 stumpy75

stumpy75

    Mini Mad

  • Members
  • PipPipPipPip
  • 291 posts
  • Location: wales

Posted 04 June 2019 - 09:54 PM

Deffo a proper resto this fair play

Edited by stumpy75, 04 June 2019 - 10:24 PM.


#37 emale75

emale75

    Learner Driver

  • Just Joined
  • PipPip
  • 24 posts
  • Location: hampshire

Posted 06 June 2019 - 08:40 PM

Jockey Wheels fitted to the jig (Can easily get another 8-10 inches of ground clearance if I need to) and trimming it all away. Hope the weather improves for Sat. Chuffed with the progress (Easily impressed... lol).


Attached File  20190606-mini-trimmed.jpg   74.12K   4 downloads


#38 Homersimpson

Homersimpson

    One Carb Or Two?

  • Members
  • PipPipPipPipPipPipPip
  • 802 posts
  • Location: Redditch

Posted 07 June 2019 - 07:39 PM

Now thats what I call a brave restoration, well done for tackling it, it will be great when done!


#39 emale75

emale75

    Learner Driver

  • Just Joined
  • PipPip
  • 24 posts
  • Location: hampshire

Posted 09 June 2019 - 06:32 PM

So been a busy few days, managed to get the metal (ahem) that I'm replacing into a Hippobag "Midi"... 


Ground anchor and chains will be here in the week so the jig will be chained down. Plan to take the frames for blasting in the next few weeks and also the bulkhead, but I still have the spotwelds from the inner toprail, sides and top of the toeboard to drill out. I tried that remover with the circular teeth, but couldn't get on with it even with centre punching the panel. Then I'm honing my technique between a Sealey cobalt spot weld bit and a finger sander. Made a fair bit of progress with that!  


Attached File  20190609-just-bulkhead.jpg   80.4K   5 downloads


Excitement is building up!!!


Just have to upgrade the electrics in the garage now to support the spot welder! (Yes - I'm getting a spark in to do that).


#40 Ben_O

Ben_O

    Mill Road Garage

  • Paint Doctor
  • PipPipPipPipPipPipPipPipPipPip
  • 9,781 posts
  • Location: Isle of Wight

Posted 09 June 2019 - 08:50 PM

I have moved this to the projects section :-)


Ben


#41 emale75

emale75

    Learner Driver

  • Just Joined
  • PipPip
  • 24 posts
  • Location: hampshire

Posted 09 June 2019 - 09:38 PM

I have moved this to the projects section :-)


Ben


Thanks :-) Is there a mammoth projects section? :-D


#42 Ben_O

Ben_O

    Mill Road Garage

  • Paint Doctor
  • PipPipPipPipPipPipPipPipPipPip
  • 9,781 posts
  • Location: Isle of Wight

Posted 10 June 2019 - 06:33 AM


I have moved this to the projects section :-)


Ben


Thanks :-) Is there a mammoth projects section? :-D


Perhaps we need an airfix style rebuild section!


#43 emale75

emale75

    Learner Driver

  • Just Joined
  • PipPip
  • 24 posts
  • Location: hampshire

Posted 25 July 2020 - 01:24 PM

So as I've said before I've been buying panels.


Attached File  84860080_10156593274056793_6004673143791157248_o_10156593274041793.jpg   104.77K   2 downloads


Earlier this year I've been fitting them, this was the start


Attached File  MVIMG_20200529_135958.jpg   57.78K   2 downloads


I've since put them all on and trying to check the fitment before I started welding, but hit big problems, turned out the pitch of the subframe was pointing up at the front so brought that down by an inch or so an the top of the bulkhead then came into line allowing the front panels to line up.


So it's now coming apart again to prep the edges for welding.


I've also since started a youtube channel so it'll be easier for me to see the build process and if others like it so be it.


This below IS its badge :-D I bought 2 and cut the S & R off one, and ground them off the other and then superglued the letters back over the ground off ones. Given its going to be a 1293 supercharged lump I thought it highly appropriate :-D  If you look close at the bottom left of the R and the left of the S you can still see lines...


The you tube channel has the same name - Rustin Sooper  (https://www.youtube....52wtqv4zjaj1Qzg)


Attached File  rustin_sooper.PNG   236.97K   3 downloads


I will still be back now things are starting to progress to pick brains etc. 


I've just ordered its right hand tank and be looking to weld in the tank brackets and cut the hole for the filler neck when the body is welded together.


Thanks for all the support up until now, you remind me to keep going!


Edited by emale75, 26 July 2020 - 01:12 PM.


#44 gaspen

gaspen

    Super Mini Mad

  • TMF+ Member
  • PipPipPipPipPipPip
  • 683 posts
  • Location: Budapest

Posted 25 July 2020 - 04:28 PM


This drawing is very useful, but are you sure the dimensions are correct ? 


D2 - A1 should be eqaul with D1 - A2, but your measurements are different : 2830 vs. 2380.


Type mismatch ?


#45 exuptoy

exuptoy

    Super Mini Mad

  • TMF+ Member
  • PipPipPipPipPipPip
  • 674 posts

Posted 25 July 2020 - 11:54 PM

Amazed.com! :D


0 user(s) are reading this topic

0 members, 0 guests, 0 anonymous users