Jump to content


Photo
- - - - -

1960 Austin Seven/mini Restoration Project-Us Import


  • Please log in to reply
61 replies to this topic

#16 jchomme

jchomme

    Stage One Kit Fitted

  • Noobies
  • PipPipPip
  • 99 posts
  • Location: Georgia

Posted 21 April 2016 - 01:46 PM

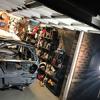
OK, its been a while and my project looked to be fizzling away.  The other body I was working on to practice came out pretty good.  It took a while.  Anyways, decided to get back on the 1960.  Built a spit and bought tons of stuff from Somerford, dsn, and Huddersfield.   So, to all that showed interest, I apologize.  


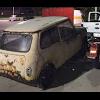
Good news.  Still finding a really solid car.  Just check out the original paint behind the front shock mounts!  


For now, I am in a real dilemma over the following:


-I have a solid 998 that I know runs and drives, but I have the original 850 that isn't seized and I think it will easy to bring back to life(my guess is the carburetor was the reason the car stopped moving) Keeping the magic wand gear change would be nice too.

     - the 998 might be a better driving car overall anyways, and I plan to use it as a main car.  I had an 850 and as I recall it was just as much fun to drive, dependable as well.


-I have the 7.5 disk conversion coming- I want to drive the car and be safe, but the disks take away from originality.  Thinking of maybe twin shoe??( just keep the parts) have the original riveted wheels that I could weld up and run, but have a set of cooper replica alloys on the way.  I would greatly appreciate the opinion of someone who has experience with both twin shoe and 7.5 ask.


-Really I want to keep the main things original and put in a few upgrades like overriders and corner bars, wheels,engine, ect , but make easy to convert back to mostly original spec.  


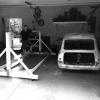
please don't laugh at my facilities:)


Edited by jchomme, 08 February 2018 - 07:08 PM.


#17 timmy850

timmy850

    Up Into Fourth

  • TMF+ Member
  • PipPipPipPipPipPipPipPipPip
  • 2,989 posts
  • Location: NSW, Australia
  • Local Club: MITG

Posted 27 April 2016 - 11:18 AM

In regards to the 998 and 850 engines, you can always put the 998 engine on the 850 gearbox (assuming it's in decent nick) and have the best of both worlds - more power and the original style shifter. You can make a 998 look pretty similar to an 850 under the bonnet too.

I've got the twin cylinder front drums on mine (swapped from the single ones) and the brakes work decent enough for a mild 998 engine. I've never had problems with them fading or anything. That said I wouldn't have any hesitation to put discs on, as long as you keep the old parts you can always change it back one day if you feel so inclined...

#18 Archived1

Archived1

    Super Mini Mad

  • Archived
  • PipPipPipPipPipPip
  • 619 posts

Posted 28 April 2016 - 05:22 PM

Alot of work but much better than most we have left as projects over here.

Looks like youre cracking on well now.

#19 jchomme

jchomme

    Stage One Kit Fitted

  • Noobies
  • PipPipPip
  • 99 posts
  • Location: Georgia

Posted 02 May 2016 - 02:57 AM

Thanks for the input all.  After a week of trying to sandblast and using paint stripper, I found the perfect solution.  Got this wet sand blaster to go with my pressure washer( no compressor needed) and it work phonominally and the pressure washer isn't anything special -3000psi and 2.5 gym walmart special.  Also, got a bunch of panels and parts including: boot floor, front panel, wing, rear valance, disk kit, cooper replica alloys, bumpers.... tons on misc parts.  Have more on the way too.  So I am priced in at this point.


my goal now is to keep the shell as original as possible, keep all the original stuff and make it "easily" convertible back to original.  I am going to throw in the 998 and put a stage one kit on it for now.  Starting off mild


For the look,  staying farina grey, but going to go Dark grey for the roof , cooper replicas, and chrome bumper with overriders and corner bars.  Maybe lower it a tad too.  


So last week was a lot of wasted time and cash, I was able to do tons more with the wet blaster today; really saved the project.  Im using crushed glass , which is cheap, but you need lot of it; went through about 500lbs of it today.


I've been trying to figure out if  I need a clutch alignment tool, because I can't find one anywhere?  Also, not sure how bad the treads for mounting the front subframe.  Are these repairable?  Has anyone heard of re-tapping them?


Edited by jchomme, 08 February 2018 - 07:04 PM.


#20 Chappers

Chappers

    Mini Mad

  • Noobies
  • PipPipPipPip
  • 129 posts
  • Location: Columbus, IN

Posted 16 June 2016 - 03:42 AM

Wow what a find! Looks so solid too.
That water blasting sounds intriguing, and bring up the panels a treat.

Where are you located in US?
I'm in Indiana.
We should compare notes as I have very similar car to you, I found a rusty 1960 mk1, originally farina gray, in 2014. I'm currently restoring the body my thread is on here too
http://www.theminifo...-3#entry3392168

Cheers

#21 jchomme

jchomme

    Stage One Kit Fitted

  • Noobies
  • PipPipPip
  • 99 posts
  • Location: Georgia

Posted 26 June 2016 - 06:27 PM

Wow, what a find.  Going to post on your thread...

Wow what a find! Looks so solid too.
That water blasting sounds intriguing, and bring up the panels a treat.

Where are you located in US?
I'm in Indiana.
We should compare notes as I have very similar car to you, I found a rusty 1960 mk1, originally farina gray, in 2014. I'm currently restoring the body my thread is on here too
http://www.theminifo...-3#entry3392168

Cheers


#22 mattmiglia

mattmiglia

    Super Mini Mad

  • Members
  • PipPipPipPipPipPip
  • 515 posts
  • Location: West Midlands

Posted 20 August 2016 - 09:47 PM

What an amazing shell for its age! Extremely jealous and looking forward to seeing the new panels going on

#23 jchomme

jchomme

    Stage One Kit Fitted

  • Noobies
  • PipPipPip
  • 99 posts
  • Location: Georgia

Posted 22 August 2016 - 07:17 AM

What an amazing shell for its age! Extremely jealous and looking forward to seeing the new panels going on


Thanks for that, I am slowly getting to it.  Compared to the basket cases that people have successfully brought back on TMF, it is really solid.  My biggest issue is my own obsessive compulsive nature.


#24 jchomme

jchomme

    Stage One Kit Fitted

  • Noobies
  • PipPipPip
  • 99 posts
  • Location: Georgia

Posted 11 December 2016 - 06:09 AM

so, I am getting there test fitting panels and sub frames.  I'ts been a lot of tedious work picking panels off and cleaning up the edges .  I have bee contemplating on which ones to do first and like everything else, it is driving me crazy with second guessing.  Anyways, I really think I overthink everything, so I think I will get the subframes lined up as close as I can and everything should just fall into place.  I am thinking the degree of exactness would probably be fine within a 1/4 " or less, but I shoot for better I cant go wrong.  Well, wish me luck!  Please chime in if you have any words of caution as I am at the point of just need to buckle down and get  the shell together.


I've got the subframes temp fitted, but the rear subby mounting brakets aren't lining up with the holes in the boot floor.  Possible heritage panels are off as I've heard they are falling off in quality.  Hopefully I can get this sorted tomorrow.


side note: Not sure if I will yet, but might replace the roof and attempt to do a write-up on it.  


Edited by jchomme, 08 February 2018 - 07:18 PM.


#25 jchomme

jchomme

    Stage One Kit Fitted

  • Noobies
  • PipPipPip
  • 99 posts
  • Location: Georgia

Posted 21 December 2016 - 02:14 AM

Getting on with mocking up the panels.  I plug welded the boot floor, but spot welded the tunnel and offered the floor panels up.  


I decided to trim the floor halves mostly, I did this with a previous floor, but had a fairly large gap between the panels.  I need to figure out a better solution this time to trim the pieces, getting a better fit between panels.


I decided to splice in the toe board to maintain the mk1 aspects,  but might need to reinforce it.  


Last one I did in quarters, having full halves and a competely fresh tunnel is soooo much better!


P1110019_zpslzpluv41.jpg

P1110019_zpslzpluv41.jpg

PC200142_zpsa9k6vocb.jpg

P1100012_zpsnzwx9g0g.jpg


Edited by jchomme, 08 February 2018 - 07:17 PM.


#26 minimissions

minimissions

    Up Into Fourth

  • Members
  • PipPipPipPipPipPipPipPipPip
  • 3,427 posts
  • Location: North West
  • Local Club: M.M.O.C

Posted 22 December 2016 - 06:51 AM

Some lovely new metal work there, look forward to seeing it all welded in :)


#27 jchomme

jchomme

    Stage One Kit Fitted

  • Noobies
  • PipPipPip
  • 99 posts
  • Location: Georgia

Posted 12 January 2017 - 08:20 PM

Been trying to get everything lined up.  A lot of fitting, panel massaging.  The repo floor I have is slightly different than what was there.  Looks like M-machine never pressed the whole floor halves for early minis, its more of a weld along the middle where the sills are.  


I am really hesitant about starting to weld as the from to the floor toward the outsides aren't fitting quite right. you can see how the door strap panel dives down.  At least both sides aren't fitting in the same way.  What is driving me crazy is that the tunnel is positioned almost perfectly along the length, and the cross member does aswell.  Also everything is symmetrical and the Subframe is perfectly placed.  I think I will just have to adjust the floor pans toward the outer front sides by taking some material away.  


Any help appreciated! 


P1100005_zpsmzjv0c4g.jpg


Edited by jchomme, 08 February 2018 - 07:19 PM.


#28 jchomme

jchomme

    Stage One Kit Fitted

  • Noobies
  • PipPipPip
  • 99 posts
  • Location: Georgia

Posted 08 February 2018 - 07:49 PM

Back at it after, got a few things done here and there over the past year, but planning to make a huge push.  Have nothing but time for the next few months.  cut out the roof, did a few rounds of phosphoric de-rusting and wet sand blasting.  Plan to build up a rust removal shower to get everything thoroughly soaked with evaporust especially inside the structure, at the seams and pitted areas.  Stripped all the old paint off and seeing it mostly in bare metal boosted my motivation some!


Also started fiddling with the engine.  Has poor compression and an odd piston that sits a few mil lower than the others at tdc.  Can get the compression up squirting oil in the cylinder, but the compression is still very uneven over all.  Might be a matter of new pistons, hopefully the block is good enough to rebuild and if anyone has suggestions of what to look for as I tear it down, I am all ears.  


20180206_180856_zpscjjp1y1f.jpg

20180206_180846_zpsjwfldkdb.jpg

20180206_172331_zpscr09tbia.jpg20180206_180821_zpsieimgxz8.jpg


#29 Chappers

Chappers

    Mini Mad

  • Noobies
  • PipPipPipPip
  • 129 posts
  • Location: Columbus, IN

Posted 09 February 2018 - 12:06 AM

Woah man thats some huge progress!
I like the look of the new floor and boot floor, that must be boosting your motivation, great work.

I love that youre sandblasting in your back yard and what looks like your house backs onto a lake, haha

That sheet metal has come up really clean too! Not much to replace there.

Regarding your floor pan, it does look like it slopes down towards the front edge like you say, compared to the door strap L shaped panel, assuming that it is square?
Have you checked the floor pan is straight with a straight edge underneath?
Does the floor pan outer edge (usually outer sill on other floors) line up with the door step?

Maybe the toe board is too low and needs to come up?

#30 jchomme

jchomme

    Stage One Kit Fitted

  • Noobies
  • PipPipPip
  • 99 posts
  • Location: Georgia

Posted 09 February 2018 - 01:33 AM

Woah man thats some huge progress!
I like the look of the new floor and boot floor, that must be boosting your motivation, great work.

I love that youre sandblasting in your back yard and what looks like your house backs onto a lake, haha

That sheet metal has come up really clean too! Not much to replace there.

Regarding your floor pan, it does look like it slopes down towards the front edge like you say, compared to the door strap L shaped panel, assuming that it is square?
Have you checked the floor pan is straight with a straight edge underneath?
Does the floor pan outer edge (usually outer sill on other floors) line up with the door step?

Maybe the toe board is too low and needs to come up?

I did the floor dry fit last year, only put in the boot floor.  I went off the original door step/rear subframe panel/ toe board and the floor panels just seems to be off a little bit. It is like they don't taper in and there is excess material.  I think I'll need to do a bit of cutting, but not too worried.  Should come out ok.  


I will say that wet blasting is where it is at.  It's messy, but It gets the really hard to reach areas and pitting areas really good!  It does take a ton of crushed glass too. 


Looking back, a chemical dip might have been a better option. 


0 user(s) are reading this topic

0 members, 0 guests, 0 anonymous users