Jump to content


Photo

New To The Forum But An Old Dog With Minis


  • Please log in to reply
37 replies to this topic

#1 Itsjustanestate

Itsjustanestate

    On The Road

  • Noobies
  • PipPip
  • 43 posts
  • Location: Hull

Posted 04 October 2015 - 10:27 PM

Thought I would join the forum to share my rebuild project. The Car is a 1098cc 1976 Mini Clubman Estate that I rebuilt in 1990 for Road rallying. I fitted a fibreglass front, full roll cage, part seam welded and strengthened the shell, a seam welded/strengthened front subframe and full sump guard, gear linkage guard and tank guard. She was powered by a MED 1380cc stage 4 engine running a Piper 285 cam on a single HIF44 carb with water heated inlet manifold, Janspeed LCB exhaust manifold and home made stainless skidded exhaust, married to a Jack knight SCCR metro challenge box and Jonspeed LSD. Suspension was fully adjustable, camber, tow, height, bump and rebound. She ran on 13 inch weller wheels and brakes were vented metro turbo 4 pots on the front and minifins drums on the rear with adjustable brake bias and fly off handbrake. I competing in around 30 Midlands events in the 90s many being run around the lanes of Derbyshire. In her prime she could give a well specked escort or even a sierra cosworth a good run for its money, much to the dismay of their owners. She then got run for a couple of winters and was put away in my garage for the tin worm to do its job. I decided the time had come to do something with it so me and my 13 year old son stripped the back subframe off and I started to poke a few holes in it. It soon became apparent that a full rebuild was necessary so I persuaded the wife I still had the gumption and started cutting and welding. Hopefully the pictures will tell the rest of the story to date


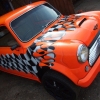
Here it is back in the day

Mini.jpg


Edited by Itsjustanestate, 04 October 2015 - 10:49 PM.


#2 Itsjustanestate

Itsjustanestate

    On The Road

  • Noobies
  • PipPip
  • 43 posts
  • Location: Hull

Posted 04 October 2015 - 10:46 PM

N/S floor cut out.

IMG_2073.jpg


Starting to add some strength to the rear subframe mount area.


IMG_2078.jpg


Roll cage foot strengthening being tied into inner sill strengthening.

IMG_2079.jpg


New rear subframe mount made from 6mm plate.

IMG_2175.jpg


The makings of a rear wheel arch turret. I should be able to run coilovers with this stiff fabrication.

IMG_2297.jpg


New rear wheel arch and turret. This is where I switched from a tired old MIG to TIG!

IMG_2523.jpg


The wheel n/s/r arch being fitted. Still learning the TIG at this point.

Note the uneven shape to the arch at the front is to account for the fact it is a standard mini roll cage in the longer estate shell.

IMG_2529.jpg


IMG_2546.jpg


IMG_2549.jpg


IMG_2550.jpg


IMG_2557.jpg


IMG_2563.jpg


IMG_2567.jpg


Reasonably happy with the out come as there will be a fibreglass Group 5 wheel arch extension covering the outer edge on the final car and the TIG welds are nice and soft to allow for a bit of panel beating.


Next job was to fit a new rear n/s corner - unfortunately I chose a non-genuine panel so it needed a bit of persuading to fit but finally got there. It is genuine panels from here on where they are available.


IMG_2569.jpg


IMG_2570.jpg


And then fit a floor closing panel to the new wheel arch fabrication. Few one wheel arch done!


IMG_2581.jpg


IMG_2583.jpg


Edited by Itsjustanestate, 04 October 2015 - 10:50 PM.


#3 Carlos W

Carlos W

    Mine is purple, but I have been told that's normal

  • TMF+ Member
  • PipPipPipPipPipPipPipPipPipPipPip
  • 10,110 posts
  • Location: Sittingbourne, Kent

Posted 05 October 2015 - 06:33 AM

Welcome to TMF

Looks like a good project

#4 Itsjustanestate

Itsjustanestate

    On The Road

  • Noobies
  • PipPip
  • 43 posts
  • Location: Hull

Posted 05 October 2015 - 09:31 AM

I gues I should really post in the project section.

#5 Carlos W

Carlos W

    Mine is purple, but I have been told that's normal

  • TMF+ Member
  • PipPipPipPipPipPipPipPipPipPipPip
  • 10,110 posts
  • Location: Sittingbourne, Kent

Posted 05 October 2015 - 09:46 AM

I gues I should really post in the project section.


I can move it if you like


#6 Itsjustanestate

Itsjustanestate

    On The Road

  • Noobies
  • PipPip
  • 43 posts
  • Location: Hull

Posted 05 October 2015 - 05:20 PM

Cheers that would be good. Looks like you have a great project on yourself.

#7 Itsjustanestate

Itsjustanestate

    On The Road

  • Noobies
  • PipPip
  • 43 posts
  • Location: Hull

Posted 05 October 2015 - 09:47 PM

There is another mini in there!

Next up was to tackle the rear valance. I eventually decided nothing was worth saving so cut the whole thing off at floor level.

Here it is with a new closing panel clamped in place.


IMG_2617.jpg

 
I chose to weld it all up off the car. This did result in a slight bow (Note to self always make a jig.) but pretty sure it would have been a nightmare to weld on the car.
 
IMG_2622.jpg
 
IMG_2624.jpg
 
Now on the car ready for welding. Spot the Scooby bits!
 
IMG_2630.jpg
 
And welded in.
 
IMG_2632.jpg
 
IMG_2638.jpg
 
Main seems ground off as it will be fully deseemed.
IMG_2639.jpg


#8 minimissions

minimissions

    Up Into Fourth

  • Members
  • PipPipPipPipPipPipPipPipPip
  • 3,427 posts
  • Location: North West
  • Local Club: M.M.O.C

Posted 06 October 2015 - 11:36 AM

Looks like an awesome project and nice to see a car with a story to tell as well :) good luck with the build :)


#9 Itsjustanestate

Itsjustanestate

    On The Road

  • Noobies
  • PipPip
  • 43 posts
  • Location: Hull

Posted 06 October 2015 - 01:06 PM

Looks like an awesome project and nice to see a car with a story to tell as well :) good luck with the build :)


Cheers for the interest. She is moving along slowly. The rear is nearly finished. I will keep adding pictures to bring it up to a current status.

#10 Itsjustanestate

Itsjustanestate

    On The Road

  • Noobies
  • PipPip
  • 43 posts
  • Location: Hull

Posted 06 October 2015 - 10:15 PM

Floor and inner sill welded to the sill strengthening (50mm x 50mm x 6mm steel angle). The roll cage feet mounts and the rear subframe mounting are also welded to this strengthening - all made from 6mm plate.


IMG_2612.jpg


IMG_2615.jpg
 
Next job was to tackle the side window frames. 
 
Here is the result of removing the glass and frame.
 
IMG_2643.jpg
 
IMG_2644.jpg
 
A quick repair plate welded in the rear corner and the small holes plugged with weld.
 
IMG_2645.jpg
 
IMG_2649.jpg
 
 
And another small plate.
 
IMG_2696.jpg
 
IMG_2702.jpg
 
Here is the window frame (new ones not available). There were a few holes in it that I welded up. 
 
IMG_2704.jpg
 
Here is the body side showing the window frame finished awaiting the window ledge panel.
 
IMG_2707.jpg
 
And with the ledge panel fitted. I chose to bolt it in place with stainless steel button head bolts. That way it could be painted put on with seam sealant. no issue of burnt paint from welding.
 
IMG_2712.jpg


#11 swampy1978uk

swampy1978uk

    On The Road

  • Noobies
  • PipPip
  • 38 posts
  • Location: essex

Posted 06 October 2015 - 11:43 PM

cool project looking forward to seeing more.

liking the tidy workshop :D


#12 minimissions

minimissions

    Up Into Fourth

  • Members
  • PipPipPipPipPipPipPipPipPip
  • 3,427 posts
  • Location: North West
  • Local Club: M.M.O.C

Posted 07 October 2015 - 05:41 AM

I have a feeling that I will be replacing these panels on both sides of mine when I come to do the work....


#13 Itsjustanestate

Itsjustanestate

    On The Road

  • Noobies
  • PipPip
  • 43 posts
  • Location: Hull

Posted 07 October 2015 - 06:30 AM

The tidy workshop is my nemesis. To be fair all the pictures are taken at the end of the day when I have put the stuff back. You will notice there is a mark 3 buried at the back! There is also a 1/4 scale steam Lorry in there to.

#14 Itsjustanestate

Itsjustanestate

    On The Road

  • Noobies
  • PipPip
  • 43 posts
  • Location: Hull

Posted 07 October 2015 - 05:49 PM

One rear quarter done one to go. So time to crack on with the o/s. More of the same for the window frame (tin worm!).


IMG_2713.jpg

 
IMG_2714.jpg
 
IMG_2735.jpg
 
Next it was out with the cutting disc and sabre saw to put another hole in the shell!
 
IMG_2718.jpg
 
IMG_2719.jpg
 
That left a nice hole for a new wheel arch. Out with the tape measure and I quickly knocked up a mirror image of the n/s fabrication. Here is the cantilevered turret sitting upside down.
 
IMG_2723.jpg
 
Next I cut the o/s/r rear rear subframe mount out and fabricated a new one in 6mm plate. I did the same to the n/s but didn't get pictures. Here it is cooling after welding up.
 
IMG_2726.jpg
 
Here is the mounting in place.
 
IMG_2727.jpg
 
And checking the fit with the turret.
 
IMG_2729.jpg


#15 minimissions

minimissions

    Up Into Fourth

  • Members
  • PipPipPipPipPipPipPipPipPip
  • 3,427 posts
  • Location: North West
  • Local Club: M.M.O.C

Posted 08 October 2015 - 05:41 AM

No hanging about here you seem to be cracking on fast with this :)


0 user(s) are reading this topic

0 members, 0 guests, 0 anonymous users