Jump to content


Photo
- - - - -

Mini Trailer Back End Project


  • Please log in to reply
24 replies to this topic

#1 minitiae

minitiae

    Stage One Kit Fitted

  • Noobies
  • PipPipPip
  • 87 posts

Posted 08 March 2016 - 08:22 PM

Installment #1  8th March 2016


I recently spotted a Mini back end on the local Gumtree freebie ads and, by quick action, was able to get it the following day in the next town. The guy had got a whole shell for parts and had cut it in two, intending to make a barbeque out of the front end, but was having to move house so was clearing out. He told me he'd had about 6 replies since mine so I can consider myself very lucky to get this, as Mini shells are now as rare as hen's teeth around here.

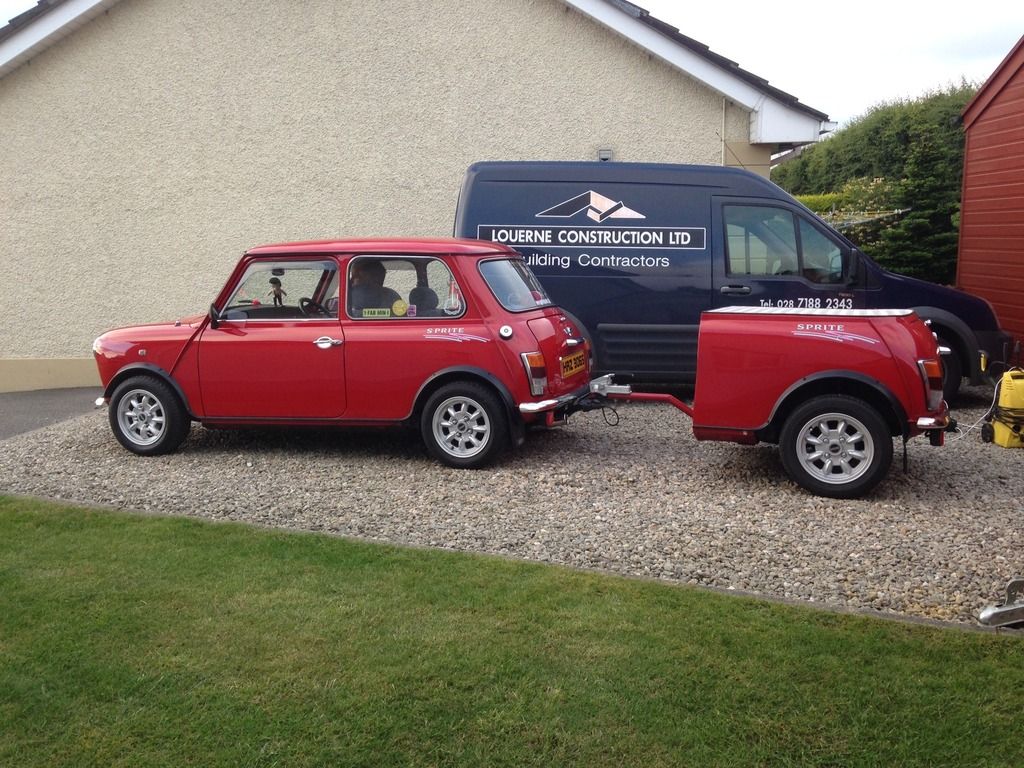
I did a rebuild of a Mini starting in September 2009 and finishing in March 2013 - look up "Total Mini Rebuild of a 1983 Mini 1000" and you'll see the car that I'm doing this trailer for.


The half shell is a major rust bucket with holes and patches everywhere joined up by rust and also has dents on both side panels which I could well have done without. However my original Mini project wasn't much better so I'm going ahead regardless.


Here are a couple of pics the day after I brought it home.

">Mini%20Half%20Shell%202.jpg


In this second pic you can see the 'raw material' sheet steel (computer, boiler & washing machine panels) in the background

">Mini%20Half%20Shell%201.jpg


First job was to cut off the roof so I could easily turn the shell upside down to get a good look at it ;:-

">Mini%20Trailer%203.jpg


Someone had started a repair on one of the side panels and had cut away the bottom of it, (I'll have to do this on the other side anyway) :-

">Mini%20Trailer%204.jpg


Also some neat welding on of a cheapo aftermarket rear valence ! :-

Mini%20Trailer%205.jpg


And two very nicely cut 6 x 9 speaker holes ! :-

Mini%20Trailer%202.jpg


Started by removing the rear valence (and associated 'patches') in such a way as to save the panel as I intend to repair and re-use it :-

Mini%20Trailer%206.jpg


Then, by way of relief, scraped off what remained of the floor and side panel sound deadening 'felt' :-

Mini%20Trailer%201.jpg


Back to the sheetmetal, cut out the battery box and  removed the overhanging part of the seat base together with entire seat back and parcel shelf, (still to remove spot welded flanges on floor and wheel arches in this pic.) 

Mini%20Trailer%207.jpg


Well, that'll do to begin with - hope this meets with general approval as it's certainly not the first time this has been done here on the forums but my 'take' on things might turn out to be a bit different.....


#2 Adam1275

Adam1275

    Mini Mad

  • Members
  • PipPipPipPip
  • 158 posts
  • Location: Northern Ireland
  • Local Club: Causeway Coast Mini Club

Posted 08 March 2016 - 08:40 PM

By any chance are you from Northern Ireland, think I seen this ad on gumtree too?


#3 minitiae

minitiae

    Stage One Kit Fitted

  • Noobies
  • PipPipPip
  • 87 posts

Posted 09 March 2016 - 07:44 PM

Well spotted, Adam1275, The back end was advertised in Bangor, Co.Down. I live in Holywood.


#4 Adam1275

Adam1275

    Mini Mad

  • Members
  • PipPipPipPip
  • 158 posts
  • Location: Northern Ireland
  • Local Club: Causeway Coast Mini Club

Posted 09 March 2016 - 09:38 PM

I thought I regonised it, I live outside Londonderry and my dad has a trailer for his mini 3AE30E59-D3C5-46DA-8887-EBE17CFFFD66_zps I'll look forward to seeing this build!

#5 minitiae

minitiae

    Stage One Kit Fitted

  • Noobies
  • PipPipPip
  • 87 posts

Posted 10 March 2016 - 07:37 PM

What a beauty, Adam1275, - if mine ends up anything remotely like that I'll be very pleased indeed !  But a VERY long way to go......


#6 cubby1701

cubby1701

    Mini Mad

  • Members
  • PipPipPipPip
  • 187 posts
  • Location: Portstewart
  • Local Club: causeway coast mini club

Posted 11 March 2016 - 12:15 AM

nice to see a couple of others from Norn iron active on the forum. Looking forward to seeing more of your trailer project


#7 Minimattvan

Minimattvan

    Mini Mad

  • Noobies
  • PipPipPipPip
  • 105 posts
  • Location: Ware, Hertfordshire

Posted 16 March 2016 - 07:02 PM

Love the look of your project! Like your creativity for sheet steel!! I am in the process of making a Subaru brat trailer to tow behind my Subaru pickup, and my repairs were all made with the help of an old filing cabinet! Anyway good stuff!!!!

#8 minitiae

minitiae

    Stage One Kit Fitted

  • Noobies
  • PipPipPip
  • 87 posts

Posted 16 March 2016 - 08:53 PM

Thanks - 'Norn Iron' cubby1701 and Minimattvan for encouraging replies. Love to see the Scooby brat trailer build or at least a pic or two of it - any chance Minimattvan ?


Installment #2 of my 'rustathon' coming any day now.......


#9 minitiae

minitiae

    Stage One Kit Fitted

  • Noobies
  • PipPipPip
  • 87 posts

Posted 18 March 2016 - 08:42 PM

Installment #2  18th March 2016 :-
 
Started on setting in pieces to replace the rear of the boot floor/bumper flange (computer casings) These are tack butt welded on as shown in pic below.
 N.B:- No overlap welding (i.e:- patching) being done anywhere on this refurb as this can only be classed as a bodgers method which encourages water ingress and thus rust to quickly get restarted. Butt welding requires MUCH more time and patience, but with the result that rust cannot get a hold - sermon over !
Next, the left hand subframe rear mounting area of the boot floor was cut out - the piece nearly 1/2 inch thick at the mounting holes with the build up of rust and old patch pieces !
 Mini%20Trailer%209.jpg


The same on the right side - the bit removed is just propped up as in the previous pic,for your viewing pleasure !
Mini%20Trailer%208.jpg


Then tacked on the rear panel bottom edge all round as shown, trimmed the bumper flange and drilled three of the bumper mounting and the four boot lid hinge holes:- Mini%20Trailer%2010.jpg


Removed this rotted thin area of the floor in readiness for another 'insert' :-
Mini%20Trailer%2012.jpg


Here's a shot of progress so far on the boot floor with all the 'inserts' tacked in. (I think I must be close to having replaced half the entire boot floor already and it's not over yet !) :-
Mini%20Trailer%2011.jpg


Front of mudguard cut cut away.  More to do here - it is also rusted through elsewhere as more holes can be seen (If this was a car refurb,I would have replaced both wheel arches entirely) :- Mini%20Trailer%2013.jpg


Left mudguard piece tacked in, together with two small filler panels in front of it.  Started on removing inner and outer sill pieces :-
Mini%20Trailer%2014.jpg


Bottom of side panel made up and tacked in place:- Mini%20Trailer%2015.jpg


That's the progress to date, peeps - actually a bit faster than anticipated due to many uninterrupted days spent on it, but the 'rustathon' is set to continue for some time yet ........!


#10 minitiae

minitiae

    Stage One Kit Fitted

  • Noobies
  • PipPipPip
  • 87 posts

Posted 02 April 2016 - 07:09 PM

Installment #3   2nd April 2016


Had to replace the bottom 2 inches of the right hand pocket as it it was well rotten. (surprisingly the other side was fine). I'm leaving the pockets in place as they are very light but help to hold everything together, particularly in giving the B pillars some strength to keep them vertical until the front panel is fitted :-

">Mini%20Trailer%2016.jpg


Finished off this area with the outer sill (made, as was the other side, from a piece of the old rear seat back) and the replacement bottom of the side panel tacked in place ">Mini%20Trailer%2017.jpg


Below are 3 pics of the progress to date. The patchwork quilt effect is mind blowing. I measured it out and what I've done so far is 60' - yes SIXTY FEET (almost 20 metres) of tacking, meaning 60' of continuous welding coming up - not looking forward to it.  And that's without even considering the front panel and top arrangement !

">Mini%20Trailer%2018.jpg


">Mini%20Trailer%2019_1.jpg


">Mini%20Trailer%2020.jpg


The 'rustathon' has ended (for now) and the 'weldathon' begins, when I manage to summon up the will, that is...........!


#11 minitiae

minitiae

    Stage One Kit Fitted

  • Noobies
  • PipPipPip
  • 87 posts

Posted 25 April 2016 - 07:39 PM

Installment #4  25th April 2016
 
 
Well, after about three weeks of nothing but butt-welding on this project, joining up all the tacks, I finally reached the stage of blasting the floor both sides including the wheel arches, etc. This exposed one or two 'iffy' areas particularly in the extremely thin metal spare wheel recess which I had to attend to with the welder, but otherwise it turned out to my satisfaction.
 
Mini%20Trailer%2021.jpg


Mini%20Trailer%2022.jpg


I sprayed all the areas the day after they were blasted in order to prevent the bloom of rust that would inevitably appear if the humidity was high enough - too big a risk to delay after all this work. The primer is 2-pack Tetrosyl. As you can see, the welding distortion on the floor, etc., shows up clearly, but this I have come to regard as inevitable and certainly is of no major concern on this part of the project. I tried various methods to combat this - spreading out the tacks, cooling them quickly, letting them cool slowly, continuous short runs of varying lengths, etc., but nothing I tried would reduce the metal shrinkage and distortion. (any solutions to this problem on a postcard please....!)
 
Mini%20Trailer%2023.jpg


Mini%20Trailer%2024.jpg


Mini%20Trailer%2025.jpg


Mini%20Trailer%2026.jpg


Next, I have to start thinking about the front panel .....oh...............


#12 minitiae

minitiae

    Stage One Kit Fitted

  • Noobies
  • PipPipPip
  • 87 posts

Posted 28 May 2016 - 07:33 PM

Installment #5  28th May 2016
 
Change of plans - instead of going about the front panel as I had previously planned, and after much thought, it was decided first to deal with reinforcing around the sides and back of the shell in preparation for the lid/top. I was very lucky in this respect as I was only recently given the remains of a scrap damaged cricket pitch mobile rain cover trolley, (I'm sure it has a name but not being a cricketer, I've no idea what it might be !), and among the bits were about 8 long galvanised folded 16 gauge beams and curved pieces of galvanised 3/4 inch square x 16 gauge tubing, (one of which can be seen in the centre of the first picture).
 
So, I experimented bending some of this, and came up with the idea of machining an old flywheel (with the ring gear removed) so that it left a 'rib' along the centre, (you can see this also in the next picture). This 'rib' has the effect of 'caving in' the tube and allowing an easier bend. Holding the flywheel in the vice, hooking the tube under the bracket shown, and with heavy pulls (particularly at the tight bend corners), I was able to bend the tubing without any kinking or flats.
 
After much to'ing & fro'ing I eventually formed the shapes to exactly match the inside profile of the shell right round at bottom of side window level where I increased the existing 'turn over' or flange a little with a bit of hammer and dollying.  Briefly described but this all took a LOT of time and effort .
 
Pic 1
Mini%20Trailer%2027.jpg


Then held each piece of tubing in place and tack welded at about 2 inch intervals. This greatly strengthens up the what were now very weak side and boot panels, and also providing a welding point for the 'decking' panels, and very importantly, eliminating my constant enemy - distortion !
The final result can be seen in the next two pics :-
Pics 2 & 3 :-

Mini%20Trailer%2028.jpg


Mini%20Trailer%2029.jpg


Next, using the scrap galvanised beams, (seen in background), the 'decking' pieces were cut out, shaped and tack welded to the 3/4 inch surround tubing. Due to the fact that 3/4 inch flanges already existed on some of the beams it saved all the bother of trying to create these manually (hammering over angle iron, etc.), as the lengths required were both too long and too heavy in gauge thickness for my folder. 
The results can be seen in the next two pics:-
 
Pics 4 & 5 :-
Mini%20Trailer%2030.jpg
 
Mini%20Trailer%2031.jpg


Can't be certain what will be next, so we'll just have to wait and see......


#13 KonradK_2

KonradK_2

    On The Road

  • Noobies
  • PipPip
  • 43 posts

Posted 30 May 2016 - 06:10 AM

why are you leaving orginal boot floor? it;s a lot of lost space 


#14 minitiae

minitiae

    Stage One Kit Fitted

  • Noobies
  • PipPipPip
  • 87 posts

Posted 30 May 2016 - 06:57 PM

Sorry, but I don't really understand.  Are you suggesting I should have removed the boot floor entirely and fitted say a flat sheet with all the difficulties this would have caused ? This would have gained only a tiny bit of extra space, and anyway space for me is NOT an issue. This trailer is intended purely for show and the most it will ever carry is a folding picnic table and chairs !


#15 minitiae

minitiae

    Stage One Kit Fitted

  • Noobies
  • PipPipPip
  • 87 posts

Posted 04 July 2016 - 07:07 PM

No clarification as to what he was talking about, forthcoming  from KonradK_2, so we'll carry on regardless......


Installment #6  4th July 2016


For the front panel, a friend of mine sourced me a VW Golf bonnet only lightly damaged at one front corner, which I would be cutting off anyway -  perfect for the job !
I removed the frame, bonded to the inside of the panel, (not particularly easy as it takes great care to avoid damaging the delicate sheet metal skin), and you can see it here:-
 Mini%20Trailer%2032.jpg


Next was the very big job of trimming it to size and forming a 5mm lip across the bottom and down the sides to match up with the joggled edge side panel extensions. This is covered in one sentence but took many weeks of work, as I had to experiment making tools for a hand bead roller machine before I could satisfactorily form the curved flanges or lips.  Endless practising on bits of scrap sheet was done before committing to forming the lips on the panel itself. I wanted to achieve a nice radiused edge on all outer corners rather than simply welding panels edge to edge which would have been fraught with all sorts of distortion problems, not to mention not looking at all good, in my opinion.
Mini%20Trailer%2033.jpg


Finally, after trimming and forming the lip along the top curved edge, the panel was finally tacked in place.
(The curve along the top will match the adjacent top panel (or 'lid') when it tackled at a later date).
First, a view from the outside:-
Mini%20Trailer%2034.jpg


And from the inside:-
Mini%20Trailer%2035.jpg


That's all for now - hope to have something on progress on the roof (or lid) panels, etc., next.......


0 user(s) are reading this topic

0 members, 0 guests, 0 anonymous users