Jump to content


Photo
- - - - -

Retirement Project Rover Sprite


  • Please log in to reply
96 replies to this topic

#1 spraybeater

spraybeater

    Speeding Along Now

  • Members
  • PipPipPipPipPip
  • 468 posts
  • Location: west yorkshire
  • Local Club: Mcr

Posted 12 May 2016 - 10:19 AM

Hi folks, bought this on eBay this time a year ago, whilst enjoying a extended break in Cyprus!

so thought it was time to share my project so far,at his time I am on another extended break in

same place.

DSC_0001_zpstzyca2f5.jpg

DSC_0002_zpsy51oaly0.jpg

DSC_0003_zps5qfidawa.jpg

I was purchased as a full rebuilt project so was aware of rust and other work that needed doing,

plus having spent most of my working life in the trade new that it was well within my capability,

although now in my 69thyear maybe not as quickly! but HeyHo its supposed to be a hobbyDSC_0012_zpspwmq09lh.jpg

DSC_0013_zpsnriaaoix.jpg

DSC_0015_zpsdqre1jyw.jpg

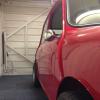
So strip down starts rust in all usual Mini places 

DSC_0018_zpsm7qdt2bh.jpg

DSC_0019_zps2u1ncokf.jpg

Both inner wings broken of probably due to poor previous repairs and Subframe mountings being 

split ,

DSC_0026_zpsspvkqtpg.jpg

After becoming a TMF+ member always like a bit of discount HaHa !seriously though new that the spend

on parts would be a good amount and used to trade discount for years well worth the £5.er and having

moved to Yorkshire from Scotland lost all my trade contacts!

Asked on here best places for parts as hadn't worked on Minis for about 30 years after a trip up to

mMachine picked up this lot to get started

DSC_0002_zpseo4jbhdi.jpg


Next instalment to follow now its swimming pool time.


#2 Cookiez

Cookiez

    Mini Mad

  • Members
  • PipPipPipPip
  • 205 posts
  • Location: Glasgow

Posted 12 May 2016 - 11:19 AM

Looks a good project


Looking forward to what your going to do with it.


#3 minimissions

minimissions

    Up Into Fourth

  • Members
  • PipPipPipPipPipPipPipPipPip
  • 3,427 posts
  • Location: North West
  • Local Club: M.M.O.C

Posted 12 May 2016 - 01:12 PM

Looking like a great project good luck with it :) Keep the pics coming.


#4 spraybeater

spraybeater

    Speeding Along Now

  • Members
  • PipPipPipPipPip
  • 468 posts
  • Location: west yorkshire
  • Local Club: Mcr

Posted 12 May 2016 - 02:23 PM

Thanks for the comments so far, re plans for it! bring it back to original condition and colour 

and some mods, already has 1275 A+ so no real mods in the department .

Although I have done many resto jobs over the years have never done one for myself !

I had already decided that it would be a complete nut and bolt strip down and rebuild

so the strip down started 

DSC_0003_zpsbzqksdpz.jpg

DSC_0004_zpsmircpvej.jpg

DSC_0003_zpspvithboh.jpg

didn't take a lot of photos at this point! most no whats involved at this stage , purchased

some 1"x1" box section for bracing and started cutting out rusted parts

DSC_0002_zpsq9unemnc.jpg

DSC_0003_zpsocbbl3hb.jpg

rear subframe refitted to aid lining up heel board 

DSC_0007_zpscy23hekn.jpg

floor section with sill fitted all made by mMachine fitted save a lot of work with sill, all parts were acid

etched and seam sealed before fitting ,

DSC_0009_zpsnopqparv.jpg

DSC_0009_zpsnopqparv.jpg

DSC_0003_zpsi4iuhtft.jpg

tacked up and flitch repair section lined up 

DSC_0006_zpsfnl7taoh.jpg

hmm made lower quarter repair panel.

O/S floor, sill, foot,well,flitch ,shower mount and A panel fitted .

I had already made a Roll over frame to ease work ,can't do crawling around under cars so 

easily now 

DSC_0001_zpshxjvgx2n.jpg

ready to start N/S it was worst side wing was held on by 4 tack welds to inner wing and fibre glass and an

ally plate plate riveted to door post.

DSC_0006_zpskjq1ip74.jpg

and fitted with cover sill nasty things,I do however admit to having fitted some back in

the day for other people to keep them on the road , hindsight would be a blessing seeing

what some MK1s are fetching now,

More to follow later


#5 spraybeater

spraybeater

    Speeding Along Now

  • Members
  • PipPipPipPipPip
  • 468 posts
  • Location: west yorkshire
  • Local Club: Mcr

Posted 15 May 2016 - 03:41 PM

Started removing N/S sill !all the usual hidden rust! at least when I have a long time ago fitted cover sills,

I always removed all the old rusted metal and cleaned up inside,

DSC_0003_zps6rhpy8hz.jpg


DSC_0004_zpsd3xb2qh7.jpg


After cleaning up and preparing got new floor section and sill trial fitted,


DSC_0012_zpsjdtk5yts.jpg


DSC_0013_zpskzlnztuy.jpg


When I picked up parts from mMachine they only had this one on the other side I fitted included to the first flute so a

little bit of fabrication required,


DSC_0015_zpsbdj2jvcs.jpg


DSC_0019_zpsfnkbauoj.jpg


DSC_0006_zpssmhaylef.jpg


DSC_0006_zpssmhaylef.jpg


Had a quick visit up to Minispares Harrogate to pick up Heritage panels for door steps,Apanels and rear sill clossing

panel after arranging TMF+ discount of coarse!.


DSC_0007_zpsy3avsvwh.jpg


More to follow later.


#6 minimissions

minimissions

    Up Into Fourth

  • Members
  • PipPipPipPipPipPipPipPipPip
  • 3,427 posts
  • Location: North West
  • Local Club: M.M.O.C

Posted 16 May 2016 - 05:40 AM

wow you didnt hang about this is looking great nice solid good steel going in there :)


#7 spraybeater

spraybeater

    Speeding Along Now

  • Members
  • PipPipPipPipPip
  • 468 posts
  • Location: west yorkshire
  • Local Club: Mcr

Posted 17 May 2016 - 01:13 PM

Thanks for that, although haven't actually done a full resto job on a mini before have repaired and

painted 100rds over the years ,last actual car that I restored for someone was a 1972 XJ6 4.2

Jaguar and you think Minis rust!!!!!


Anyway on with the story


DSC_0009_zpsutatitmg.jpg


DSC_0011_zpse6is2ye9.jpg


DSC_0013_zpsi9gdsct2.jpg


as it was nice weather decided that I would take it out of garage and tidy up,turn it round ,


DSC_0015_zps3fp9kvzj.jpg


DSC_0002_zpsygzjtzag.jpg


next order of parts for boot floor and battery box from nMachine,


DSC_0006_zpse0zzawix.jpg


after removing all rusted parts from rear started winning up rear subframe temporarily fitted to aid winning up!


DSC_0008_zpscdrarumg.jpg


rear wheel arches from Minispares made by Heritage ,


DSC_0011_zpssexxak7q.jpg


corner of rear quarter will be cut out and replaced,


DSC_0014_zpstpg3zmcv.jpg


Decided to give welder a treat to a new torch& Euro fitting old one was about 20 odd year old ,

and with gas valve on trigger my old hands were getting sore ,


DSC_0016_zpsjdgtwsiv.jpg


Floor and underside painted up and ready for rear valance fitting,


DSC_0019_zps9upotwqw.jpg


DSC_0001_zpsfz72qegw.jpg


back onto trolley and rear rollover frame removed ,inside boot etch primed ready to fit rear panel


More to follow later, thanks for looking !


Edited by spraybeater, 17 May 2016 - 01:15 PM.


#8 spraybeater

spraybeater

    Speeding Along Now

  • Members
  • PipPipPipPipPip
  • 468 posts
  • Location: west yorkshire
  • Local Club: Mcr

Posted 18 May 2016 - 09:24 AM

An other instalment of this build, hope its not to boring not showing weld by weld detail,


DSC_0003_zpshxcdcwmb.jpg


added some extra welds to inner wheel arche/floor seam along with plug welds along flange,


DSC_0004_zpswionauqe.jpg


rear panel prepared for fitting,


DSC_0006_zpsfpcsafd9.jpg


clamped up ready for welding,


DSC_0011_zpszamulrqj.jpg


welded and dressed up,


DSC_0013_zpsa9o5xw7g.jpg


booted trial fitted,


DSC_0015_zpsbu3m9se5.jpg


back half of shell all metal work finished ready for paint prep,

can't wait to get all the Black crappy Fred the shed cellulose paint removed some parts aren't 

even keyed just peels of !!

At this point no work done for 6wks of to the sun for holiday


#9 domdee

domdee

    Formally known as dominicdee

  • Members
  • PipPipPipPipPipPipPip
  • 1,183 posts
  • Location: hull
  • Local Club: hull clubs on FB

Posted 18 May 2016 - 11:27 AM

all i can say is, roll on retirement! Great project!


#10 FlyingScot

FlyingScot

    Up Into Fourth

  • TMF Team
  • PipPipPipPipPipPipPipPipPip
  • 2,660 posts
  • Location: Inverclyde Scotland
  • Local Club: Mini Cooper Register

Posted 18 May 2016 - 11:30 AM

Great thread, loving the detail!

FS

#11 Carlos W

Carlos W

    Mine is purple, but I have been told that's normal

  • TMF+ Member
  • PipPipPipPipPipPipPipPipPipPipPip
  • 10,110 posts
  • Location: Sittingbourne, Kent

Posted 18 May 2016 - 11:42 AM

That rear 1/4 repair is superb


#12 minimissions

minimissions

    Up Into Fourth

  • Members
  • PipPipPipPipPipPipPipPipPip
  • 3,427 posts
  • Location: North West
  • Local Club: M.M.O.C

Posted 18 May 2016 - 12:22 PM

Great work this is looking sweet! Lovely detail with the welds etc


#13 slidehammer

slidehammer

    One Carb Or Two?

  • Members
  • PipPipPipPipPipPipPip
  • 1,081 posts
  • Location: Surrey
  • Local Club: LSMOC

Posted 18 May 2016 - 01:13 PM

Really enjoying the project, I think you must be taking speed in your retirement, the amount of progress you have made! The next job I have to do on my Mayfair is fit 2 M-Machine half floors with sills and jacking points attached so it is handy seeing how you went about doing yours. The only thing I have thought is that due to the way the sills are made you can't get paint on the inside of the jacking points as they are already sealed. I will have to try and get cavity wax in once assembled and painted. Last time I did this I fitted inner sills and painted and welded on jacking points before fitting the outer sills. but my current shell has more rot so wanted to have better datum points on the new panel (just my ramblings)


#14 Macker2

Macker2

    Learner Driver

  • Noobies
  • PipPip
  • 14 posts

Posted 18 May 2016 - 05:02 PM

Enjoying reading this thread. That is some class work you are doing there.

#15 Beatie

Beatie

    Passed Test

  • Noobies
  • PipPip
  • 34 posts
  • Location: Lingwood

Posted 18 May 2016 - 05:11 PM

Love that ,great to see someone doing a proper job .
That's going to give you many many more years of pleasure !
Well done and keep it up 😀


0 user(s) are reading this topic

0 members, 0 guests, 0 anonymous users