Absolutely epic work!! If you fancy giving another mini a go for a bit of extra to the retirement fund, let me know!


Retirement Project Rover Sprite
Started by
spraybeater
, May 12 2016 10:19 AM
96 replies to this topic
#31

Steve220
-

- Members
-

- 4,885 posts
Up Into Fourth
- Location: Shropshire
- Local Club: RAF Mini Club
Posted 26 May 2016 - 05:16 PM
#32
spraybeater
-
- Members
-
- 468 posts
Speeding Along Now
- Location: west yorkshire
- Local Club: Mcr
Posted 26 May 2016 - 07:15 PM
HaHa! Although the extra to the retirement fund sounds good, as will become apparent in next couple of
instalments of this project ave another waiting in the sidelines to start. I did do a front end welding job on
a VW Beetle for a friend mid Feb but that was quite local , be back to Mini in a weeks time try and get it
finished in the summer! 
#33
grahama
-

- Members
-
- 2,442 posts
Up Into Fourth
- Location: Warrington
- Local Club: None in my area !!
Posted 26 May 2016 - 07:59 PM
Can't get over the speed of this build, epic work !!
#34
spraybeater
-
- Members
-
- 468 posts
Speeding Along Now
- Location: west yorkshire
- Local Club: Mcr
Posted 27 May 2016 - 02:23 PM
Always been used to working to tight schedule! had my own Bodyshop for years did a lot of Ins work.
Had a customer at one time that had 50 odd Mini van fleet and their fleet manager would get a van
front end damaged on a Friday and expect it back on the road by Tuesday! 2wings/front panel/bonnet
all fitted and painted.
So back to project, underneath finished for now so back onto trolley and rollover jig packed away!


started getting holes drilled for fitting arches ect,


inside painted ,forgot how hard it was chasing a spray gun with colour round inside a body shell ,


[URL=http://s12.photobuck...v1bna.jpg.html]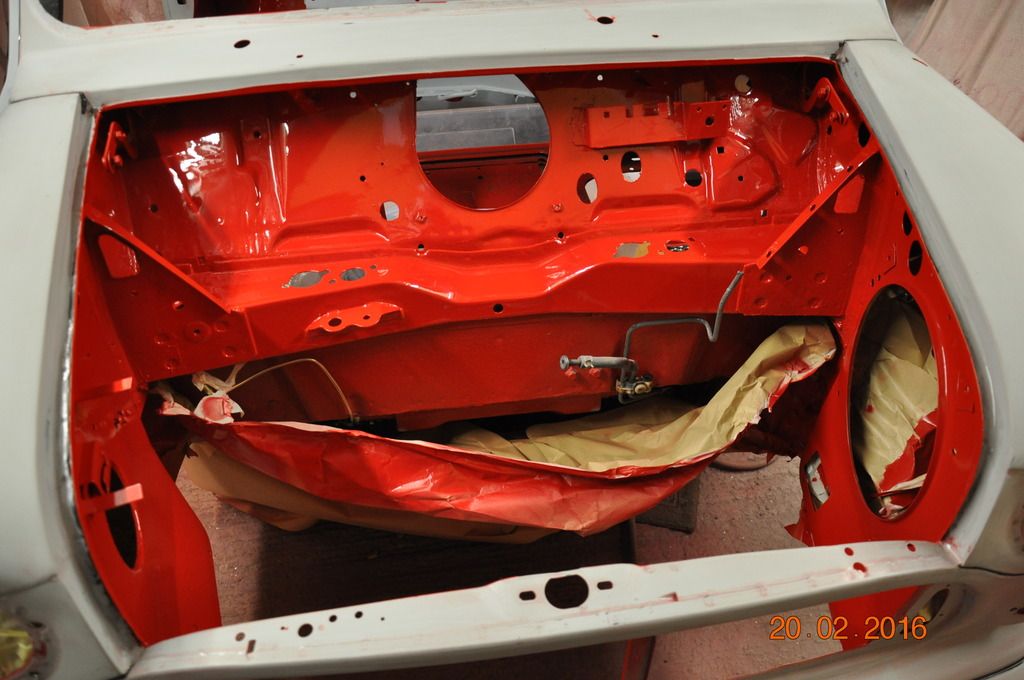 [/URL
[/URL
engine compartment painted got to say its good to get it in colour,
More to follow once again thanks for looking and comments.
#35
MrBounce
-

- TMF+ Member
-
- 2,562 posts
Up Into Fourth
- Location: The Manroom in Ipswich
Posted 29 May 2016 - 12:02 PM
Wow that looks absolutely stunning! It's one of the best things in the world to see a car in new paint as they look SOOOO good! 
I would imagine that once the outer panels are done this'll be amazing 
#36
spraybeater
-
- Members
-
- 468 posts
Speeding Along Now
- Location: west yorkshire
- Local Club: Mcr
Posted 30 May 2016 - 05:02 PM
The story continues! cleaned up and painted all the seam mouldings and refitted them using some panel
adhesive to try and stop rust reforming under them for a while I hope fully won't need to remove them
again!! all seams were sealed and three coats of primmer surfacer applied, then flatted with P800 mirka
abranet with dust free block after masking of the first section was then cleaned with Sprit wipe then Tak
raged !


front end finished,

over the next couple of days all the red was finished in sections N/S first then O/S then the rear and all the parts
that were red , the doors and door checks were first base coated and then fitted for Clear coating on the shell
because of lack of space found this was best way,


decided to paint roof black as the car was originally red then repainted????? red .
All the paint was sprayed at the last thing in the afternoon in winter when there was nobody about ,and not so
many flying insects about as they can ruin a paint job.
Clear had a little drop of rocket added to speed up dust free times!
this is when I miss my Low bake Booth ,


outside for photoshoot with its stable mate and next project  .
.
Thanks for looking and comments more to follow
#37
spraybeater
-
- Members
-
- 468 posts
Speeding Along Now
- Location: west yorkshire
- Local Club: Mcr
Posted 01 June 2016 - 02:10 PM
Last bit of story so far! 1 year after first seeing this on eBay doing deal for it , back to UK tonight back to
work on project in a couple of days  ,
,


continued getting parts blasted and cleaned up ,


brake pipes kupprinol and some other billet alloy parts from DSN classics ,

front subframe painted and fitted with solid mounts top turret are new update from minispares part poly part alloy
brake master cylinder temp fitted will need removing to fit engine/gearbox,


covered up for a couple of months,
took head of have a look before lubing bores for storage,

main warring loom was fitted before covering up (no photos at this time )
Headliner arrived from Optimise the day before we left so put it on stays and and stretched and clipped into
place ready for glueing next job!
once again thanks for viewing and comments.
Frank 
#38
WPD
-

- Noobies
-
- 85 posts
Stage One Kit Fitted
- Location: Hampshire
Posted 01 June 2016 - 02:39 PM
Wow, making quick progress, looks great!
#39
spraybeater
-
- Members
-
- 468 posts
Speeding Along Now
- Location: west yorkshire
- Local Club: Mcr
Posted 07 June 2016 - 08:59 PM
So after relaxing!!!!! in Cyprus for 6wks time to get back to project, after tidying up garden ect.
not mentioned in last update! all cavities were given a good coating cavity wax and left to drip
while away,

just to keep my mind on my other home life


black headliner from Optimise fitted hot, tiring work in the temperatures of the last couple of days + last time I fitted one
was about 20odd years ago and I was a lot fitter then,some of photos show op a little grey but think thats just the
perforations?

these chrome hinges are coming back of (crap cheeps of eBay don't allow boot to close properly)


rear windows and some other parts fitted.

A&B pillars and sun visors covered as well all materials in headliner kit,

excellent cavity wax from Bit Hamber adhesive for headliner from Terson not expensive and worked well,


put window rubbers in place don't know whether to order narrow front screen rubber as this one was redesigned to
try and improve the Tbag water ingress problems of original! used to spend hours repairing water ingress faults back
in the day.
Thanks for looking
#40
GraemeC
-

- TMF+ Member
-
- 7,313 posts
Crazy About Mini's
- Location: Carnforth
Posted 07 June 2016 - 09:57 PM
Narrow rubber - the later ones made the problem worse by trapping the water against in the profile of the window recess.
#41
spraybeater
-
- Members
-
- 468 posts
Speeding Along Now
- Location: west yorkshire
- Local Club: Mcr
Posted 16 July 2016 - 04:52 PM
I don't know where the time disappears to on this type of job!! and to think I used to work
fulltime in in the Body repair trade having said that when you charging and getting paid
for it time is money.I now spend most days working at this and its progressing slowly!
got rear brakes and suspension all cleaned up painted new parts as required ,

sorry poor quality photo

got all windows in except O/S door waiting on correct seal from Minispares


Went for the narrow front windscreen rubber as was suggested ,

cleaning up and polishing/painting parts ready to be refitted ,
next up is get wiring completed!
More to follow thanks for looking
#42
blueovalcraig
-

- Members
-
- 193 posts
Mini Mad
- Location: Rothesay, Isle of Bute
Posted 16 July 2016 - 07:56 PM
Wow quick work, great project! Looks great. Putting me to shame
#43
spraybeater
-
- Members
-
- 468 posts
Speeding Along Now
- Location: west yorkshire
- Local Club: Mcr
Posted 11 October 2016 - 11:48 AM
Not updated this for a while! amazing how a build thread slips back when not updated for a while,
before fitting wiring loom gave it a good check over and found a few nasties !!!! most probably
caused by Main dealer auto/spark???? checking for a fault at sometime in the past,


Repaired this and tided up the rest of the main loom ,added new blade type fuseboxes including
replacing inline fuses with blade type fuseboxes, also fitted relays for dipped and main beams and
spot lights with a few extra separate earths to try and eliminate future problems!
next job was to get wheels cleaned up and painted, purchased a set of 4 on eBay just to get a matching
spare ,and sorted out the best tyres,

Then disaster happened, had all my air tools and grinders, polishing machine ect, stored on a shelf on
garage wall that had been put up by previous house owner and for some reason I had not checked
collapsed and fell down onto side of car fortunately only damaged the door slightly! so out came the
panel beating tools again and a quick repaint was put right ,


Thanks for looking .
#44
minimissions
-

- Members
-
- 3,427 posts
Up Into Fourth
- Location: North West
- Local Club: M.M.O.C
Posted 11 October 2016 - 12:43 PM
This an amazing amount of work you have done in not a lot of time, she is looking great and will be back on the road soon :)
#45
spraybeater
-
- Members
-
- 468 posts
Speeding Along Now
- Location: west yorkshire
- Local Club: Mcr
Posted 13 October 2016 - 07:43 PM
Yeah, thanks for that! being retired helps as said before send most days working on it, although currently
in Cyprus on a break from it so got some time to spend updating on here!!!
So on with the story, the next jobs were to get engine/gearbox stripped checked and rebuilt, was found to
be in good order wear wise, so decided to replace all gaskets and seals, oil pump,presure relive valve ,clutch
core plugs ect, also gave the head an overhaul lapped in valves ect.


Clutch cover cleaned up and fitted , new engine mounts also fitted,
engine painted and Cyl head and other parts painted.


fan cleaned up and new engine mounting fitted,

inner pot joints cleaned ,checked, regressed and fitted with new stainless steel gaiter retainers ( hate using cable ties on these )

Ready waiting for engine crane to be delivered, and get it in place .
Thanks for looking


0 user(s) are reading this topic
0 members, 0 guests, 0 anonymous users


![http://s12.photobuck...v1bna.jpg.html]](http://s12.photobucket.com/user/frankhubbard2/media/Sprite%201275/DSC_0004_zps71vv1bna.jpg.html%5D)