Your at the pipe work too I see..... Its looking ace.
I need to figure out what pipes go where for the cooling.

Mini Mad


Posted 08 December 2016 - 09:48 PM
Your at the pipe work too I see..... Its looking ace.
I need to figure out what pipes go where for the cooling.
Mini Mad
Posted 09 December 2016 - 11:00 AM

Mini Mad
Posted 09 December 2016 - 05:35 PM
An here today on ze hydraulic press channel, we ave a ztainless exhorst

Tbf tho Im looking at your sexy exhaust, then looking at my monstrosity and im thinking I cant put this POS on my car 
Mini Mad
Posted 10 December 2016 - 01:17 AM
An here today on ze hydraulic press channel, we ave a ztainless exhorst
Tbf tho Im looking at your sexy exhaust, then looking at my monstrosity and im thinking I cant put this POS on my car

Mini Mad
Posted 11 December 2016 - 12:39 PM
Mini Mad
Posted 11 December 2016 - 01:45 PM
I bolted the old cast manifold to my new flange before I welded it to help prevent any twisting. Worked out great. Stainless is a real asshole to prevent bending tho...
Mini Mad
Posted 11 December 2016 - 04:54 PM
Mini Mad
Posted 12 December 2016 - 05:00 PM
I bolted the old cast manifold to my new flange before I welded it to help prevent any twisting. Worked out great. Stainless is a real asshole to prevent bending tho...
I used a large chunk of beam to bolt the flange for my inlet manifold. I suppose I should have drill more holes and used the same beam for the exhaust.
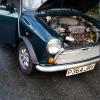
I tried modifying the front panel but access for a hammer is restricted by the engine. I ended up cutting a chunk out. It goes against my policy of modifying the shell but if it's not there then it can't get too hot! Nothing will be visible when the grill is on.
The Mpi front panel is cut away for the radiator , and it cant be seen. Will be fine.
Mini Mad
Posted 19 December 2016 - 04:48 PM
The front hose is complete. Bent a piece of 25mm stainless tube and even made up a couple of rings to weld on the ends of the pipes to stop the pipes blowing off under pressure.

The alternator required a wee bit of modification to the front panel. No big deal as I need to paint a few bits of the bodywork later on.

The bottom mounting bolt is "interesting" to get a spanner on.

I am still working on the water pipe for the back of the engine. It needs a couple of spurs welded on to join up to the heater and also a bypass hose. I won't get that welded until after Christmas.
What are others doing for heater control valves?
Mini Mad

Posted 20 December 2016 - 02:05 AM
What are others doing for heater control valves?
Mini Mad
Posted 20 December 2016 - 02:06 AM
What are others doing for heater control valves?
Mini Mad
Posted 20 December 2016 - 09:29 AM
Mini Mad
Posted 02 January 2017 - 05:39 PM


Mini Mad
Posted 08 January 2017 - 02:35 PM
Edited by McMini 22, 08 January 2017 - 02:36 PM.
One Carb Or Two?
Posted 08 January 2017 - 04:49 PM
I do like the idea of the tubular rear frame, I guess cost will be the biggest factor


0 members, 0 guests, 0 anonymous users


