
some really nice work on this :)
284 replies to this topic
#76

g111mds
-

- Members
-

- 432 posts
Speeding Along Now
- Location: Edinburgh
Posted 27 September 2017 - 10:03 PM
#77
nicnoo
-
- Just Joined
-
- 212 posts
Mini Mad
- Location: Leamington Spa
- Local Club: south warwickshire minis
Posted 30 September 2017 - 09:40 PM
..........And finally some primer in the boot....................

Now maybe i can spin the min and start getting ready to put the front back on 
Once i've bought some decent A-panels that is
#78
Northernpower
-

- Members
-
- 2,409 posts
Mr. 7-Port
- Name: Graham
- Location: North Yorkshire (God's County)
- Local Club: Its out there somewhere
Posted 30 September 2017 - 10:20 PM
Looking good, it seems to be the day for nice paintwork...........And finally some primer in the boot....................
Now maybe i can spin the min and start getting ready to put the front back on
Once i've bought some decent A-panels that is
#79
nicnoo
-
- Just Joined
-
- 212 posts
Mini Mad
- Location: Leamington Spa
- Local Club: south warwickshire minis
Posted 01 October 2017 - 04:20 PM
Today, A little bit of preventitive maintainance. Since my metal guillotine was litterally hanging off the wall due to me using it to cut wood. I decided to put a leg on the front to prevent it falling on my newly primered mini.


Now disaster averted.
Edited by nicnoo, 01 October 2017 - 09:06 PM.
#80
nicnoo
-
- Just Joined
-
- 212 posts
Mini Mad
- Location: Leamington Spa
- Local Club: south warwickshire minis
Posted 16 October 2017 - 05:39 PM
Bored with seam sealing the boot area, i decided to make a start prepping the front end panels ready for assembly. First thing on the list was to remove the number plate brackets as i have no intention of using them an d think the front end looks cleaner without them.
What i will probably do is replace these brackets with removeable versions, secured with rivnuts, in case i need to put the plate back there for MOTs etc.
so here's the brackets................................

And drilled out ...............................

And the old brackets kept as templetes

#81
nicnoo
-
- Just Joined
-
- 212 posts
Mini Mad
- Location: Leamington Spa
- Local Club: south warwickshire minis
Posted 05 November 2017 - 09:39 PM
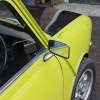
So with the rear end in primer I've turned the mini round and begun assembly of the front end panels. with alot of pushing prodding clamping and swearing I've ended up with this.

No welding just yet as I dont have any A-panels and the doors are still in the shed, so for now It's all temporarily screwed in place so I can start checking bonnet gaps.
Next little isuue is the bonnet itself, it was kindly donated by a freind of mine but has suffered some damage at some point that needs sorting,


Firstly i uncovered all the damage and corrosion and cut out the affected area.

Next job was finding something to fill in the hole, the original idea was to use a section cut from another donated bonnet that had been previously butchered but something tells me i might need it for another project further down the line.................So i thought i'd have a go at making a panel myself

Sadly by the time i'd got to this point it was time to stop neglecting the wife and kids so i'll have to wait till I can get five minutes later in the week.
#82
nicnoo
-
- Just Joined
-
- 212 posts
Mini Mad
- Location: Leamington Spa
- Local Club: south warwickshire minis
Posted 09 November 2017 - 09:59 PM
Managed to get a little more time on it tonight...................................


#83
slidehammer
-

- Members
-
- 1,081 posts
One Carb Or Two?
- Location: Surrey
- Local Club: LSMOC
Posted 10 November 2017 - 01:13 PM
Really taking shape now, keep up the good work
#84
MasterD78
-

- Noobies
-
- 125 posts
Mini Mad
- Location: Utah
Posted 10 November 2017 - 02:31 PM
Coming along and you are doing some great work!
#85
nicnoo
-
- Just Joined
-
- 212 posts
Mini Mad
- Location: Leamington Spa
- Local Club: south warwickshire minis
Posted 17 November 2017 - 04:17 PM
Thanks folks,
So...........................Todays lesson "If you move into a house and choose to ignor the fact that the garage electrics are run from a single 13amp plug, badly wired with a bit of twin and earth and run through a hole in the brick wall................................you should expect that 12 years later you will come home to either a pile of cinders where your house used to be, or, as in my case (luckly) a really bad burning smell coming from the cupboard under the stairs"

And before you say, yes there was a fuse in it......................

Time to swap the minispares catalogue for the screwfix one..........
#86
Ben_O
-

- Paint Doctor
-
- 9,781 posts
Mill Road Garage
- Location: Isle of Wight
Posted 17 November 2017 - 07:52 PM

#87
panky
-

- Members
-
- 1,776 posts
Camshaft & Stage Two Head
- Location: Cheshire
- Local Club: Northwest Casual Classics
Posted 17 November 2017 - 08:04 PM
Lucky escape there. I've found a few 'issues' over the years, and the previous house owner was (allegedly) a qualified electrician 
#88
73MkIII
-

- Noobies
-
- 158 posts
Mini Mad
- Location: Worcestershire
Posted 18 November 2017 - 01:16 PM
Lucky escape.
My brother bought a house and a plug inside had a wire that disappeared through the ceiling. Turns out it went to a transformer boxed in under the eaves feeding a security light on the front of the house.
When he looked further a 30A feed from a removed cooker was cut off and buried in the kitchen wall. One misplaced screw could have killed someone which was funny because the previous owner had split the insulation on this wire with a screw to hang stuff above the new cooker.
Then there was the toilet connected to a soil pipe with flexible tumble dryer exhaust ducting, the RSJ in a load bearing wall that only extended half way over the doorway it was associated with............
The surveyor before purchase told them they needed to put energy saver bulbs in but it was fine otherwise.
#89
Avtovaz
-

- Members
-
- 1,133 posts
One Carb Or Two?
- Location: widnes
Posted 18 November 2017 - 10:31 PM
wow, thats quite interesting to me, ive wired parts of our garage from one plug socket. So some lights, jet wash, compressor, all threw this. Maybe a rethink is inorder too!
that plug has got hot, maybe its terminals when welding have got hot and then corroded.
#90
nicnoo
-
- Just Joined
-
- 212 posts
Mini Mad
- Location: Leamington Spa
- Local Club: south warwickshire minis
Posted 23 November 2017 - 10:20 PM
As HE-MAN once said " I have the powerrrrrrrrrrrrrrrrrrrrrrrrrrrr"

Thats better.
So on with the mini................................
With the front end panels screwed, clamped and hammered in place i was happy that everything will eventually fit when the time comes. Ive started preping everything ready.


Confident that my new electrics will hold up to the strain, I fired up the welder and tacked up the wing to front panel, this is a little trick I have blatently robbed from someone off here as it's much easier to tack it all from the front, remove the wing/front panel assembly for final plug welding of the inner flange and then clean the tack welds off afterwards.


Also tagged with one or more of these keywords: roundnose
Projects →
Mini Saloons →
1965 Austin Mini Restoration - Canadian Mk1Started by DoubleEh , 14 Nov 2022 |
|

|
||
Projects →
Mini Saloons →
Project Joe - 1991 Mini Mayfair 998Started by Eggers , 02 Jun 2022 |
|

|
||
Projects →
Mini Saloons →
Mpi Dashboad ProblemStarted by mikeprez , 22 Dec 2021 |
|

|
||
Projects →
Mini Saloons →
1978 Oew - Willy The MiniStarted by smalltreegrower , 11 Nov 2021 |
|

|
||
Projects →
Mini Saloons →
1968 Mk2 Cooper BuildStarted by Minime998 , 15 Sep 2021 |
|

|
0 user(s) are reading this topic
0 members, 0 guests, 0 anonymous users


