Jump to content


Photo
* * * * * 1 votes

New Mini Shed/garage


  • Please log in to reply
45 replies to this topic

#16 ryan22_lgm

ryan22_lgm

    One Carb Or Two?

  • Traders
  • PipPipPipPipPipPipPip
  • 1,478 posts
  • Location: woolacombe, north devon
  • Local Club: north devon mini register

Posted 08 October 2016 - 08:59 AM

Got the roof basically finished yesterday she's looking sweet!
AD7463CB-3691-418A-8ACB-EDD24EC8A723_zps
1BE49FC6-3654-462A-9A99-05BDB85CE3A3_zps
We have put extra strips of damp proofing under the frame now too. Now rgb and the timber chap I have ordered the cladding from say it won't need boarding up on the outside just membrane then cladding on top of that? Then board it up on the inside and roof. I'm thinking I should do both sides with cladding on top of obd sheet. Thoughts please guys!!!

#17 greenwheels

greenwheels

    Super Mini Mad

  • Members
  • PipPipPipPipPipPip
  • 672 posts
  • Location: Gloucestershire
  • Local Club: Mini Fixers

Posted 08 October 2016 - 09:15 AM

and put some insulation in the walls -  nothing worse than a cold workshop


#18 Northernpower

Northernpower

    Mr. 7-Port

  • Members
  • PipPipPipPipPipPipPipPipPip
  • 2,409 posts
  • Name: Graham
  • Location: North Yorkshire (God's County)
  • Local Club: Its out there somewhere

Posted 08 October 2016 - 09:25 AM

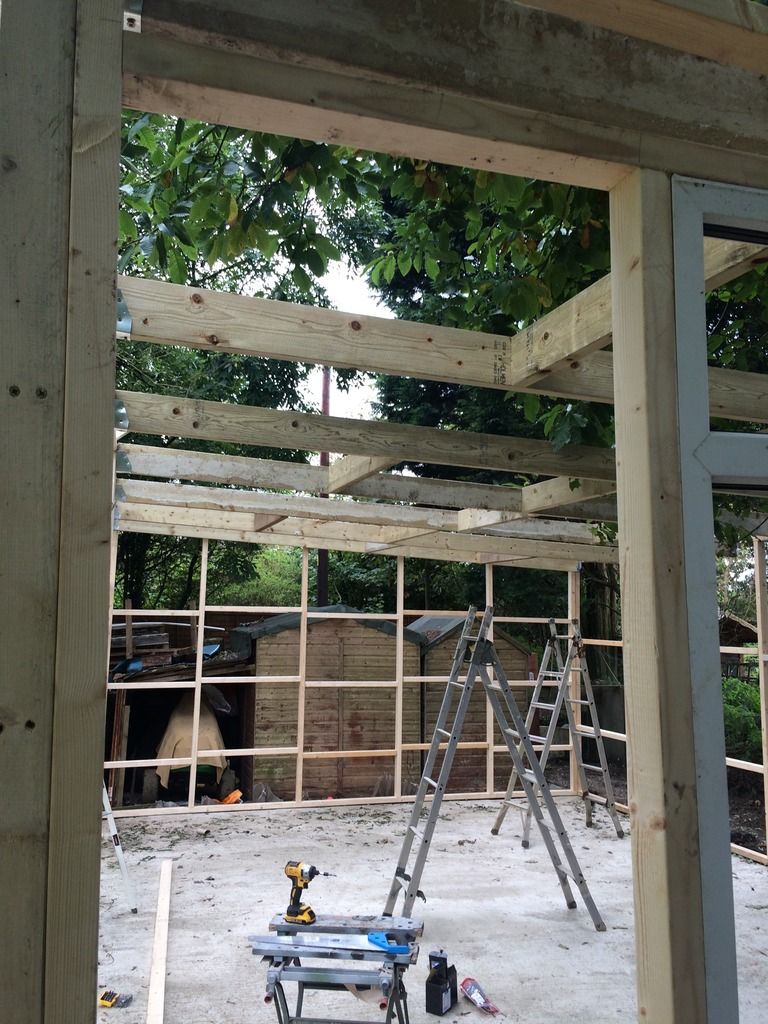
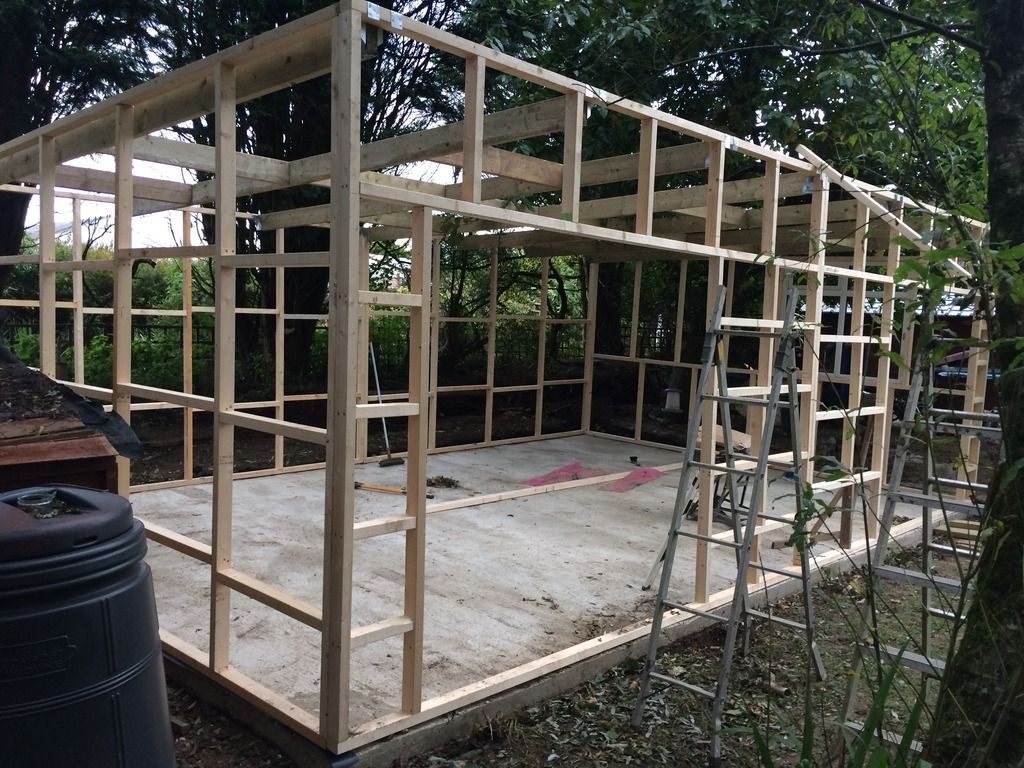
Looking at the top photograph, you're generating a large point load over the opening where the roof joist hanger sits on the top ladder rail. Over time the ladder rail will distort quite significantly because there is no vertical support under the lower rail because of the opening. The cladding could be made semi structural but it won't be a complete answer. Although our winters are now mild the roof loading through snow and especially heavy wet snow can weigh as much as 60kg per sq m.


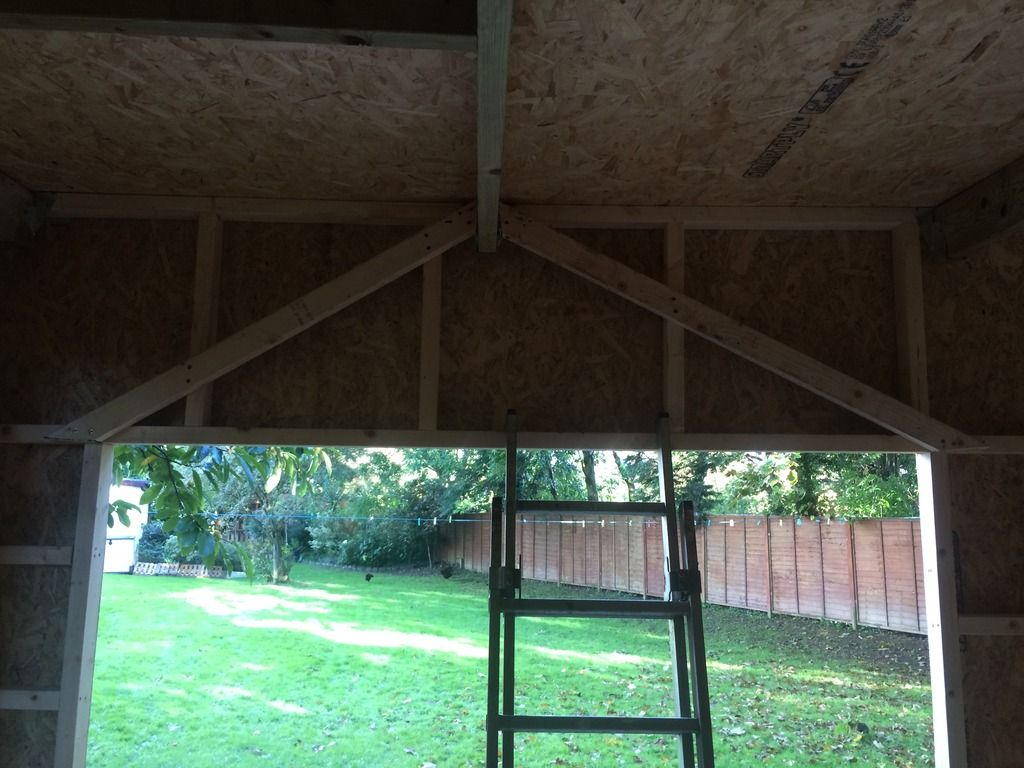
To counteract the point load you will need to add some triangulation. You could do this on the inside of the frame. You will need to add two diagonal bracing bars extending down from the joist hanger on the upper rail to a point on the lower rail above a vertical joist i.e. above the right hand vertical ladder framing on the left hand side of the opening. Its important you attach these to the horizontal rails because the load transmitted from these will put the lower rail in tension. If you were to attach it to say the corner upright the transmitted load would push the upright sideways.


If you want to keep the inside flush an alternate solution would be to clad the inside and outside of the horizontal ladder frame in exterior grade 22mm ply. It needs to be exterior grade ply because normal ply or particle board will lose its structural integrity over time because of damp; damp will occur no matter how well you wrap it. The down side to this solution is, its a lot more expensive than two relatively short lengths of TR26 grade timber.


Hope this helps


Edited by Northernpower, 08 October 2016 - 10:02 AM.

#19 ryan22_lgm

ryan22_lgm

    One Carb Or Two?

  • Traders
  • PipPipPipPipPipPipPip
  • 1,478 posts
  • Location: woolacombe, north devon
  • Local Club: north devon mini register

Posted 08 October 2016 - 12:58 PM

Looking at the top photograph, you're generating a large point load over the opening where the roof joist hanger sits on the top ladder rail. Over time the ladder rail will distort quite significantly because there is no vertical support under the lower rail because of the opening. The cladding could be made semi structural but it won't be a complete answer. Although our winters are now mild the roof loading through snow and especially heavy wet snow can weigh as much as 60kg per sq m.
 
To counteract the point load you will need to add some triangulation. You could do this on the inside of the frame. You will need to add two diagonal bracing bars extending down from the joist hanger on the upper rail to a point on the lower rail above a vertical joist i.e. above the right hand vertical ladder framing on the left hand side of the opening. Its important you attach these to the horizontal rails because the load transmitted from these will put the lower rail in tension. If you were to attach it to say the corner upright the transmitted load would push the upright sideways.
 
If you want to keep the inside flush an alternate solution would be to clad the inside and outside of the horizontal ladder frame in exterior grade 22mm ply. It needs to be exterior grade ply because normal ply or particle board will lose its structural integrity over time because of damp; damp will occur no matter how well you wrap it. The down side to this solution is, its a lot more expensive than two relatively short lengths of TR26 grade timber.
 
Hope this helps


Ideal mate cheers ! Will run 2 lengths of timber on the inside on both doors :)

#20 Northernpower

Northernpower

    Mr. 7-Port

  • Members
  • PipPipPipPipPipPipPipPipPip
  • 2,409 posts
  • Name: Graham
  • Location: North Yorkshire (God's County)
  • Local Club: Its out there somewhere

Posted 08 October 2016 - 05:08 PM

Looking at the top photograph, you're generating a large point load over the opening where the roof joist hanger sits on the top ladder rail. Over time the ladder rail will distort quite significantly because there is no vertical support under the lower rail because of the opening. The cladding could be made semi structural but it won't be a complete answer. Although our winters are now mild the roof loading through snow and especially heavy wet snow can weigh as much as 60kg per sq m.
 
To counteract the point load you will need to add some triangulation. You could do this on the inside of the frame. You will need to add two diagonal bracing bars extending down from the joist hanger on the upper rail to a point on the lower rail above a vertical joist i.e. above the right hand vertical ladder framing on the left hand side of the opening. Its important you attach these to the horizontal rails because the load transmitted from these will put the lower rail in tension. If you were to attach it to say the corner upright the transmitted load would push the upright sideways.
 
If you want to keep the inside flush an alternate solution would be to clad the inside and outside of the horizontal ladder frame in exterior grade 22mm ply. It needs to be exterior grade ply because normal ply or particle board will lose its structural integrity over time because of damp; damp will occur no matter how well you wrap it. The down side to this solution is, its a lot more expensive than two relatively short lengths of TR26 grade timber.
 
Hope this helps

Ideal mate cheers ! Will run 2 lengths of timber on the inside on both doors :)
You've need to run them on the top ladder frame, not the doors.

#21 ryan22_lgm

ryan22_lgm

    One Carb Or Two?

  • Traders
  • PipPipPipPipPipPipPip
  • 1,478 posts
  • Location: woolacombe, north devon
  • Local Club: north devon mini register

Posted 08 October 2016 - 10:25 PM

Sorry mate that's what I meant haha

#22 Northernpower

Northernpower

    Mr. 7-Port

  • Members
  • PipPipPipPipPipPipPipPipPip
  • 2,409 posts
  • Name: Graham
  • Location: North Yorkshire (God's County)
  • Local Club: Its out there somewhere

Posted 08 October 2016 - 10:33 PM

Sorry mate that's what I meant haha

Because its structural make sure it's at least TR26 grade and also as its going to be in compression it needs to be cut out of at least 100x36 nominal.

#23 ryan22_lgm

ryan22_lgm

    One Carb Or Two?

  • Traders
  • PipPipPipPipPipPipPip
  • 1,478 posts
  • Location: woolacombe, north devon
  • Local Club: north devon mini register

Posted 08 October 2016 - 11:08 PM

Sorry mate that's what I meant haha

Because its structural make sure it's at least TR26 grade and also as its going to be in compression it needs to be cut out of at least 100x36 nominal.

Getting a bit confused now mate you say to use tr26 grade but online it says they are using c16/c24 for new house builds. This is a shed!!! I was going to order a pre built shed for nearly 7k and that would have a third of the strength that mine does already without being finished. I'm not even sure farmers build them this strong and theirs last years!

#24 ryan22_lgm

ryan22_lgm

    One Carb Or Two?

  • Traders
  • PipPipPipPipPipPipPip
  • 1,478 posts
  • Location: woolacombe, north devon
  • Local Club: north devon mini register

Posted 08 October 2016 - 11:14 PM

and put some insulation in the walls -  nothing worse than a cold workshop


Will be very well insulated mate don't worry :)

#25 Northernpower

Northernpower

    Mr. 7-Port

  • Members
  • PipPipPipPipPipPipPipPipPip
  • 2,409 posts
  • Name: Graham
  • Location: North Yorkshire (God's County)
  • Local Club: Its out there somewhere

Posted 09 October 2016 - 06:45 AM

Sorry mate that's what I meant haha

Because its structural make sure it's at least TR26 grade and also as its going to be in compression it needs to be cut out of at least 100x36 nominal.
Getting a bit confused now mate you say to use tr26 grade but online it says they are using c16/c24 for new house builds. This is a shed!!! I was going to order a pre built shed for nearly 7k and that would have a third of the strength that mine does already without being finished. I'm not even sure farmers build them this strong and theirs last years!
I fully agree with you, you don't need to use TR26 to build your garage with. All I'm suggesting is, for the two lengths of structural timber you need to transfer the point load from the top ladder rail to the vertical rails (which will be working in compression and therefore you won't want them to flex) the industry standard for truss manufacture is TR26. The two lengths would not cost much more than two lengths of rough sawn. Of course you're free to use whatever you want. I'll leave it entirely up to you.

#26 ryan22_lgm

ryan22_lgm

    One Carb Or Two?

  • Traders
  • PipPipPipPipPipPipPip
  • 1,478 posts
  • Location: woolacombe, north devon
  • Local Club: north devon mini register

Posted 15 October 2016 - 04:33 PM

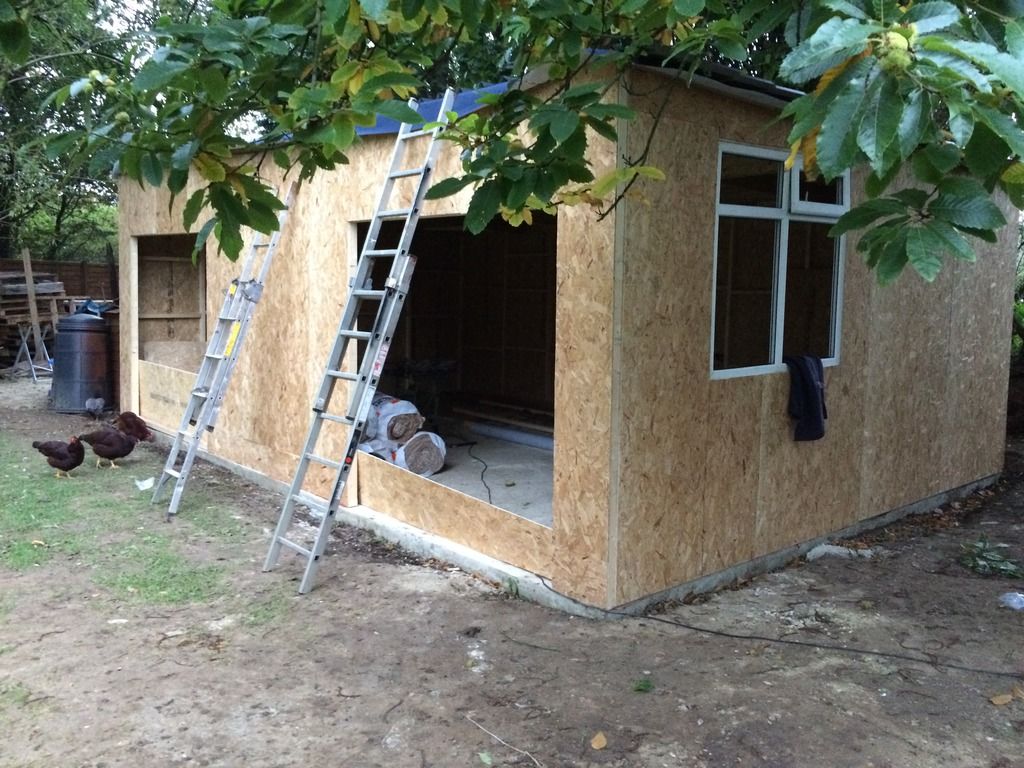
Made a fair bit of progress on the garage. Decided to board the outside in the end just to add more strength and sound proofing mostly. Roof is also on now all looking good ! The outer cladding and membrane is still not here yet hopefully it will come mid week so we can get on and finish the outside. I have also fully treated the whole wooden frame with some clear sealer I got from screw fix. Sprayed it on to so it was nice and easy !
1AB450FB-9C9D-48AF-9059-7135388F8B11_zps
Ignor the off cuts across the door ways they are to stop the chickens getting in XD.
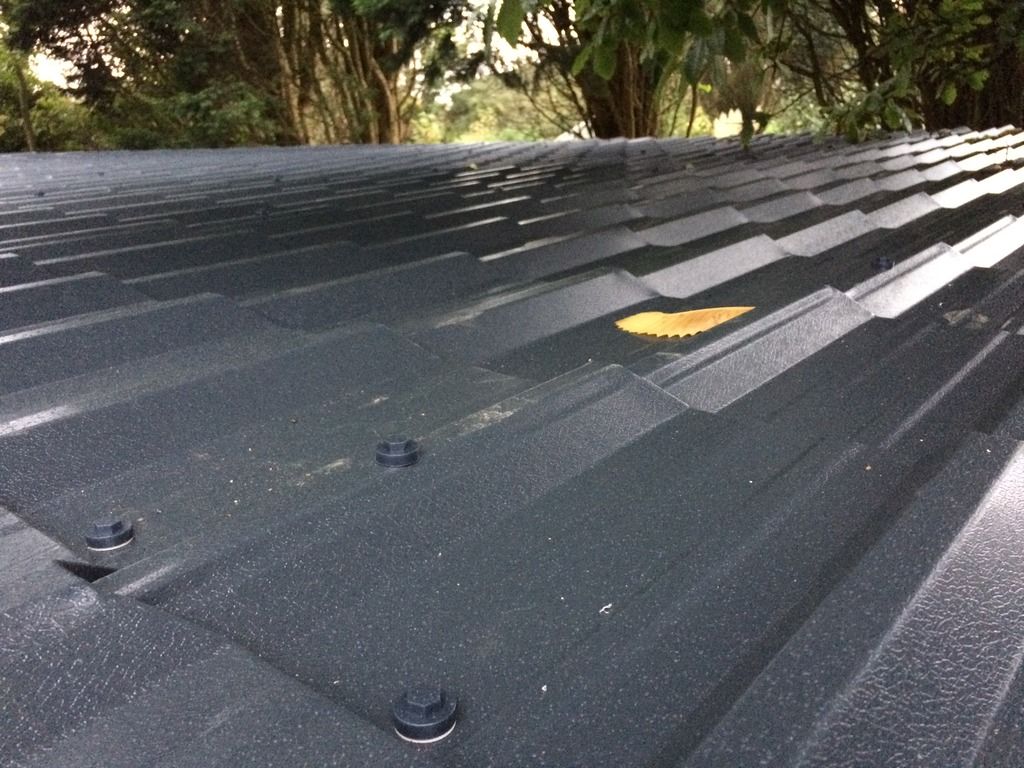
Roof!
81478885-B824-47B0-A405-6DE38F4DAC7F_zps
Also sorted out the door ways
C4A8BD20-FB1D-4675-9145-5AD55BEF6AE5_zps
The inside is now going to to be lined with 12mm ply!!! Just so it's better for attaching stuff to if I need to in the future.

Edited by ryan22_lgm, 15 October 2016 - 04:34 PM.


#27 Northernpower

Northernpower

    Mr. 7-Port

  • Members
  • PipPipPipPipPipPipPipPipPip
  • 2,409 posts
  • Name: Graham
  • Location: North Yorkshire (God's County)
  • Local Club: Its out there somewhere

Posted 15 October 2016 - 06:02 PM

Made a fair bit of progress on the garage. Decided to board the outside in the end just to add more strength and sound proofing mostly. Roof is also on now all looking good ! The outer cladding and membrane is still not here yet hopefully it will come mid week so we can get on and finish the outside. I have also fully treated the whole wooden frame with some clear sealer I got from screw fix. Sprayed it on to so it was nice and easy !
1AB450FB-9C9D-48AF-9059-7135388F8B11_zps
Ignor the off cuts across the door ways they are to stop the chickens getting in XD.
Roof!
81478885-B824-47B0-A405-6DE38F4DAC7F_zps
Also sorted out the door ways
C4A8BD20-FB1D-4675-9145-5AD55BEF6AE5_zps
The inside is now going to to be lined with 12mm ply!!! Just so it's better for attaching stuff to if I need to in the future.

Looking great, I bet you're really enjoying it.

#28 ryan22_lgm

ryan22_lgm

    One Carb Or Two?

  • Traders
  • PipPipPipPipPipPipPip
  • 1,478 posts
  • Location: woolacombe, north devon
  • Local Club: north devon mini register

Posted 15 October 2016 - 06:24 PM

Made a fair bit of progress on the garage. Decided to board the outside in the end just to add more strength and sound proofing mostly. Roof is also on now all looking good ! The outer cladding and membrane is still not here yet hopefully it will come mid week so we can get on and finish the outside. I have also fully treated the whole wooden frame with some clear sealer I got from screw fix. Sprayed it on to so it was nice and easy !
1AB450FB-9C9D-48AF-9059-7135388F8B11_zps
Ignor the off cuts across the door ways they are to stop the chickens getting in XD.
Roof!
81478885-B824-47B0-A405-6DE38F4DAC7F_zps
Also sorted out the door ways
C4A8BD20-FB1D-4675-9145-5AD55BEF6AE5_zps
The inside is now going to to be lined with 12mm ply!!! Just so it's better for attaching stuff to if I need to in the future.

Looking great, I bet you're really enjoying it.

Cheers mate yes enjoying it!! Just desperate to get my minis back in asap as my van is under a cover. :(

#29 mini_matt_106

mini_matt_106

    Super Mini Mad

  • Members
  • PipPipPipPipPipPip
  • 591 posts
  • Location: Andover

Posted 31 October 2016 - 04:04 PM

That's one hell of a shed mate!!

Make sure you get some decent lighting and electrics all have circuit protection.
Also painting the floor will make a massive difference to how much dust is created when you're sweeping up!

#30 ryan22_lgm

ryan22_lgm

    One Carb Or Two?

  • Traders
  • PipPipPipPipPipPipPip
  • 1,478 posts
  • Location: woolacombe, north devon
  • Local Club: north devon mini register

Posted 31 October 2016 - 06:04 PM

That's one hell of a shed mate!!

Make sure you get some decent lighting and electrics all have circuit protection.
Also painting the floor will make a massive difference to how much dust is created when you're sweeping up!


Electrics all being done buy a professional! All from a consumer box. Floor will be being painted but that will be the last thing done as I don't want paint from the inside walls dripping on it XD
Haven't updated this in a while as haven't really got much more done just built 2 of the doors but haven't hung them both yet. Will get some pictures as soon as I can !


0 user(s) are reading this topic

0 members, 0 guests, 0 anonymous users