Jump to content


Photo
- - - - -

Boris - Retrieved From The Garden After 21 Years.


  • Please log in to reply
44 replies to this topic

#1 phildward

phildward

    Stage One Kit Fitted

  • Noobies
  • PipPipPip
  • 93 posts
  • Location: BOROUGHBRIDGE

Posted 30 October 2016 - 02:42 PM

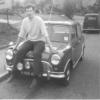
Boris was bought new in January 1985 which makes him an early disc brake model built in 1984.  I ran him for 3 years before offering him to my girlfriend and now wife Kay.  It’s a single owner two keeper car.  Kay also ran him for three years until I found a job working away from home.  Fitting lead free heads and new carbs etc at weekends was just too much so Boris was retired to the Mother in Laws drive in favour of a new Golf.


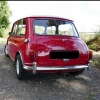
In late 1994 I handed my company car key back, left work and went back to Uni.  Boris was retrieved and was my daily transport until mid-1995 when a steering rack failure resulted in Boris, with almost 120k on the clock, being dumped in the garden.  21 years later he has been dragged out:


IMG_3671_zpshnncc6b9.jpg


I was advised that the car was beyond economical repair, however I’m not in this for the money.  I want to drive my Mini again.  I have lots of Mini mechanical repair experience but no welding experience.  The car is now dry stored so my inclination is not to rush the body repairs (can’t afford it just yet anyway) and repair everything else and get it running.  Tuning can also wait until the car is looking good and back on the road.


Here is the task I have set myself:


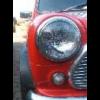
Brakes had to be cut off to move the car:


IMG_1109_sRGB_zpsxpkkhtzx.jpg


A very sad heater:


IMG_3675_zpsb72gd43n.jpg


Dead wheels, may be able to salvage a spare:
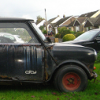


IMG_3690_zpskmq76p19.jpg


It could be worse:


IMG_3693_zps77g0b5gy.jpg


Floor drain holes:


IMG_3696_zpslnrmfrrr.jpg


Both sides:


IMG_3697_zps6fpsfx21.jpg


Also rear


IMG_3699_zpskonzobil.jpg


Rear seat perforated:


IMG_3698_zpsjdqm9uj2.jpg


What boot? Battery box is fine though:


IMG_3702_zpskdjvkx0f.jpg


Cute, original fuel filler cap :) :


IMG_3701_zpsb56fvi7v.jpg


All the seats looked like this until mice ate the other two:


IMG_3703_zpsritzq5nv.jpg


Dead starter etc:


IMG_3704_zpszwgxpua4.jpg


119448 miles:


IMG_3705_zpskchsmjg4.jpg


Its all there:


IMG_3707_zpsoxmab3lv.jpg


Must remember that goes on upside down:


IMG_3713_zpsrejiyowq.jpg


Ghost carb, but everything moves:


IMG_3714_zps2ifgnyli.jpg


Also a 1984 Gemini alarm, I wonder if that still works????


Edited by phildward, 30 October 2016 - 05:06 PM.


#2 phildward

phildward

    Stage One Kit Fitted

  • Noobies
  • PipPipPip
  • 93 posts
  • Location: BOROUGHBRIDGE

Posted 30 October 2016 - 05:44 PM

Let’s get started, that heater is a real shocker.  Must have sucked salt and road debris in over the years and some mice have been living in there;


IMG_3675_zpsb72gd43n.jpg


IMG_3676_zpsy1kpbwzt.jpg


Even worse inside:


IMG_3683_zpsc1imjbvf.jpg


IMG_3681_zpsn6nzrxyd.jpg


Matrix shot:


IMG_3684_zpstqw802ax.jpg


First panel in for rust conversion (OK it needs a clean out, job 1 tomorrow):


IMG_3716_zpssx8lpj01.jpg


However I could win or lose this one here:


IMG_3678_zps4lrfdphr.jpg


Anybody able to advise how to remove that plastic operating knob?


Also could I ask that somebody has a look at a good condition heater please?  Are they gloss or satin black on the main body?


Thank you. 


#3 JCP

JCP

    Stage One Kit Fitted

  • TMF+ Member
  • PipPipPip
  • 73 posts
  • Location: Colchester

Posted 30 October 2016 - 05:59 PM

You've got some work on your hands there, totally worth it though in my opinion, there's lots of other project threads on here so if you get stuck on anything it'll probably already be covered in one of those.

The last heater box I had out was gloss, not sure if that was original so hopefully someone else can confirm either way.

I'll be following this thread for sure.
Good luck with it

#4 alex-95

alex-95

    I am THE CLAMP MAKER

  • TMF+ Member
  • PipPipPipPipPipPipPipPipPipPip
  • 6,017 posts
  • Location: l

Posted 30 October 2016 - 06:36 PM

Looks like a great project, are you going to keep it as it was? 


the knob should 'just' pull off, they're pretty tight as they have backwards facing teeth.


#5 JamesC

JamesC

    Mini Mad

  • Just Joined
  • PipPipPipPip
  • 125 posts
  • Location: Kent, United Kingdom
  • Local Club: Mini Cooper Register

Posted 30 October 2016 - 08:15 PM

Cool thread! Following!

#6 Richie83

Richie83

    One Carb Or Two?

  • Members
  • PipPipPipPipPipPipPip
  • 1,494 posts
  • Location: Somerset

Posted 30 October 2016 - 08:32 PM

Great backstory on this one. I wish I had my early cars.

#7 Psycho-biker

Psycho-biker

    Stage One Kit Fitted

  • TMF+ Member
  • PipPipPip
  • 90 posts

Posted 30 October 2016 - 08:37 PM

Looks to be a good project! like to see electrolysis being adopted for rust conversion. everyone I spoke to about me doing it looked at me crazy like! Keep plodding! little and often!! will be following! 


#8 johnR

johnR

    Up Into Fourth

  • Members
  • PipPipPipPipPipPipPipPipPip
  • 2,244 posts
  • Location: Dorset

Posted 30 October 2016 - 08:54 PM

Not for the fainthearted!  Good luck - have you thought about colour and spec yet or is it too early?  Perhaps if you put a piece of upholstery on the mousetrap you'd get a result!

JohnR


#9 CAU998

CAU998

    One Carb Or Two?

  • Members
  • PipPipPipPipPipPipPip
  • 1,202 posts
  • Local Club: TMF South Central...

Posted 30 October 2016 - 08:55 PM

Awesome project! Would be nice to see it being returned to a relatively standard look but should be great all the same!

#10 JamesC

JamesC

    Mini Mad

  • Just Joined
  • PipPipPipPip
  • 125 posts
  • Location: Kent, United Kingdom
  • Local Club: Mini Cooper Register

Posted 30 October 2016 - 09:11 PM

Not for the fainthearted!  Good luck - have you thought about colour and spec yet or is it too early?  Perhaps if you put a piece of upholstery on the mousetrap you'd get a result!
JohnR


Haha! :)

#11 phildward

phildward

    Stage One Kit Fitted

  • Noobies
  • PipPipPip
  • 93 posts
  • Location: BOROUGHBRIDGE

Posted 31 October 2016 - 06:54 AM

What a fantastic response thank you. If you don't mind I won't respond individually but just cover off your points of interest and contributions.

Firstly the spec, I'm naturally inclined to restore to original but that's not possible in this case due to the mouse damaged seats. Also I was never comfortable with either the City nor Mayfair spec cars. I always thought there should have been be a Mini S (Sport) with a tuned 998. I will never lose that desire to restore to original so wheel trims, nut caps, the grill and damaged seat covers will be retained.

So:

Flat black paint inside and out

Black wipers, bumpers, door handle, mirrors and wheel arch extensions as original

Full use of original interior except seats recovered in navy blue leather and a new roof liner.

Slatted black grill and silver MiniLite alloys

Possible fogs

Engine painted yellow as original ( upgrade to follow cosmetic/bodywork restoration of car if as I expect the car will be too slow).

These are the fogs bought new in 1983 but never fitted to any of the three Minis I have owned.  They would have to be mounted low close to the bumper and these have influenced my decission to fit a slatted gril. Should square the front up a little so the square lamps dont look out of place.  


IMG_3718_zpshhtejadt.jpg


Thoughts???


Edited by phildward, 31 October 2016 - 09:28 AM.


#12 phildward

phildward

    Stage One Kit Fitted

  • Noobies
  • PipPipPip
  • 93 posts
  • Location: BOROUGHBRIDGE

Posted 31 October 2016 - 09:25 AM

The heater, first part came out of rust conversion this morning.  The rust has gone and so has the paint.  The black marks are rust converted to iron and the brownish tinge is a camera error.  Probably will have to go back in again as ordered gloss black paint this morning and over a couple of days it will start to rust again:


IMG_3725_zpsc8bv0ldf.jpg


Pull the knob off, good advice and I got what I was after:


IMG_3726_zpshwzjhqij.jpg


I now need to create a replica.


#13 Carlos W

Carlos W

    Mine is purple, but I have been told that's normal

  • TMF+ Member
  • PipPipPipPipPipPipPipPipPipPipPip
  • 10,110 posts
  • Location: Sittingbourne, Kent

Posted 31 October 2016 - 10:03 AM

IMAG1509_zps2j2yv1im.jpg


I used a satin black for my heater


#14 spraybeater

spraybeater

    Speeding Along Now

  • Members
  • PipPipPipPipPip
  • 468 posts
  • Location: west yorkshire
  • Local Club: Mcr

Posted 31 October 2016 - 10:07 AM

Looks like a good challenge !!! and a healthy panel and bodywork bill.

Personally not a fan of square spot lamps! but each to their own,recon

it will be some time before you are ready to fit them.

Good luck


#15 phildward

phildward

    Stage One Kit Fitted

  • Noobies
  • PipPipPip
  • 93 posts
  • Location: BOROUGHBRIDGE

Posted 31 October 2016 - 10:52 AM

I did wonder about satin black Carlos, however I appear to have both gloss and satin on my heater. Side plates gloss and the rest satin. Strange perhaps the sides are slightly shiny satin?

I'll spray a panel or two and see how it looks, also keep the paint on the front facing into the cabin original.


0 user(s) are reading this topic

0 members, 0 guests, 0 anonymous users