I agree Spraybeater, I bought them years ago to fit either side of the number plate. Then I found out that was far too low. I'll mock it up first as low above the bumper as I can. Probably some time this time next year.
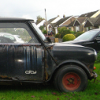

Boris - Retrieved From The Garden After 21 Years.
Started by
phildward
, Oct 30 2016 02:42 PM
44 replies to this topic
#16

phildward
-
- Noobies
-

- 93 posts
Stage One Kit Fitted
- Location: BOROUGHBRIDGE
Posted 31 October 2016 - 10:55 AM
#17
domdee
-

- Members
-
- 1,183 posts
Formally known as dominicdee
- Location: hull
- Local Club: hull clubs on FB
Posted 31 October 2016 - 12:34 PM
Great story. hope you get it back in order
#18
bensheward
-

- Members
-
- 200 posts
Mini Mad
Posted 31 October 2016 - 10:23 PM
Great story to your mini. Look forward to following your progress. Best of luck
#19
phildward
-
- Noobies
-
- 93 posts
Stage One Kit Fitted
- Location: BOROUGHBRIDGE
Posted 01 November 2016 - 10:13 AM
I've been reading some of you guy's restoration threads. Some fantastic work out there. I do appear to have something of an advantage though in terms of knowing the full history of the car. No getting frustrated at somebody else’s repairs or finding too many hidden faults.
My heater is progressing through electrolytic rust conversion so I thought I address a known fault. The timing had become impossible to set accurately as the ignition fired either side of the mark I was trying to hit. Also the vacuum advance had a tendency to fill with petrol, eventually solved by rerouting the vac pipe. The vac advance is not working now so picked a distributor up of eBay for £10. Just finished stripping, cleaning and lubricating it, everything appears fine. I'm pleased with this for £10:

Now I wonder if the previous owner set the dwell angle correctly????
Edited by phildward, 01 November 2016 - 04:22 PM.
#20
minimissions
-

- Members
-
- 3,427 posts
Up Into Fourth
- Location: North West
- Local Club: M.M.O.C
Posted 01 November 2016 - 02:04 PM
This looks like a great little project, cant wait to see this come along.
#21
Rob Gavin
-

- Noobies
-
- 138 posts
Mini Mad
- Location: Glasgow
- Local Club: no
Posted 01 November 2016 - 02:15 PM
love the history of the car.
as for the body work, at least your not dealing with years of bodges; I'd far rather work on this than many out there that claimed to have been 'restored'. I don't see anything more than I had to deal with on mine
#22
phildward
-
- Noobies
-
- 93 posts
Stage One Kit Fitted
- Location: BOROUGHBRIDGE
Posted 01 November 2016 - 02:37 PM
Thanks both, what's left of the bodywork, except for the boot lid and O/S door, is original. Both were damaged while the car was parked and luckily the shell was fine on both occasions. At least the old lady who reversed into the door left a note and paid for the repair.
With the car now, it would appear I didn't just dump the car, I gave it a full service first. I hope that bodes well for it being a runner.
Edited by phildward, 01 November 2016 - 04:20 PM.
#23
DomCr250
-

- Members
-
- 667 posts
Super Mini Mad
- Location: Berkshire
- Local Club: 16V mini club
Posted 01 November 2016 - 03:42 PM
The body work is not as bad as some I've worked on... If you match the welding and paint to your heater restoration you are going to have a mint car in time.
What's the roof like?
What's the roof like?
#24
phildward
-
- Noobies
-
- 93 posts
Stage One Kit Fitted
- Location: BOROUGHBRIDGE
Posted 01 November 2016 - 04:15 PM
The body work is not as bad as some I've worked on... If you match the welding and paint to your heater restoration you are going to have a mint car in time.
What's the roof like?
The mint heater belongs to Carlos. I'm struggling at the moment, to get that kind of finish, I would have to use a high build primer or filler to disguise the treated rust damage. No sure that is justified for an item that I would have to lay on my back with my head in the foot well to inspect. I'm thinking about it; I do have some filler; perhaps just the sides???
The roof is fine, so far I've found a tiny amount of steel missing from the gutter at a joint above the B post and some rust, but not through, under the screen rubber above the windscreen.
Edit: forgot to mention; not sure about mint, that’s not me. I've been lucky in that I’ve had mainly new cars, not many because I take them to high mileages. However I still own one example of each and the other three are completely original well preserved used cars. So the Mini has to be able to join that line-up, looking good but not mint and fairly close to original with a few inevitable tweaks.
Edited by phildward, 01 November 2016 - 05:44 PM.
#25
phildward
-
- Noobies
-
- 93 posts
Stage One Kit Fitted
- Location: BOROUGHBRIDGE
Posted 02 November 2016 - 09:45 AM
I'm quite enjoying this; something of a trip down Memory Lane. Drove Boris to the South of France twice, Switzerland and Germany an holidays back in the 80s. His sun glasses:

Chased an annoying rattle some 30 years ago. The heater had extra foam stuck to it, the joints were glued with silicone and dum dum putty had been smeared on the fixing of the controls to the main body. The cause? Those tags holding the control panel front the mechanism behind it were loose:

Removed the ghost carb for a checking over. It’s rough on the outside but otherwise in very good condition. I replaced it to try and make the car more reliable for Kay just before we gave up and bought a Golf. It’s probably not done more than 10K miles:

Edited by phildward, 02 November 2016 - 07:18 PM.
#26
phildward
-
- Noobies
-
- 93 posts
Stage One Kit Fitted
- Location: BOROUGHBRIDGE
Posted 05 November 2016 - 08:52 AM
The plan was to make the carb functional, along with the fuel pump, fuel tank and distributor (done) and then start the engine and see to what extent it turns into a water feature. Except I had a few hours to kill and needed to occupy my mind:

Looks like I’ve created some work for myself now, the carb body is going to have to be blasted; walnut or soda I think is the appropriate approach? The steel components WILL however just be derusted and oiled for the time being.
Not surprisingly the outside of the heater is going to have to be filled where it is visible when fitted and sprayed with a satin black paint. Gloss back over removed rust simply does not work:

#27
phildward
-
- Noobies
-
- 93 posts
Stage One Kit Fitted
- Location: BOROUGHBRIDGE
Posted 06 November 2016 - 03:06 PM
One step closer to starting the engine, retrieved the fuel pump. This replaced the original pump that constantly leaked. I sourced it from a scrap yard from the second car in a stack of 3. I’m surprised nobody was killed but you pushed the stack a bit and if nothing moved climbed up and retrieved your bits. Called at a Rover dealer on the way home and bought a seal kit. The repaired pump has probably done 100k miles, interesting to see what condition it is in:

I was hoping to fill the cooling system with coolant to start the car but noticed the radiator core was semi restricted by white deposits:

Retrieved the radiator and pleased I did, the coolant is black and full of crispy black flakes, I hope that is not dissolved engine block. Best thing I could come up with is to fill it with washing machine descaler and leave it overnight:

Again the radiator is not the original; that one leaked constantly from the joint between the core and the top pressing just to the right of the filler neck. I soldered it three times and then exchanged it for a reconditioned unit. None of the modern day throwaway nonsense, a guy with a lock-up in the back streets of Leeds soldered in new cores and did a good job. I really hope this one is still fit for purpose.
Edited by phildward, 06 November 2016 - 03:30 PM.
#28
phildward
-
- Noobies
-
- 93 posts
Stage One Kit Fitted
- Location: BOROUGHBRIDGE
Posted 16 November 2016 - 05:52 PM
Right, it appears with Mini restoration that you disappear into a black hole of challenges before you reappear. Oh joy, I’m sure it will be worth it :)
I’m now tending to favour a black interior with dark red leather seats, Kay does not agree and is with my original thoughts of preserving the interior as far as possible. Now there is a challenge:

The engine appears to have weathered neglect reasonably well mechanically. Bores appear good, possibly with the exception of a slight ridge at TDC on 4:

Also valves look good except for sight roughness on 4 exhaust valve seat:

Unfortunately the cooling system is in a bad way and will probably need a trip to an engine restorer. However I’m going for DIY with molasses, going for a run and then an assessment of the situation:

The heater is still making its way through rust conversion, the last two parts are in there right now. The metal loss is significant and I’m going to have to fill the visible external surfaces to make them acceptable;

#29
lawrence
-

- Members
-
- 1,330 posts
One Carb Or Two?
Posted 19 November 2016 - 03:27 PM
To be honest mate I think personally your putting way to much effort into that Heater! At the end of the day it's a utility item that's rarely seen under the dash. By all means make it clean and tidy but I personally wouldn't bother with filler etc as you more than likely going to kick it as soon as you use the clutch and ruin the paint. Just my opinion there.
Keep it up :)
L
Keep it up :)
L
#30
phildward
-
- Noobies
-
- 93 posts
Stage One Kit Fitted
- Location: BOROUGHBRIDGE
Posted 23 November 2016 - 05:51 AM
Thanks L, yes I have disappeared into a heater black hole. Too late though mate, slapped the filler on yesterday, going to take a week to rub it down.
Not to worry everything else that I'm working on has just started a month long soak in molasses so got time on my hands.
Not to worry everything else that I'm working on has just started a month long soak in molasses so got time on my hands.


0 user(s) are reading this topic
0 members, 0 guests, 0 anonymous users


