Jump to content


Photo

Long Overdue Estate Revamp


  • Please log in to reply
33 replies to this topic

#1 998kid

998kid

    Speeding Along Now

  • Members
  • PipPipPipPipPip
  • 473 posts
  • Location: Canvey Island, Essex
  • Local Club: Essex Mini Club

Posted 04 December 2016 - 05:08 PM

Hi all, this won't be a quick build as its my first time taking a project like this on and I will be learning on the way with it

So this is where it all starts. My 1980 clubman estate

The spec:

1330 bill Richards fast road engine
Stage 4.5/5, polished and ported head
Titan 1.5 roller rockers
Megga dished Pistons
High lift cam
Turbo nitride wedged and balanced crank
Duplex vernier timing chain
Hif 44 carb
Ignition system from a ford consorts BDA engine

Made 104bhp on Peter baldwins rolling road

image_zpsokgoihrx.jpeg

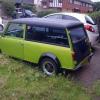
This is the best picture I have of the whole car from when I got it

I bought it from a member on here about 4 years ago and haven't really needed to do much work on it at all, so have been very lucky

So this is my story of the day I got it to now. And then it's future will be added into this thread too

Hope you enjoy and it is worth the read :)

Josh

Edited by 998kid, 04 December 2016 - 05:16 PM.


#2 998kid

998kid

    Speeding Along Now

  • Members
  • PipPipPipPipPip
  • 473 posts
  • Location: Canvey Island, Essex
  • Local Club: Essex Mini Club

Posted 04 December 2016 - 07:19 PM

So, as you can see, when I first got it it had a horrendous front bumper on it which soon came off
Never seen a bumper like this before but here's another couple pictures of it

image_zpsmwepfbgr.jpeg

image_zps1uoisjbp.jpeg

That was the first thing to be removed from the car as it was slightly cracked anyway and I couldn't stand it.

Next came the grill. I didn't like the look of the front end at all. So once I had removed the bumper I decided to black out the front grill which completely changed the look of the car and only cost me about £10 to do which was a result

image_zpsw3uwrexn.jpeg

image_zpsb1aidx7s.jpeg

#3 minimissions

minimissions

    Up Into Fourth

  • Members
  • PipPipPipPipPipPipPipPipPip
  • 3,427 posts
  • Location: North West
  • Local Club: M.M.O.C

Posted 05 December 2016 - 02:26 PM

Nice estate, i saw this at a few shows this year. I didn't no it was hiding a big lump like that lol


what's your plans for its end looks?


#4 998kid

998kid

    Speeding Along Now

  • Members
  • PipPipPipPipPip
  • 473 posts
  • Location: Canvey Island, Essex
  • Local Club: Essex Mini Club

Posted 05 December 2016 - 11:45 PM

Nice estate, i saw this at a few shows this year. I didn't no it was hiding a big lump like that lol
 
what's your plans for its end looks?


Thanks mate. Yeah a lot of people don't really know what it runs like until I tear past them haha

I'm still completely undecided on what look to go for. Going to get it fixed up first then decide I think :)

#5 998kid

998kid

    Speeding Along Now

  • Members
  • PipPipPipPipPip
  • 473 posts
  • Location: Canvey Island, Essex
  • Local Club: Essex Mini Club

Posted 05 December 2016 - 11:52 PM

So, next on the mods on a budget list came a roof rack
I ended up getting one from someone on here and as I can sandblast bits at work I took it in and got it stripped of its nasty paint and then repainted it the same satin black as the grill

Then the following day my door mirror came off and got run over so bought myself some chrome ones

Here's how it stayed for a while once I'd tinted my headlights with some cheap and cheerful vinyl

image_zpsvdai62io.jpeg

#6 minimissions

minimissions

    Up Into Fourth

  • Members
  • PipPipPipPipPipPipPipPipPip
  • 3,427 posts
  • Location: North West
  • Local Club: M.M.O.C

Posted 06 December 2016 - 06:51 AM

Thats fair enough get it all solid and ready for the colour and then see which way you want to go, it also give you the chance to have a look about at some shows etc


#7 998kid

998kid

    Speeding Along Now

  • Members
  • PipPipPipPipPip
  • 473 posts
  • Location: Canvey Island, Essex
  • Local Club: Essex Mini Club

Posted 06 December 2016 - 09:03 AM

Thats fair enough get it all solid and ready for the colour and then see which way you want to go, it also give you the chance to have a look about at some shows etc


Yeah that's the plan. Get everything sorted and perfect and then can narrow down on the colour

#8 998kid

998kid

    Speeding Along Now

  • Members
  • PipPipPipPipPip
  • 473 posts
  • Location: Canvey Island, Essex
  • Local Club: Essex Mini Club

Posted 06 December 2016 - 09:12 AM

Then did a little more of the cheap and subtle mods
First up was the wind deflectors which are a definite must have in my opinion now!
Followed by a 4" sunstrip in satin black to match the roof, bonnet, roof rack and grill

image_zpsraucdpht.jpeg

This was the stage that I was happy with the way it looked other than the over arch issue
Which was then sorted with a lovely set of 10x7 exacton splits finished in satin black

image_zps1vbuobhx.jpeg

Before they were fitted I got a photoshoot done with one of my good friends and fell back in love with the car again

image_zps5hlboao3.jpeg

image_zpsl888mayr.jpeg


The splits then went on and completely changed the look of the car and at this point I loved the way it sat having lowered it within an inch of its life

image_zpsetyxr2cn.jpeg

Edited by 998kid, 06 December 2016 - 09:13 AM.


#9 minimissions

minimissions

    Up Into Fourth

  • Members
  • PipPipPipPipPipPipPipPipPip
  • 3,427 posts
  • Location: North West
  • Local Club: M.M.O.C

Posted 06 December 2016 - 01:50 PM

Loving the splits they look amazing!


#10 998kid

998kid

    Speeding Along Now

  • Members
  • PipPipPipPipPip
  • 473 posts
  • Location: Canvey Island, Essex
  • Local Club: Essex Mini Club

Posted 07 December 2016 - 09:04 PM

Loving the splits they look amazing!


Thanks a lot man. I love them too!

#11 998kid

998kid

    Speeding Along Now

  • Members
  • PipPipPipPipPip
  • 473 posts
  • Location: Canvey Island, Essex
  • Local Club: Essex Mini Club

Posted 07 December 2016 - 09:39 PM

So after 2 years of owning the car and not having a problem (EVER!) the car decided to over heat and smoke when I pulled up at lights

Luckily one of my friends was in front so got it towed home and had a look the following day. I have never seen a problem like this before.
After taking the rad out I found where all my water had disappeared to...
It turns out that the pulley has been grinding and wearing through the bottom of the rad

image_zps16hdloz5.jpeg

Took the rocker cover off and was greeted by this lovely sight too which was just great

image_zpsvjy4nrp7.jpeg

#12 998kid

998kid

    Speeding Along Now

  • Members
  • PipPipPipPipPip
  • 473 posts
  • Location: Canvey Island, Essex
  • Local Club: Essex Mini Club

Posted 10 December 2016 - 06:01 PM

Ordered a new radiator and then was up til 2 am fixing all manor of bits and pieces (head gasket, rad etc) didn't have time to make sure it was running ok or anything so fingers crossed.
Then was up at 5am for work and managed to finish early and get back home in time to drive it up to the show I had planned on going to

Right result!

Anyone else ever had that problem with the rad?

#13 998kid

998kid

    Speeding Along Now

  • Members
  • PipPipPipPipPip
  • 473 posts
  • Location: Canvey Island, Essex
  • Local Club: Essex Mini Club

Posted 11 December 2016 - 04:22 PM

Sorted out the engine bay after this when I had some free time
Looks far better now

Not bad for half a day's work and about £20 of materials like paints etc
Pretty pleased with it. Will do it properly one day though
image_zpsfzb66kpq.jpeg

#14 998kid

998kid

    Speeding Along Now

  • Members
  • PipPipPipPipPip
  • 473 posts
  • Location: Canvey Island, Essex
  • Local Club: Essex Mini Club

Posted 28 December 2016 - 08:15 PM

Few months later and the engine decided to start to smoke under heavy acceleration and felt a little down on power
Done a compression check and was all fine
So decided to strip the head and have a little look

It turned out to be the valve guides that had gone, whilst the head was off I decided to clean the head up completely and the valves looked worn so I decided on replacing them too
I also Wasn't overly happy with the way the bay looked so decided to buy a few shiny bits for it to improve it a bit more while it was in bits

Head coming off
image_zpsrfwglufa.jpeg

Head off
image_zpsjcbeddnd.jpeg

Head was a bit coked up

image_zpsyfajxchg.jpeg

Cleaned and refitted, painted block and head gloss black, wire wheel on some of the parts I could get to and a few shiny bits fitted

B07C7045-CBA4-4EAD-8E4F-A62933C2A13F_zps

image_zpsyvx3x4ri.jpeg

Edited by 998kid, 06 January 2017 - 01:04 PM.


#15 998kid

998kid

    Speeding Along Now

  • Members
  • PipPipPipPipPip
  • 473 posts
  • Location: Canvey Island, Essex
  • Local Club: Essex Mini Club

Posted 06 January 2017 - 01:10 PM

So interior came next as I noticed it becoming a bit scabby in places
Pulled the seats and carpet out to find underlay and then a straw like mat which seemed pointless and a pain to remove the bits that had got damp

Here's a pic of it after I'd spent forever scraping off the bitumen on the floor

image_zps2ow58mtr.jpeg

Gave it a go over with a wire wheel on a drill and then some kurust followed by a couple coats of hammertoe just to smarten it up and hold the rust back a little bit

I then noticed it was very rattly just by tapping panels it was buzzing and I knew it would do my head in. So I got some cheap bitumen and stuck strips in offending areas

image_zps8rhowvjk.jpeg


Wonder if anyone actually reads this thread 😂😂

Edited by 998kid, 06 January 2017 - 01:11 PM.


1 user(s) are reading this topic

0 members, 1 guests, 0 anonymous users