Jump to content


Photo
- - - - -

Coachbuilt Oyler Contessa (The Countess)


  • Please log in to reply
300 replies to this topic

#31 spraybeater

spraybeater

    Speeding Along Now

  • Members
  • PipPipPipPipPip
  • 468 posts
  • Location: west yorkshire
  • Local Club: Mcr

Posted 11 March 2017 - 08:46 PM

Had a bit of luck! on the Saturday morning went passed the place where I get my gas supplies 

and HeyHo they were open so managed to pickup a bottle, meant I could get started early on

the Monday morning.

So as the sill was ready for welding got carried away and had a bit of a welding spree,


DSC_0001_zpsvqw8xnlv.jpg[/URL


DSC_0002_zpszgjbedbe.jpg


sill door step and Apex pane all fitted and ground back,


DSC_0003_zpsnxiacuhs.jpg


DSC_0004_zps68p6krsx.jpg


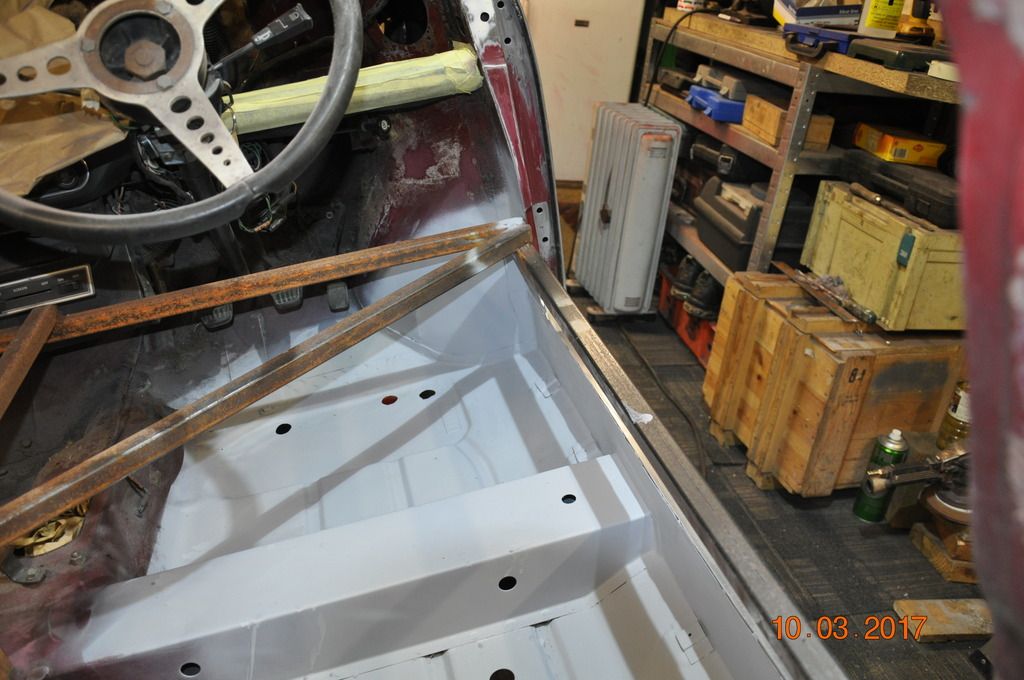
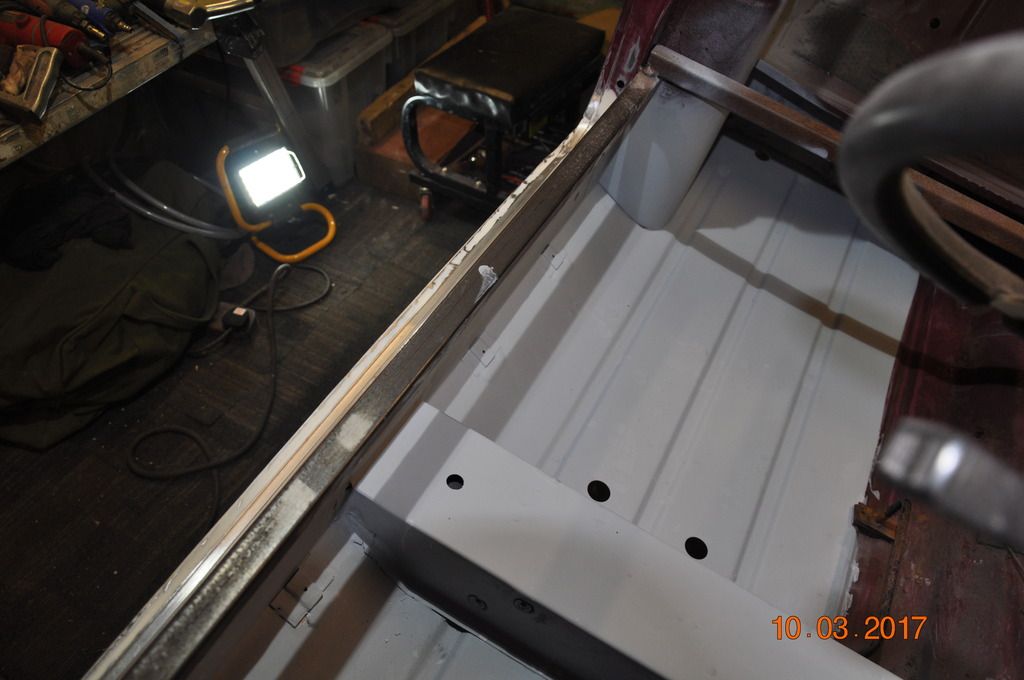
inner sill cleaned up and coated with epoxy primer,


DSC_0005_zpsv2hlpwsm.jpg


DSC_0005_zpsv2hlpwsm.jpg

DSC_0009_zpscqiwhf7v.jpg


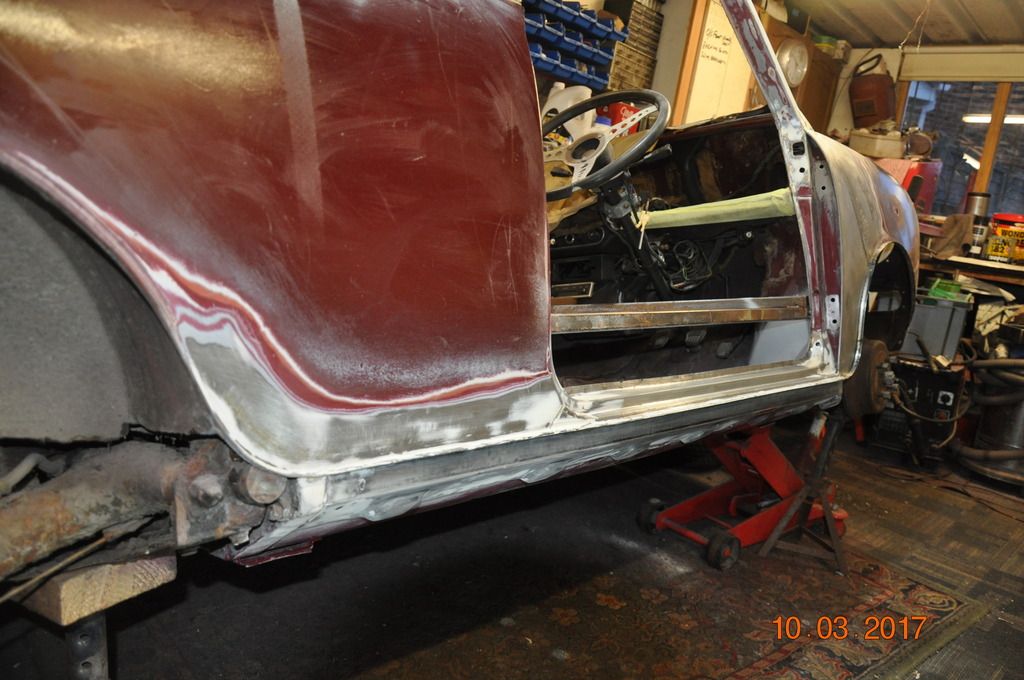
a little skim of filler just to tidy up,


DSC_0005_zps1t1uvmxm.jpg

DSC_0006_zps9xpzicta.jpg


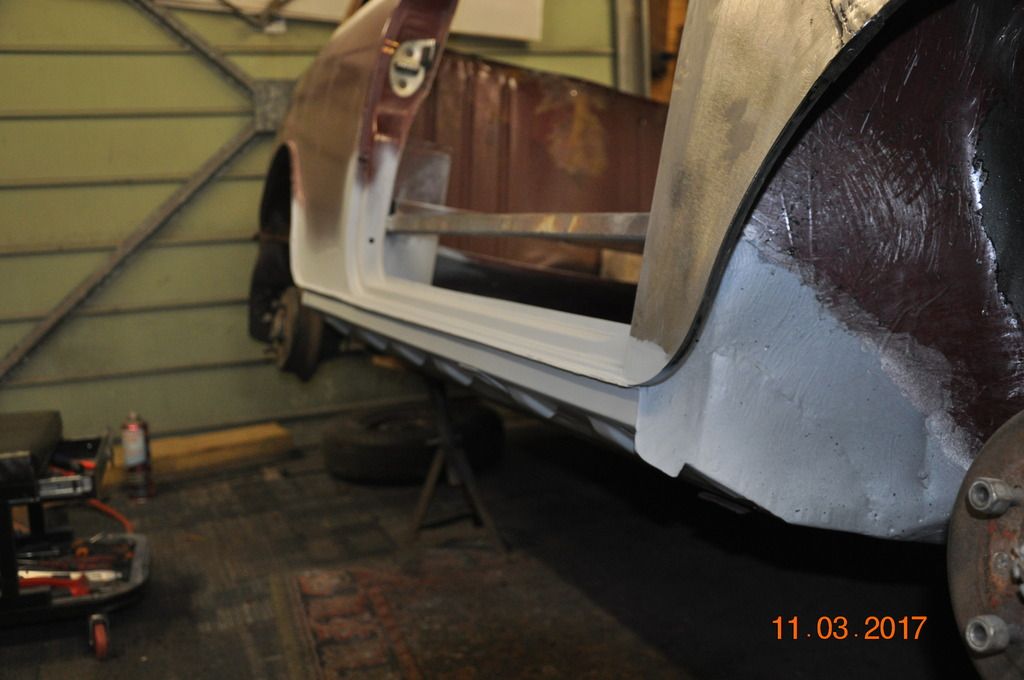
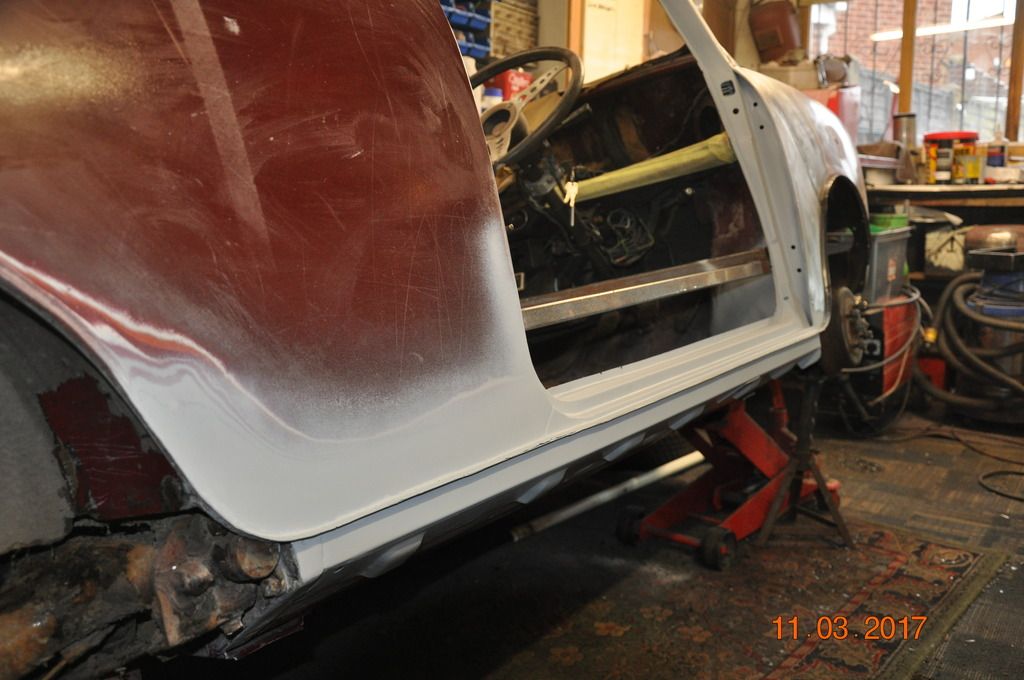
and coated with epoxy primer to keep it from forming surface rust, will be sanded back and redone when paint prep is

done,


The plan was to get wing to A panel de seamed join lead loaded as well this week but when I looked in the tinning paint

bottle it was past its sell by date ( remembered it was about 18yrs old last used on a Jaguar front wing nose cone)


[URL=http://s12.photobucket.com/user/frankhubbard2/media/Mini%20Contessa/DSC_0001_zpsdzocyydg.jpg.html]DSC_0001_zpsdzocyydg.jpg


So check out the bottom of door and was well pleased when I scraped back the wax coating and found the door was

in great condition!


Had another few photos to put up but having a nightmare with phtobucket tonight,


Thanks for looking .


#32 spraybeater

spraybeater

    Speeding Along Now

  • Members
  • PipPipPipPipPip
  • 468 posts
  • Location: west yorkshire
  • Local Club: Mcr

Posted 12 March 2017 - 08:29 PM

After having a nightmare with Photo bucket last night thought i would give it a go tonight with the

rest of update,


DSC_0003_zps7xmdpfir.jpg


inner doorstep wasn't to bad just some pitting on sill flange, and a few pin holes, but just in between the

curved parts of A &  B posts I decided that buying 2 heritage doorsteps which include inner A post was

a bit pricey at £80. a piece as I would be cutting some of it of and not using !!!


DSC_0004_zpsjcoukkb2.jpg


managed to get 2 of these made up to the pattern of original , local sheet metal firm made them for a tenner

well pleased .

The only disappointment of the week was after trying locally to get solder paint for the lead loading

with out any luck phoned Frost restorations to find out there out of stock till the 17th March so kind of

slows up getting O/S panel work finished before starting N/S.

All for now, thanks for looking


#33 spraybeater

spraybeater

    Speeding Along Now

  • Members
  • PipPipPipPipPip
  • 468 posts
  • Location: west yorkshire
  • Local Club: Mcr

Posted 19 March 2017 - 09:37 PM

Now that my Rover Sprite Project is finished sold and gone to its new owner! 

hopping to push this along in the next few weeks! 

got all the welding done to the O/S just waiting for some fryolux to be delivered

to get the wing/a-panel join lead loaded was promised by Frost that it would be

in stock by the 17th but now they have put that back indefinitely so chased about

and found another supplier, 


DSC_0002_zpsbz8r6ydv.jpg

DSC_0003_zpsmzis4kih.jpg

stripped the old paint back to bare metal as it had been painted a few times,


DSC_0004_zps56jodkom.jpg

when cleaned the Cadulac treatment from rear wheel housing in really good condition,


DSC_0005_zpsx9kwt6m3.jpg

third go with stripper on door,


DSC_0003_zpsuioxarnk.jpg


Door refitted after cleaning up in checks and hinges and expoy priming-painting,

cleaned of some of the cadulac from the flitch panel it had gone quite brittle with

age but done its protection job well,


DSC_0005_zpsud2ctest.jpg

DSC_0006_zps1k3anwbj.jpg


some damage found at door handle repaired and skimmed with a little filler,


DSC_0009_zps2v5hltbt.jpg

back on its wheels ready for moving to get other side done,


DSC_0010_zpsjrwjgc52.jpg

DSC_0011_zpsfnoigf3d.jpg

how we used to fit door skins a bit of braze at the window frame these however are original ,

DSC_0008_zpsgjeejzb4.jpg

 when scrapping of Cadulac from wheel housing cleaned some from rear brake pipes and radius arm 

these are all original , starting to feel a bit of a fraud on this one not taxing enoughHaHa,


fullsizeoutput_333_zpspfuxq4ax.jpeg


as posted else where in the forum front page of the Super Cover book showing dates and dealer

details been doing a bit of research on the cars history .


Once again thanks for comments and views more to follow.


Edited by spraybeater, 19 March 2017 - 11:54 PM.


#34 GraemeC

GraemeC

    Crazy About Mini's

  • TMF+ Member
  • PipPipPipPipPipPipPipPipPipPip
  • 7,313 posts
  • Location: Carnforth

Posted 20 March 2017 - 10:09 AM

So what's the sweeping line of colour change in the steel about?


#35 spraybeater

spraybeater

    Speeding Along Now

  • Members
  • PipPipPipPipPip
  • 468 posts
  • Location: west yorkshire
  • Local Club: Mcr

Posted 20 March 2017 - 11:03 AM

So what's the sweeping line of colour change in the steel about?

Yeah! wondered if someone would ask that , I believe its part of Phosphate dip

process done in the factory at the time, have seen on other BL cars of the 

same era when I have bare metal repainted them back in the day.

Or maybe someone else has their own ideas 


#36 GraemeC

GraemeC

    Crazy About Mini's

  • TMF+ Member
  • PipPipPipPipPipPipPipPipPipPip
  • 7,313 posts
  • Location: Carnforth

Posted 20 March 2017 - 11:58 AM

Could be I guess - with no hole in the rear bulkhead this can't have gone through the Rotadip process that would've seen the whole shell submerged.

Maybe the later process just dipped the front and lower extremes on a conveyor.


#37 clubman91

clubman91

    Mini Mad

  • TMF+ Member
  • PipPipPipPip
  • 137 posts
  • Location: North Wales

Posted 20 March 2017 - 10:49 PM

Great work =D, What paint stripper have you been using?
Thanks,
Mark.

#38 spraybeater

spraybeater

    Speeding Along Now

  • Members
  • PipPipPipPipPip
  • 468 posts
  • Location: west yorkshire
  • Local Club: Mcr

Posted 20 March 2017 - 11:19 PM

I don't who makes it! I got it from one of the local paint factors Northern Auto Paints,

just says Heavy duty paint stripper on the can was a bit pricey  but seems to do the job

stripped the bonnet today about 4 applications of stripper ( it was bl**dy thick paint +

some polyester spray filler ) certainly better than the modern watered down Nitromors 

once I got through the crap celly top coats.


#39 clubman91

clubman91

    Mini Mad

  • TMF+ Member
  • PipPipPipPip
  • 137 posts
  • Location: North Wales

Posted 21 March 2017 - 02:32 AM

Thanks for the info.
Mark.

#40 Northernpower

Northernpower

    Mr. 7-Port

  • Members
  • PipPipPipPipPipPipPipPipPip
  • 2,409 posts
  • Name: Graham
  • Location: North Yorkshire (God's County)
  • Local Club: Its out there somewhere

Posted 21 March 2017 - 09:18 AM

Great work =D, What paint stripper have you been using?
Thanks,
Mark.

Hope you don't mind me hijacking this thread. After reading through the reviews I decided (with a significant degree of cynicism) to try Screwfix's own brand paint stripper. Compared to Nitromors I can't believe how good it is. Just make sure you leave it on long enough. http://www.screwfix....per-500ml/17091


#41 spraybeater

spraybeater

    Speeding Along Now

  • Members
  • PipPipPipPipPip
  • 468 posts
  • Location: west yorkshire
  • Local Club: Mcr

Posted 21 March 2017 - 10:24 AM


Great work =D, What paint stripper have you been using?
Thanks,
Mark.

Hope you don't mind me hijacking this thread. After reading through the reviews I decided (with a significant degree of cynicism) to try Screwfix's own brand paint stripper. Compared to Nitromors I can't believe how good it is. Just make sure you leave it on long enough. http://www.screwfix....per-500ml/17091


No problems, suppose being retired Motor Trade prefer using Motor Trade suppliers

find using local Srewfix a bit like going into McDonalds 


#42 Northernpower

Northernpower

    Mr. 7-Port

  • Members
  • PipPipPipPipPipPipPipPipPip
  • 2,409 posts
  • Name: Graham
  • Location: North Yorkshire (God's County)
  • Local Club: Its out there somewhere

Posted 21 March 2017 - 10:47 AM


Great work =D, What paint stripper have you been using?
Thanks,
Mark.

Hope you don't mind me hijacking this thread. After reading through the reviews I decided (with a significant degree of cynicism) to try Screwfix's own brand paint stripper. Compared to Nitromors I can't believe how good it is. Just make sure you leave it on long enough. http://www.screwfix....per-500ml/17091


No problems, suppose being retired Motor Trade prefer using Motor Trade suppliers

find using local Srewfix a bit like going into McDonalds 


I totally agree and normally wouldn't use Screwfix but having found Nitromors a complete waste of time I started looking at recommendations on the internet and was surprised when it came up on quite a few different forums therefore I decided to try it.


#43 spraybeater

spraybeater

    Speeding Along Now

  • Members
  • PipPipPipPipPip
  • 468 posts
  • Location: west yorkshire
  • Local Club: Mcr

Posted 27 March 2017 - 09:11 PM

As well as working on the bodywork of this been doing a bit of research into its life

story, once I get some word back from DVLA! will be trying to get in touch with the 

previous owners, that is prior to the last one as he gave me what he had on it.

Anyway back to the bodywork,


DSC_0001_zpsfjuknwct.jpg

this was the paint that was stripped from bonnet and scuttle had been pained a few times

so took a fair bit to remove,

DSC_0002_zpsqihrjyml.jpg

DSC_0003_zpsyp5vw3u0.jpg

some of what the paint was hiding ,

DSC_0004_zpsg1pvaugs.jpg

DSC_0005_zpspxpogdyf.jpg

same as the dipping line on other side but appears that door must have been left open a bit

as 2 levels ,

DSC_0006_zpsmydboxlf.jpg

fair bit of filler used by the coachbuilders when they deseamed it, don't particularly like deseamed 

look but trying to keep it as original build sheet,

DSC_0007_zpsa4h8plpz.jpg

DSC_0008_zpspsybwzr8.jpg

this was inside the overfills that the PO paid to have removed and treated before fitting +

he paid a fortune to have them fitted ( I have the receipt for the work) sometimes I despair of the

standards of some members of my old profession !!!!!!!

DSC_0009_zps8ebp7sdu.jpg

same can be said of BL this was inside the jacking point bare metal its kept not

to bad for 40yr old,

DSC_0010_zpsxmdbfom2.jpg

DSC_0011_zps8mnvx0tm.jpg

the rest of inner sill not to bad once cleaned up minimal panel replacement required,

DSC_0012_zpshtnrnzoi.jpg

DSC_0013_zpsqygro1it.jpg

Kenlowe fan fitted by coachbuilers at same time, 

DSC_0013_zpsqygro1it.jpg

DSC_0014_zps0bemephj.jpg

small repair needed to lower flitch, did break one of shocker bracket bolts! will get broken end 

out the n subframe is removed,

DSC_0015_zps5dlrsteu.jpg

door step and jacking point will be replaced they are not that bad have seen the day when

they would be cleaned up and reused,

DSC_0016_zpslfdowmil.jpg

DSC_0017_zpsiv7tp0if.jpg

DSC_0018_zpsv2rh81io.jpg

ready for cleaning up and repairs getting done.

All for now more to follow next week!


#44 lawrence

lawrence

    One Carb Or Two?

  • Members
  • PipPipPipPipPipPipPip
  • 1,330 posts

Posted 29 March 2017 - 10:17 PM

Are you not tempted to split the seams on the front panel to wing joint and perhaps shotblast them when they are open? I only ask as it would be a shame for rust to appear after all your hard work
Lawrence

#45 spraybeater

spraybeater

    Speeding Along Now

  • Members
  • PipPipPipPipPip
  • 468 posts
  • Location: west yorkshire
  • Local Club: Mcr

Posted 29 March 2017 - 11:12 PM

Are you not tempted to split the seams on the front panel to wing joint and perhaps shotblast them when they are open? I only ask as it would be a shame for rust to appear after all your hard work
Lawrence

 Yeah! will be going back to these seams when the rest of the metal work is done,

they have been opened up both from inside and outside and old seam sealer removed

then treated with Deox gell, used to repair these seams for a local BL dealer back in the

day as they were always troublesome 


Edited by spraybeater, 29 March 2017 - 11:14 PM.


0 user(s) are reading this topic

0 members, 0 guests, 0 anonymous users