Jump to content


Photo

Wing...roll Snip Or Cut Off?


  • Please log in to reply
11 replies to this topic

#1 Shaggy33

Shaggy33

    Speeding Along Now

  • Members
  • PipPipPipPipPip
  • 311 posts
  • Location: Worcester

Posted 30 January 2017 - 08:46 PM

Time has come to trim wheel arch to fit the 12x6 wheels. Toyed with changing them but really Ike the look. Soooo I was going to snip and form a new lip, then someone said why not cut off the section that needs removing then weld it back onto wing but moved up slightly behind the panel to give the extra clearance. Finally grind and fill to make good. After all it's going to be hidden by wheel arches.
I like this idea as it retains the original lip.....thoughts anyone

#2 Ben_O

Ben_O

    Mill Road Garage

  • Paint Doctor
  • PipPipPipPipPipPipPipPipPipPip
  • 9,781 posts
  • Location: Isle of Wight

Posted 30 January 2017 - 08:56 PM

I think you will struggle to keep the arch line the correct profile doing that plus if you are going to move it up slightly behind and weld, you will create a rust trap between the two pieces of metal.


As you say, its going to be behind the wheel arches so it seems like an awful lot of work for something like that.


I would cut what you need and then reform the arch lip. The easiest way to do this at home is to cut a 1mm slot in a piece of bar or tube the depth of the lip and then use this to slide over the edge of the arch bend the lip back in.

Just do it a little at a time to avoid distortion.


Ben


#3 Shaggy33

Shaggy33

    Speeding Along Now

  • Members
  • PipPipPipPipPip
  • 311 posts
  • Location: Worcester

Posted 30 January 2017 - 09:01 PM

Mmm fair comment. Let's say I need to loose about 10mm at the widest point which is not far off the stock lip width. Do I cut off existing lip and then make some 'snips' in the panel before bending new lip with your great slotted bar method..

#4 Ben_O

Ben_O

    Mill Road Garage

  • Paint Doctor
  • PipPipPipPipPipPipPipPipPipPip
  • 9,781 posts
  • Location: Isle of Wight

Posted 30 January 2017 - 09:18 PM

Slits in the panel would make folding easier but it depends on your skill/patience.


It can be done without slitting if you are careful


#5 sledgehammer

sledgehammer

    Up Into Fourth

  • TMF+ Member
  • PipPipPipPipPipPipPipPipPip
  • 3,060 posts
  • Location: I'm sittin here besides my self

Posted 30 January 2017 - 09:38 PM

They showed forming a lip on the rear  arch in project binky


but I can't remember which one


https://www.google.c...t binky youtube


#6 Shaggy33

Shaggy33

    Speeding Along Now

  • Members
  • PipPipPipPipPip
  • 311 posts
  • Location: Worcester

Posted 30 January 2017 - 09:46 PM

Cheers. I just can't get my head round how the new formed lip carries on for existing. E.g. I cut just the lip off on the section I'm cutting back. That means I got a lip that stops for say 2 inches. I must have to snip into the panel to start the lip??

#7 Shaggy33

Shaggy33

    Speeding Along Now

  • Members
  • PipPipPipPipPip
  • 311 posts
  • Location: Worcester

Posted 30 January 2017 - 09:47 PM

That should say carries on from existing lip

#8 tiger99

tiger99

    Crazy About Mini's

  • Members
  • PipPipPipPipPipPipPipPipPipPip
  • 8,584 posts
  • Location: Hemel Hempstead

Posted 30 January 2017 - 11:06 PM

If what you want is the same as a Sports Pack arch, just buy the cutting template and new edge sections from Somerford. Item 11 in the link below.


http://www.somerford...&id=6&chapter=1


That way you will get a neat job without messing about, trying to fold the metal in stages, while keeping to the required curve.


#9 Shaggy33

Shaggy33

    Speeding Along Now

  • Members
  • PipPipPipPipPip
  • 311 posts
  • Location: Worcester

Posted 31 January 2017 - 04:30 PM

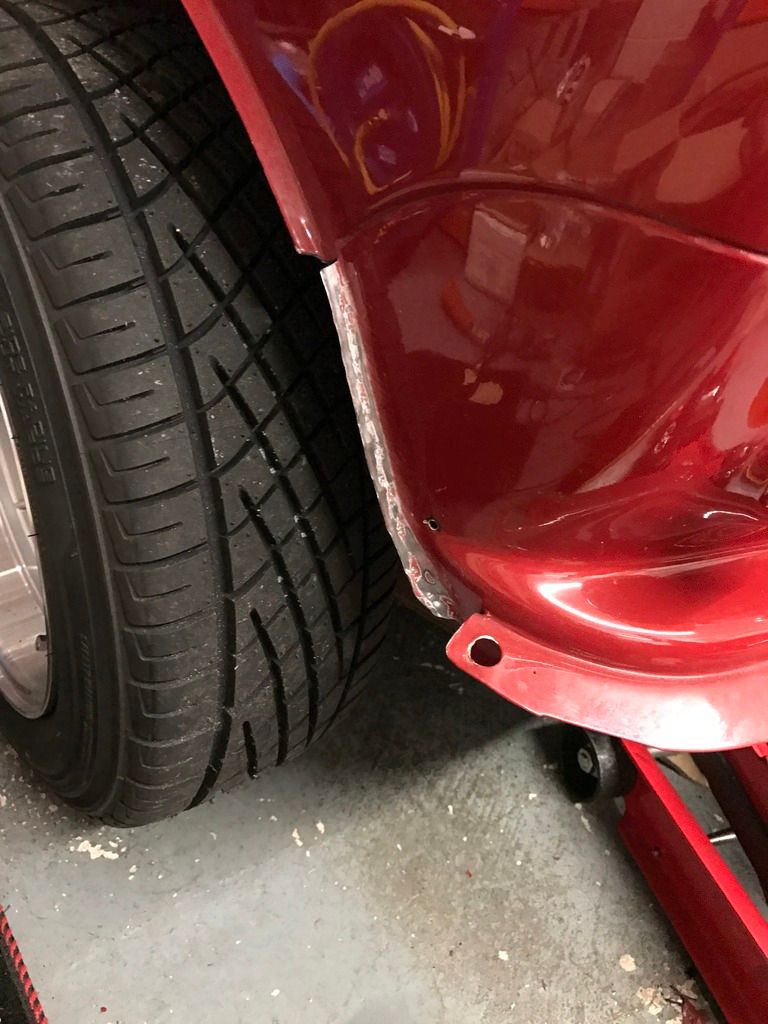
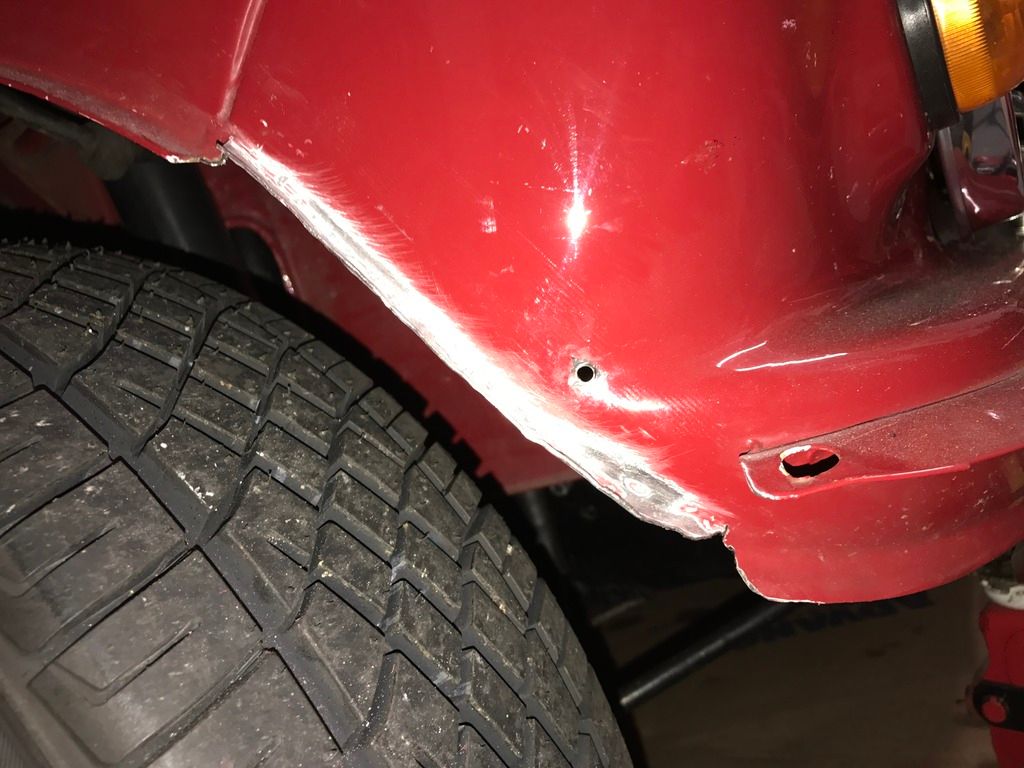
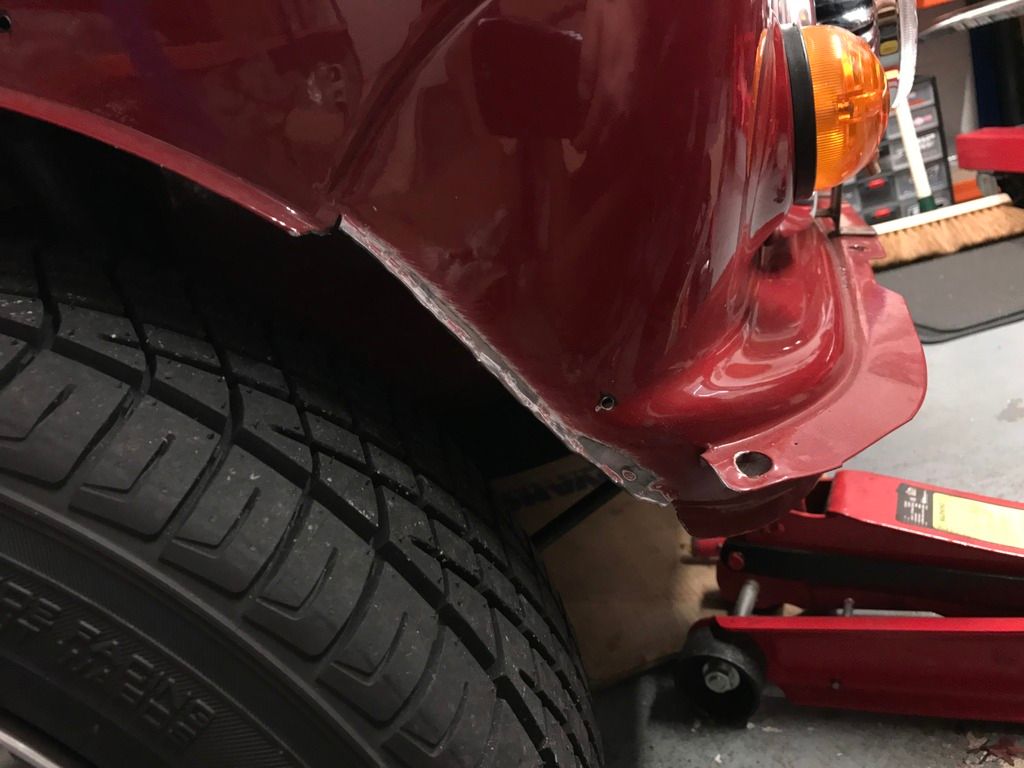
My brain almost hurt from over thinking this project so at lunchtime I tackled one side with angle grinder, mulgrips and steel tube with a 10mm deep 1mm slit in end!

I would say it's not a bad effort given that I've never attempted any sort of bodywork before but I soon realised that the easy way was to simply cut off existing lip and make new one that sat at a higher profile than the stock (pretty obvious really)!

Anyway not to unahhpy with result, will look better once I hammered it out nice and flat and rust proofed it before fitting wheelarch. Wheel clears nicely now (about 10mm which allows for bumps in road!). One side down one to go

4BDF980D-1CF5-4B37-9594-57BD36049A99_zps

C3765951-14CE-4FC9-B395-67FB2022EF5C_zps

30B1BB3C-1789-4027-8110-3D887759B8F7_zps


#10 Shaggy33

Shaggy33

    Speeding Along Now

  • Members
  • PipPipPipPipPip
  • 311 posts
  • Location: Worcester

Posted 31 January 2017 - 06:56 PM

What's the best thing to put on bare metal to act as barrier to rust whilst I organise getting the area painted properly? I won't be intentionally driving car in the wet but would like some sort of safety net!

#11 Ben_O

Ben_O

    Mill Road Garage

  • Paint Doctor
  • PipPipPipPipPipPipPipPipPipPip
  • 9,781 posts
  • Location: Isle of Wight

Posted 31 January 2017 - 06:59 PM

Looks fine to me.


Paint is the best thing to put on it so why not just use a rattle can of your colour (or similar) as it's hidden and that will protect it.


Don't just use a can of primer and leave it there (unless its epoxy) as it will absorb moisture and rust quickly


#12 tiger99

tiger99

    Crazy About Mini's

  • Members
  • PipPipPipPipPipPipPipPipPipPip
  • 8,584 posts
  • Location: Hemel Hempstead

Posted 01 February 2017 - 12:05 PM

Make sure that you fit the little stiffner between wing edge and A panel if not using the complete arch. Otherwise it will be flexing and your new paint will crack. It needs about 4 quick spot welds each side.


0 user(s) are reading this topic

0 members, 0 guests, 0 anonymous users